 |
|
 08-10-2013, 09:38 PM
|
#1
|
|
Senior Member
Join Date: Apr 2013
Location: Idaho Falls, Idaho
Trailer: 2013 19' Escape
Posts: 147
|
What we have learned
We picked up our 19 just under two weeks ago and feel a need to share some of our experiences with forum members. The entire crew at Escape was GREAT...answering questions...resolving problems...making sure we were happy with our new toy. It still wasn't pain free. Consider the following:
1) Stay close to Chilliwack for the first day or so. We spent our first night at the Lynden KOA about 20 miles from Sumas. I noticed a substantial amount of morning sunshine coming in around the door the next morning. One gap in the lower left hand corner was about 1/4+ inch wide and 2-3 inches long. Another gap along the side of the door was at least 4-5 inches long and 1/8 inch wide. Long story short...back to Chiiiwack...put up overnight at Cottonwood Meadows by Escape (thank you) and the entire door was replaced the next morning.
2) We purchased two plastic storage bins on wheels that fit under the bed. Walmart price in Chilliwack was $24+. Stateside price is $16. While we were having the door replaced, one of the Escape craftsman make a nifty little brace to keep the storage bins in place under the bed. Took 5 minutes and they didn't charge me (thank you).
3) We purchased two keyed alike padlocks at Walmart to secure the outside storage box. We found the hole in the hasp is too small for a standard lock. You can't return Canadian Walmart locks in American Walmarts.
4) The surge protector works. The third night out, the microwave and fridge shut down. After reading the manual, we found out the protector shuts down at 132 volts. Campground voltage was 133 volts.
5) Only the lower 1/2 of the inverter 110 volt socket supplies current when using inverter/batteries. The upper 1/2 is dead (when off line). Still not sure why this is the case. We were told this is the way it is wired. Seems to me that as long as the total draw is less than 1500 watts, it shouldn't matter how many plugs were active.
6) Store your toilet paper directly in the cubby directly under the fridge. While reorganizing things after arriving at home, I found 5 very wet rolls of TP in the cubby. After reviewing the situation with Reace, I checked out the pump mounted on the back side of the cubby under the bed. Water was (almost literally) pouring out the side of the pump when turned on. The TP had soaked up all of the water and there was no damage. New pump is in the mail and shouldn't be too hard to replace.
7) Customs at Sumas (for us) was 15-20 minutes entering Canada and 1 - 1 1/2 hours getting back into the states. The customs folks don't smile a lot...like not at all. All business. Not a time for humor or cleverness. Just "yes sir" and "no sir."
8) Gas in Sumas (USA) was about $3.79/gallon. In Chilliwack it was $1.39 per liter (think quart).
9) They don't have weeds in BC...they have blackberries. Just a short walk along the frontage road near the Best Western took us to the RR tracks and acres and acres of blackberries. They were everywhere. Many were thumb sized and wonderful on my oatmeal. Plan to pick up your trailer in August and enjoy.
10) Route 20 across northern Washington was a great drive. Colonial Creek campground was great (check out the northern 1/2 first). We also stayed at Deception Pass campground just north of Oak Harbor. Nice but noisy with many aircraft. The camp at Lake Como near Hamilton, Montana was our favorite. Seniors (over 62) can pick up a lifetime pass for $10 when you enter a National Park. It gets you 50% off in most of the federal campgrounds. We spent $5, $6, and $8 for three nights respectively. KOA was $45 and poor.
11) Towing will impact your gas budget. Our tug is an AWD Chevy Traverse rated at 5200 lbs. We didn't need an equalizer hitch. Gas mileage (normally 22-24 mpg highway) went from 13 mpg pulling up and down hills on route 20 to 17-18 mpg over one 100 mile stretch that was mostly downhill from 7000 feet to 4500 feet. I would buy another Traverse (same as GMC Acadia or Buick Enclave) in a heart beat. Just get the AWD and the towing package. Trailer is wonderful to tow after having pulled a 28 foot stickie with a diesel Suburban. You just have to feel for those folks pulling (dragging) the 45 foot 5th wheels.
12) The trailer is not big but it is big enough. The first 24 hours were interesting...finding places for our "stuff" and defining my space and her space. A little charity and patience goes a long ways.
Sorry for the long post. Too much information, I know. We have found the forum to be an invaluable tool as we planned and waited for our Escape. We recognize an Escape has many complex parts and pieces and represents several hundred man hours of skilled labor and craftsmanship. We are somewhat disappointed by the QC issues with the door and pump. Still we would not hesitate to buy another one.
|

|

|
|
08-11-2013, 12:26 AM
|
#2
|
|
Senior Member
Join Date: Dec 2012
Location: Edmonton, Alberta
Trailer: 1979 Boler B1700
Posts: 14,935
|
Quote:
Originally Posted by lefttee

5) Only the lower 1/2 of the inverter 110 volt socket supplies current when using inverter/batteries. The upper 1/2 is dead (when off line). Still not sure why this is the case. We were told this is the way it is wired..
|
When the trailer is plugged into outside power, and the inverter is turned off, is the lower half dead and the upper half live?
If yes, the outlets are simply split between inverter and non-inverter power. If no, then the changeover switch only supplies some outlets.
Only supplying some outlets when on inverter power makes sense to me. That way, you choose - by where you plug in - whether the item you're plugging in should be powered when running on battery. You wouldn't, for instance, use a space heater on battery through the inverter.
|
|
|
|
|
08-11-2013, 06:33 AM
|
#3
|
|
Senior Member
Join Date: Jul 2009
Location: Vancouver, British Columbia
Trailer: 2010 Escape 13
Posts: 431
|
Switching from outside power to inverter power
It would be helpful to know:
1. the size of the inverter -- is it 1500 watts?
2. whether the inverter has a remote on/off switch
3. whether there is an automatic transfer switch
The simplest way of wiring an inverter is to use one half of some or all of the 110 volt outlets for inverter power and the other half for outside power. This way you don't need a transfer switch at all. This is what I did for our setup. All of the inside outlets are split. The outside outlet (which has a ground fault interrupter) is switched separately -- I can choose whether the outside outlet is powered from the inverter or from outside power.
The remote on/off switch for the inverter does not transfer power, it just activates the inverter. If you are not using inverter power you don't want the inverter to be drawing battery power.
An automatic transfer switch can provide power to all 110 volt outlets whether you are connected to outside power or not. It needs to be wired so that heavy demands beyond the capacity of the inverter (such an an air conditioner) are not powered unless you are on outside power and so that the inverter is not trying to charge the battery (a losing proposition).
__________________
Brian
2003 Subaru Forester
2012 Toyota Highlander V6
2010 Escape 13 "Ladybug" Feb 2010
|
|
|
|
|
08-11-2013, 08:55 AM
|
#4
|
|
Senior Member
Join Date: Apr 2013
Location: Idaho Falls, Idaho
Trailer: 2013 19' Escape
Posts: 147
|
I wasn't aware of possible wiring options when I ordered trailer. I knew I could have more sockets for the inverter (or 110) but decided to have just one (under the table) besides the 12 volt socket. We don't use it for 110 so I guess I could have made it a dedicated inverter plug only. Didn't know I could have all of the 110 sockets wired to the inverter also. The inverter is the 1500 watt unit with a remote switch. The first time we used it, it took a while to find the on/off switch on the inverter itself. Lesson here is read the directions and take notes during Dave's orientation because you won't remember it all.
|
|
|
|
|
08-11-2013, 02:41 PM
|
#5
|
|
Senior Member
Join Date: Dec 2012
Location: Edmonton, Alberta
Trailer: 1979 Boler B1700
Posts: 14,935
|
I still don't know what the options are: is the inverter power handled by an automatic transfer switch, or a manual transfer switch, or just supplied to inverter-only outlets?
I am still curious about this, but I agree that the lesson is to do whatever you need to learn from the orientation.
|
|
|
|
|
08-11-2013, 03:45 PM
|
#6
|
|
Senior Member
Join Date: Apr 2013
Location: Idaho Falls, Idaho
Trailer: 2013 19' Escape
Posts: 147
|
I'm not aware of any automatic transfer switch. I need to call Escape and clarify how the plug is set up. I know I have a remote inverter switch and there is the on/off switch on the inverter itself. When traveling and when camped on the grid, I keep them both off. I just need more information. Will check with Escape this week.
|
|
|
|
|
08-11-2013, 07:30 PM
|
#7
|
|
Senior Member
Join Date: Jul 2012
Location: Albuquerque, New Mexico
Trailer: 2013 Escape 19
Posts: 251
|
Quote:
Originally Posted by Brian B-P
I still don't know what the options are: is the inverter power handled by an automatic transfer switch, or a manual transfer switch, or just supplied to inverter-only outlets?
I am still curious about this, but I agree that the lesson is to do whatever you need to learn from the orientation.
|
My understanding from Reace is the inverter is its own circuit wired directly from the batteries. I am having 2 plugs split so will have 110/110inverter at those plugs. The inverter has a remote panel that turns it on/off with a master switch to turn the inverter off long term. Remote panel has a very minimal draw.
Simple answer inverter-only outlets.
Dave
|
|
|
|
|
08-12-2013, 07:15 AM
|
#8
|
|
Senior Member
Join Date: Feb 2013
Location: Marana, Arizona
Trailer: 2018 Airstream Flying Cloud (Escape 19 & 5.0 previously)
Posts: 1,078
|
Hey Lefttee, glad all was resolved. In post #1, issue 2 you mention a brace for the sliding storage bin under the bed. Could you post a photo or two of the brace and bins? I've thought about setting up a similar storage option. Thanks!
|
|
|
|
|
08-13-2013, 09:58 PM
|
#9
|
|
Senior Member
Join Date: Apr 2013
Location: Idaho Falls, Idaho
Trailer: 2013 19' Escape
Posts: 147
|
Sorry for the delayed reply. I missed checking emails yesterday. Boxes are made by Sterilite and are found at Walmart . They have wheels and open from either end. Brace was made from scrap 1x2. Boxes fit well under the bed (in the 19). Hope the pictures workout...this is a first for me.
|
|
|
|
|
08-14-2013, 05:39 AM
|
#10
|
|
Senior Member
Join Date: Feb 2013
Location: Marana, Arizona
Trailer: 2018 Airstream Flying Cloud (Escape 19 & 5.0 previously)
Posts: 1,078
|
Thanks much, a picture really is worth 10,000 words.
|
|
|
|
|
08-14-2013, 07:34 AM
|
#11
|
|
Senior Member
Join Date: Apr 2013
Location: Hastings, Michigan
Trailer: 2021 5.0
Posts: 117
|
We get our 19 in Oct. Your 1st hand is very helpful on QC since ours to be delivered to IN. Boxes - do you move one aside to access the other? Is it tedious to lift over edge of board to pull into kit floor?
|
|
|
|
|
08-14-2013, 12:59 PM
|
#12
|
|
Senior Member
Join Date: Apr 2013
Location: Idaho Falls, Idaho
Trailer: 2013 19' Escape
Posts: 147
|
The boxes are a bit wide for the door under the bed. I put one in and move it slightly to the left side and then put the other one in. The little wood brace just lifts out like it is in the top pix setting on the bed. Without the brace, we found the boxes tend to move forward when traveling and push the doors open. They will also tend to move backwards and beat up the foil insulation so I laid my two travel chairs behind them and it all just fits fine. When you do your orientation, ask Dave it he can have one made for you. It will take them just a few minutes, a few screws, and some scrap wood. I would also open the doors under the bed, turn the pump on, and look at the pump mounted just inside to the right. Chances of another bad one are small and I think Reace is changing the model he uses. Also stand inside the trailer and close the door. Look for sunlight around the door that shouldn't be there. The leaks around ours were rather dramatic, considering it's a $30K trailer.
|
|
|
|
|
08-14-2013, 01:03 PM
|
#13
|
|
Member
Join Date: May 2013
Posts: 579
|
My Under Bed Storage Container Hold Back
Hey,
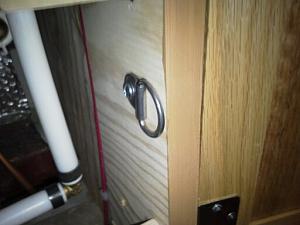
I plan on building a slide out drawer like others here but I am using the same type of plastic bins shown. I picked up two D Rings and mounted them Behind the door frame using a bungee across.
Cypher
|
|
|
|
|
08-14-2013, 01:04 PM
|
#14
|
|
Senior Member
Join Date: Apr 2013
Location: Idaho Falls, Idaho
Trailer: 2013 19' Escape
Posts: 147
|
Sorry, Diane. Just reread your post and realized you won't get the usual orientation if you're having the trailer delivered. I think once you get the trailer, you will be able to visualize how to make the brace. I suspect you will find your own way to skin the cat.
|
|
|
|
|
08-14-2013, 01:06 PM
|
#15
|
|
Senior Member
Join Date: Apr 2013
Location: Idaho Falls, Idaho
Trailer: 2013 19' Escape
Posts: 147
|
Cypherian...looks like your cat also got skinned. Nifty and easier than my set up. Well done.
|
|
|
|
|
08-14-2013, 03:02 PM
|
#16
|
|
Member
Join Date: May 2013
Posts: 579
|
Quote:
Originally Posted by lefttee
Cypherian...looks like your cat also got skinned. Nifty and easier than my set up. Well done.
|
Hey,
Yeah and funny reading your post my chairs are behind the bins too to prevent them from rolling that way :} I do prefer the KISS method lol Keep it simple stupid :} You could even pull off what I did with two inexpensive flat metal screen door handles mounted on the back side no one will see them though they would take 2 screws not the one still the same idea. I happened to have the stainless D rings from another project on my truck.
Cypherian
|
|
|
|
|
08-14-2013, 03:29 PM
|
#17
|
|
Senior Member
Join Date: Jun 2010
Location: Central, Pennsylvania
Trailer: Escape#5 2022 E19
Posts: 26,268
|
Just be careful with those screws under the bed, especially into the floor, your fresh tank is located there. Another owner already punctured their tank installing underbed drawer guides. I'd recommend laying down a piece of 3/8" plywood under there. For one thing there are 4 large bolt heads protruding into the storage area that the plywood would eliminate by cutting out around them. In addition you can now attach some protection for the back walls, the water heater to the plywood. It is not too big an area down there although for working..
__________________
Jim
Sometime life gets in the way of living.......
|
|
|
|
|
08-14-2013, 04:11 PM
|
#18
|
|
Member
Join Date: May 2013
Posts: 579
|
Yeah I read about the the floor and tank issue , the screws I used are into the back side of the double door frame under bed access. When I build the slide out they will be removed and sealed. If the bungee is not in place you would never know they were even there :}. My camera work is not the best but I did put up some pics in the album of a few changes .
Cypherian
|
|
|
|
|
08-14-2013, 07:57 PM
|
#19
|
|
Senior Member
Join Date: Apr 2013
Location: Idaho Falls, Idaho
Trailer: 2013 19' Escape
Posts: 147
|
I've approached my trailer with a "no added screws" mind set, especially after reading about some of the adventures others have had drilling into tanks, etc. It only took two screws to secure a 3 inch block of wood to hold the right side of my brace. No possible way to puncture anything there. I did mount a soap dish, towel hook, and small tray in the loo with adhesive strips but no screws.
|
|
|
|
|
08-16-2013, 07:28 AM
|
#20
|
|
Senior Member
Join Date: Apr 2013
Location: Hastings, Michigan
Trailer: 2021 5.0
Posts: 117
|
Thanks for suggestions Lefttee. Anxious for Oct and being able to do hands on! Forum has been priceless since we have been inside two 19' only after seeing one but not getting into it in FL last winter.
|
|
|
|
|
|
 Posting Rules
|
You may not post new threads
You may not post replies
You may not post attachments
You may not edit your posts
HTML code is Off
|
|
|
|
 » Recent Discussions
 |
|
|
|
|
|
|
|
|
|
|
|
|
|
|
|
|
|
|
|
|
|
|
|
|
|
|
|
|
|
|

|


 Linear Mode

