 |
|
 12-17-2018, 10:57 AM
|
#21
|
|
Senior Member
Join Date: Mar 2016
Location: Burlington Twp., New Jersey
Trailer: 2010 Escape 19
Posts: 7,146
|
Quote:
Originally Posted by MikeS

How is the rigid pipe connected to the furnace? It's not just connected to the grill, is it?
|
Hopefully TZBrown can jump in with what he did. I have the older style furnace with no ducting.
|

|

|
|
12-17-2018, 11:05 AM
|
#22
|
|
Senior Member
Join Date: Jul 2018
Location: Minneapolis, Minnesota
Trailer: 2019 5.0 TA
Posts: 864
|
Quote:
Originally Posted by Chotch
On my way to HD to pick up 5 pipe. Can I get you a new tape measure?😂
|
 
__________________
The Sweet Suite
Ronn and Colleen
|
|
|
|
|
12-17-2018, 03:09 PM
|
#23
|
|
Senior Member
Join Date: Mar 2016
Location: Burlington Twp., New Jersey
Trailer: 2010 Escape 19
Posts: 7,146
|
Quote:
Originally Posted by TZBrown
I noted that Dometic supplies a flexible duct for the hot air out, never been a fan of these, though in some places they are unavoidable. 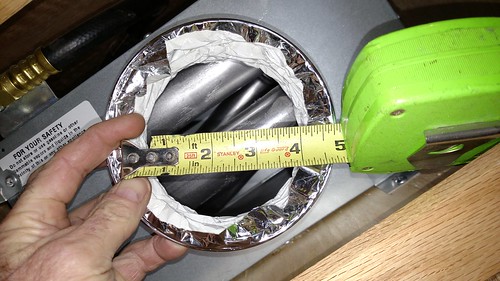
Measuring the 12 inch long as supplied duct, when collapsed to the 5 inches, the inside was reduced to less than 4 inches, volume restriction. |
Just for clarification this piece of flexible duct is most likely provided by ETI. These furnaces are used in a wide variety of applications and ducting is the responsibility of the installer. I wonder if another option might be 5" semi-rigid duct. This would have less resistance than the flex duct shown and should be easier to work with than rigid. Rated to 430F per the manufacturer.
https://www.amazon.com/A058-Semi-Rig.../dp/B00009W3GY
http://www.deflecto.com/advp/product.../A_0_t_p_s.pdf
The Dometic manual says "All ducting material used must be rated for continuous use at a minimum of 200F."
|
|
|
|
|
12-17-2018, 03:17 PM
|
#24
|
|
Senior Member
Join Date: Oct 2008
Location: Calgary, Alberta
Trailer: 2017 Escape 5.0 TA
Posts: 15,544
|
Quote:
Originally Posted by rubicon327
|
When I did my cabinet work, I ended up with an offset of about 4" for the grill to the furnace itself so a flexible duct is a must. I have intended to install this type as I just used the stuff supplied by Escape for now, but to be honest, have had no issue even in extreme cold with the furnaces performance.
__________________
2017 Escape 5.0 TA
2015 Ford F150 Lariat 3.5L EcoBoost
2009 Escape 19 (previous)
Most folks are about as happy as they make up their minds to be. Abraham Lincoln
|
|
|
|
|
12-17-2018, 05:20 PM
|
#25
|
|
Senior Member
Join Date: Mar 2016
Location: Burlington Twp., New Jersey
Trailer: 2010 Escape 19
Posts: 7,146
|
Quote:
Originally Posted by Jim Bennett
When I did my cabinet work, I ended up with an offset of about 4" for the grill to the furnace itself so a flexible duct is a must. I have intended to install this type as I just used the stuff supplied by Escape for now, but to be honest, have had no issue even in extreme cold with the furnaces performance.
|
Jim: Was the ducting bunched up a bit behind the grille (left too long by ETI?)? Maybe by extending it a bit you actually smoothed it out and reduced resistance?
|
|
|
|
|
12-18-2018, 08:48 AM
|
#26
|
|
Senior Member
Join Date: Nov 2017
Location: Fenton, Michigan
Trailer: 2018 Escape 21, 2014 Northern Lite slide in, 2014 2500 Duramax
Posts: 186
|
Quote:
Originally Posted by Chotch
On my way to HD to pick up 5 pipe. Can I get you a new tape measure?😂
|
I must have over a dozen of those, this one got hit by the welding arc during a project
Quote:
Originally Posted by MikeS
How is the rigid pipe connected to the furnace? It's not just connected to the grill, is it?
|
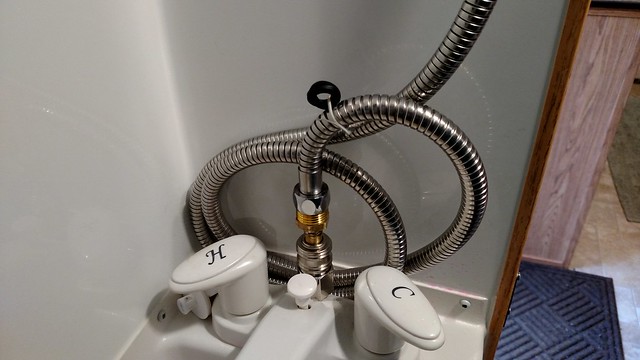
Just slid over the furnace flange, make it the proper length to be held in place between the furnace and the grille cover
Quote:
Originally Posted by rubicon327
Just for clarification this piece of flexible duct is most likely provided by ETI. "
|
The flex is provided by Dometic with the furnace
|
|
|
|
|
12-18-2018, 08:51 AM
|
#27
|
|
Senior Member
Join Date: Nov 2017
Location: Fenton, Michigan
Trailer: 2018 Escape 21, 2014 Northern Lite slide in, 2014 2500 Duramax
Posts: 186
|
Quote:
Originally Posted by Jim Bennett
When I did my cabinet work, I ended up with an offset of about 4" for the grill to the furnace itself so a flexible duct is a must. I have intended to install this type as I just used the stuff supplied by Escape for now, but to be honest, have had no issue even in extreme cold with the furnaces performance.
|
You may be able to trim a metal 5 inch adjustable elbow to an S shape fit, if the distance from the furnace to the grill is far enough
|
|
|
|
|
12-18-2018, 11:07 AM
|
#28
|
|
Senior Member
Join Date: Nov 2017
Location: Fenton, Michigan
Trailer: 2018 Escape 21, 2014 Northern Lite slide in, 2014 2500 Duramax
Posts: 186
|
Another improvement
The outside shower coil hose, and spray nozzle works well for spraying off stuff.
But in my view can be better.
I wanted to use the more flexible hose that I have for the inside shower outside also
The parts:
The hose https://www.homedepot.com/p/Delta-60...-203155702-_-N
The adapter https://www.homedepot.com/p/Everbilt...0189/300096763
From the D&W site the hose barb connector https://www.dwincorp.com/product/hose-barb/
The Quick coupling https://www.dwincorp.com/product/quick-connect-valve/
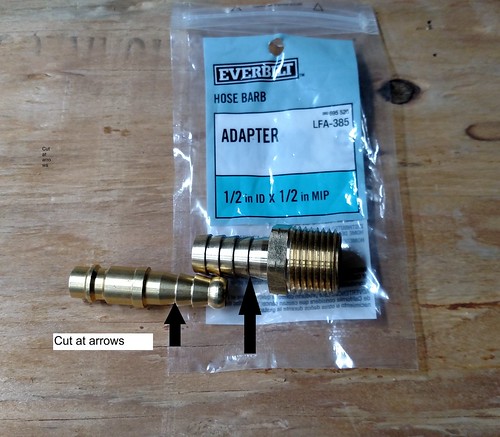
Modification needed: Cut the D&W hose barb adapter as noted in the pic
Cut the Everbilt brass adapter as noted, drill out the Everbilt adapter to fit the hose barb
Debur, Clean, Flux, and Sweat solder these 2 parts together.
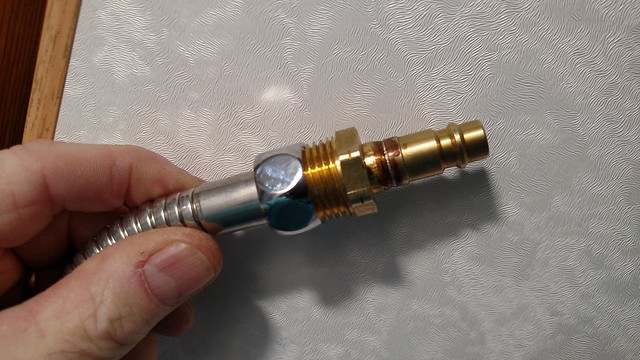
The largest mod
shorten the quick coupling to near the center markings as seen in the installed pic. This needs to be done to allow the coupling to screw on the inside fitting far enough to seat the rubber gasket used between the fixture and the adapter.
I dis assembled the fitting, then cut with a hacksaw, smooth and straighten with a file, or face on a lathe, as I did. Re assemble and install.

We can now take the inside shower hose to the outside as needed.
This is a link to the album of the photos if you need to zoom in more for clarity
|
|
|
|
|
|
 Posting Rules
|
You may not post new threads
You may not post replies
You may not post attachments
You may not edit your posts
HTML code is Off
|
|
|
|
 » Recent Discussions
 |
|
|
|
|
|
|
|
|
|
|
|
|
|
|
|
|
|
|
|
|
|
|
|
|
|
|
|
|
|
|

|


 Linear Mode

