I took some time placing the SeeLevel sensors on the tanks. They need to be somewhat shorter than the tank height, 1/4" to 3/4" from edge of tank. I cut all a little long and came back to trim another section from each.
SeeLevel makes two sensors, their standard model is 12" long and can be shortened in 1 1/2" increments. These can not be cut shorter than 6" (and still work). They make a shorter sensor for shallow depth tanks which starts at 6" long which can be cut in 1" increments. I used a longer sensor on the fresh water tank and the shorter on black and grey.
A technical note that came with the SeeLevel suggested applying them to the tank(s) temporarily with duct tape. This to see if they work and where on the tank to apply them. After cutting to length I tried to align the sensors to work best when the fresh tank was approaching empty, and set the black and grey to indicate best when approaching full.
I tested the SeeLevel by filling the tanks with a 1 gallon pitcher to know the volume added. The total volume surprised me. I thing the fresh is 20 gallons, grey 26 gallons and the black (on our 2011 model) 14 gallons. I found the usable volume for the fresh very close to 20 gallons, grey 21 gallons, and black only 10 gallons.
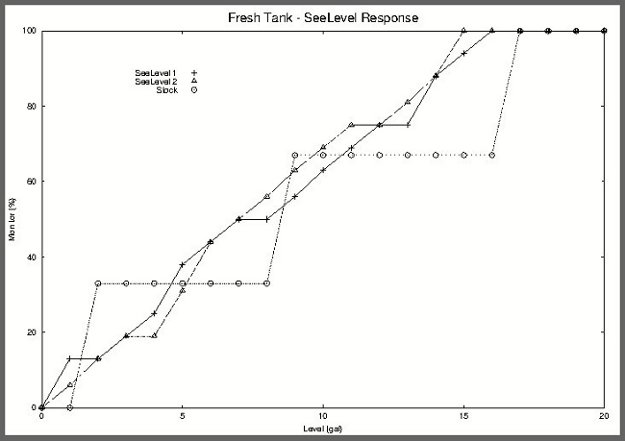
Here is a plot of the SeeLevel readings and the stock monitor for the fresh tank. I ran the SeeLevel test twice so there are two sets of data.
The SeeLevel shows full a few gallons before the tank is truely full. But the 0% corresponds well with empty and sucking air. This is what I was aiming for, clear measurement as the fresh tank approaches empty. The stock monitor works and gives a good representation of tank level, but the measure is very course.
Similar data for the grey tank.
Again good results from the SeeLevel. It is more accurate at empty and off a couple of gallons at full. This is the reverse of what I was aiming for with the holding tanks. Still a very workable reading. Our stock monitor was stuck at 1/3 and didn't go to zero. Other than that it gave a good representation but again very course.
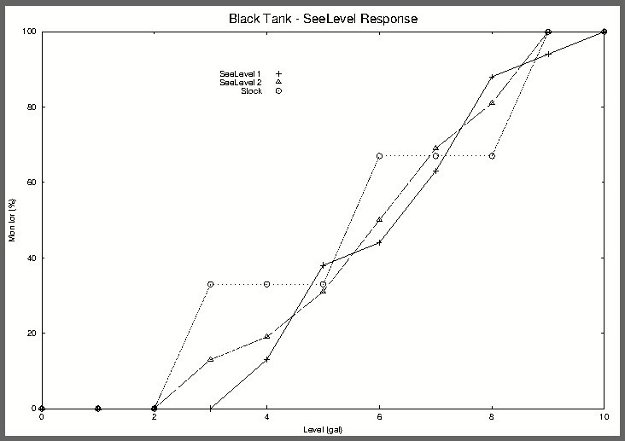
Finally data for the black tank.
The SeeLevel again gives good readings. The black tank is tilted for better emptying and the high side is the only one accessible. It takes some 2 gallons to fill the lower end and reach the SeeLevel sensor. Above this is reads well and gives a good representation of how full the tank is. The stock monitor again gives good, but course, readings.
I'm pleased with the results. I like the added resolution the SeeLevel monitor gives, but then I've been accused of being a geek. But all in all a very successful project.
Thanks for following along.


 Linear Mode


