 |
|
 07-07-2014, 09:58 PM
|
#1
|
|
Senior Member
Join Date: Jun 2014
Location: Box Elder, South Dakota
Trailer: Bigfoot 25' 2018
Posts: 347
|
New Tank Monitor
We have a brand new (to us) Escape 19. I'm thinking of changing the stock tank monitor with a retrofit SeeLevel system. This will require new sensors which are strips that stick to the outside of the tanks and a new monitoring panel. The new system can use the same wiring as the original.
I've located the existing sensors and wiring for the fresh and grey tanks. It looks possible to put new sensors beside the original taps and use the existing wires. However, I can't locate the sensors for the black tank. Does anyone know where these are located on a 19? Is this area accessible?
If anyone has installed a SeeLevel system I'd sure like to hear of your experience. I saw a thread discussing the system on here but it didn't sound like anyone had taken the plunge. I've used their system on another trailer and it has worked flawlessly (but that only for fresh water).
Thank you for any help.
__________________
Hugh Currin
2018 Bigfoot 25'
2018 RAM 2500 Diesel
|

|

|
|
07-09-2014, 01:19 AM
|
#2
|
|
Member
Join Date: Nov 2012
Location: Forks, Washington
Trailer: Working on my build list
Posts: 93
|
I don't know where the sensors are, but I think I remember mention of their location in one of the threads on black tank cleaning. I don't recall seeing them on photos of the front of the tank so they may be on the back or sides. That would make them inaccessible. Have you tried emailing ETI and asking?
Since you can access the black tank from the front to attach a new sensor, finding the existing wire or running a new wire would be the hardest part of a system upgrade. You might want to see if the wire is someplace you can tap into it. I'm thinking of the same mod so if you find the answer, please post it.
|
|
|
|
|
07-09-2014, 09:47 AM
|
#3
|
|
Senior Member
Join Date: Jun 2014
Location: Box Elder, South Dakota
Trailer: Bigfoot 25' 2018
Posts: 347
|
WestEnder:
Thank you for the response. I read the thread I think you refer to. That mentions the sensors are on the curb (towards door) side but that wasn't for a 19. It's likely the same but thought someone might know. If so it would be real hard to access. ETI has been so helpful I hate to bother them with questions the forum can answer, I'll save the hard questions for them.
The front of the black tank is visible and I see no sensors. A new sensor could be put on there with no problem. I've heard rumors that the black tank isn't square, so it may not be full depth under the dinette. If so, the new sensor would read zero till the level reached it. That's not a real problem, I'm most interested in readings as it approaches full. Not optimum but better info than the existing system.
As I read the SeeLevel documents, the sensors have two wires. These are ganged together with only the resulting two wires going to the readout. If we can't get to the black water sensors I'm thinking of threading two wires from under the dinette, though the battery lead hole, and back to the grey water tank. Then gang the black and grey tank wires into two existing leads from the grey tank. Likely gang these with the fresh sensor leads at the readout. Hope this makes some sense.
So, does anyone know where the black tank sensors are and how to access them? Or where those sensor wires run? Also, what shape is the black tank and how is it oriented? It's really buried into the bowels of the trailer.
Someone here must have done this mod?
Thanks.
Quote:
Originally Posted by WestEnder

I don't know where the sensors are, but I think I remember mention of their location in one of the threads on black tank cleaning. I don't recall seeing them on photos of the front of the tank so they may be on the back or sides. That would make them inaccessible. Have you tried emailing ETI and asking?
Since you can access the black tank from the front to attach a new sensor, finding the existing wire or running a new wire would be the hardest part of a system upgrade. You might want to see if the wire is someplace you can tap into it. I'm thinking of the same mod so if you find the answer, please post it.
|
__________________
Hugh Currin
2018 Bigfoot 25'
2018 RAM 2500 Diesel
|
|
|
|
|
07-09-2014, 09:54 AM
|
#4
|
|
Senior Member
Join Date: Jun 2010
Location: Central, Pennsylvania
Trailer: Escape#5 2022 E19
Posts: 26,268
|
Hugh,
You are in dark territory, where no man has gone before!! 
__________________
Jim
Sometime life gets in the way of living.......
|
|
|
|
|
07-09-2014, 11:04 AM
|
#5
|
|
Senior Member
Join Date: Jun 2014
Location: Box Elder, South Dakota
Trailer: Bigfoot 25' 2018
Posts: 347
|
Jim:
How quickly I stumble into dark corners, and on my first project too. Somebody hand me a flashlight, it IS dark in this black tank.
Thanks.
Quote:
Originally Posted by cpaharley2008
Hugh,
You are in dark territory, where no man has gone before!! |
__________________
Hugh Currin
2018 Bigfoot 25'
2018 RAM 2500 Diesel
|
|
|
|
|
07-09-2014, 11:12 AM
|
#6
|
|
Senior Member
Join Date: Mar 2013
Location: Yellow Springs, Ohio
Trailer: 2013 Escape 19
Posts: 709
|
View inside the tank:
|
|
|
|
|
07-09-2014, 03:39 PM
|
#7
|
|
Senior Member
Join Date: Dec 2012
Location: Edmonton, Alberta
Trailer: 1979 Boler B1700
Posts: 14,935
|
Quote:
Originally Posted by currinh
As I read the SeeLevel documents, the sensors have two wires. These are ganged together with only the resulting two wires going to the readout.
|
Garnet has a few models of SeeLevel; which model are you considering?
I'm not sure how many sensors you're expecting to install. The SeeLevel system uses a single sensor per tank - the sensor is a strip, and can be up to 17" long so any Escape tank can be covered in a single sensor. The only combining of sensors for a single tank is lining up two of them if the tank is too tall to cover in one strip.
I agree that you only need one pair of wires for each tank; the black tank will currently have four wires, and you only need two of them.
Quote:
Originally Posted by currinh
If we can't get to the black water sensors I'm thinking of threading two wires from under the dinette, though the battery lead hole, and back to the grey water tank. Then gang the black and grey tank wires into two existing leads from the grey tank. Likely gang these with the fresh sensor leads at the readout. Hope this makes some sense.
|
This is how Garnet's "common bus" models work, so it makes sense to me if you are using one of those models. That would be models 705 and 709.
With Garnet's "multibus" products (such as the 707, 711, 712, and 713), this won't quite work. Although the sensors (one or two) on the same tank share a pair of wires, the separate tanks need separate wire pairs; the black and grey tank sensors could not be combined (although they can share just the ground wire). This still doesn't matter if you are replacing all of the sensors and display with the See Level system, since you could use two of the original four wires at the grey tank for the grey tank level sensor, and the other two wires at the grey tank for the black tank sensor - no wiring together, just using wires in the same bundle.
Running wires from the black tank location to the grey tank location is looking to me like a brilliant solution if the original black tank wires are not accessible.
|
|
|
|
|
07-09-2014, 05:55 PM
|
#8
|
|
Senior Member
Join Date: Jun 2014
Location: Box Elder, South Dakota
Trailer: Bigfoot 25' 2018
Posts: 347
|
Brian:
I was considering the Garnet 709-P3. It covers three tanks (fresh, grey & black) and has a pump switch, as well as battery voltage. The included sensors are 12" which should be fine for all the Escape tanks. But the exposed portion of the black tank may be less than 6". In this case a shorter sensor is required, but available. The tank levels and pump switch are the only ones I need. It's the 709-P3 manual where I got the idea only one pair of wires would need be run to the read-out.
I only saw the 709 and 714 series models. They mention the 707, 711, 712, and 713 but these aren't listed as products. Maybe discontinued? The 714 looks way too fancy for our uses, so it's the 709 for me.
I think we can get by using two leads to the read-out with the 709. You seemed to confirm this? But if more leads are needed, the grey and fresh have four leads each as you mention. I hadn't thought of using these.
Might be able to use the extra leads for a Trimetric (TM-2025-A) battery monitor? However, the leads go from a shunt to the read-out. As a low level signal they may need to be short or heavier gage. The tank leads may not work. I'll have to ask the Trimetric manufacturer about leads. But that'll be a whole different, but equally exciting, thread.
Thank you.
Quote:
Originally Posted by Brian B-P
Garnet has a few models of SeeLevel; which model are you considering?
I'm not sure how many sensors you're expecting to install. The SeeLevel system uses a single sensor per tank - the sensor is a strip, and can be up to 17" long so any Escape tank can be covered in a single sensor. The only combining of sensors for a single tank is lining up two of them if the tank is too tall to cover in one strip.
I agree that you only need one pair of wires for each tank; the black tank will currently have four wires, and you only need two of them.
This is how Garnet's "common bus" models work, so it makes sense to me if you are using one of those models. That would be models 705 and 709.
With Garnet's "multibus" products (such as the 707, 711, 712, and 713), this won't quite work. Although the sensors (one or two) on the same tank share a pair of wires, the separate tanks need separate wire pairs; the black and grey tank sensors could not be combined (although they can share just the ground wire). This still doesn't matter if you are replacing all of the sensors and display with the See Level system, since you could use two of the original four wires at the grey tank for the grey tank level sensor, and the other two wires at the grey tank for the black tank sensor - no wiring together, just using wires in the same bundle.
Running wires from the black tank location to the grey tank location is looking to me like a brilliant solution if the original black tank wires are not accessible. |
__________________
Hugh Currin
2018 Bigfoot 25'
2018 RAM 2500 Diesel
|
|
|
|
|
07-09-2014, 08:07 PM
|
#9
|
|
Senior Member
Join Date: Dec 2012
Location: Edmonton, Alberta
Trailer: 1979 Boler B1700
Posts: 14,935
|
Quote:
Originally Posted by currinh
I was considering the Garnet 709-P3. It covers three tanks (fresh, grey & black) and has a pump switch, as well as battery voltage. The included sensors are 12" which should be fine for all the Escape tanks. But the exposed portion of the black tank may be less than 6". In this case a shorter sensor is required, but available. The tank levels and pump switch are the only ones I need. It's the 709-P3 manual where I got the idea only one pair of wires would need be run to the read-out.
|
That all sounds good to me.
Quote:
Originally Posted by currinh
I only saw the 709 and 714 series models. They mention the 707, 711, 712, and 713 but these aren't listed as products. Maybe discontinued?
|
Because I was looking for sensor wiring information, I was actually getting everything from technical support page, rather than the product info page. Maybe the other models are discontinued (but Garnet still supports them), or they're not sold at retail (only OEM), or some combination of factors like that.
Quote:
Originally Posted by currinh
I think we can get by using two leads to the read-out with the 709. You seemed to confirm this?
|
Yes, we have the same interpretation of the model 709 wiring requirements.
Quote:
Originally Posted by currinh
Might be able to use the extra leads for a Trimetric (TM-2025-A) battery monitor? However, the leads go from a shunt to the read-out. As a low level signal they may need to be short or heavier gage.
|
The shunt signal is low voltage, but also very low current/high impedance. Small-gauge wire may be fine, but I agree that's a question for the Trimetric people or their manuals.
|
|
|
|
|
07-09-2014, 10:38 PM
|
#10
|
|
Senior Member
Join Date: Jun 2014
Location: Box Elder, South Dakota
Trailer: Bigfoot 25' 2018
Posts: 347
|
Parker:
That is the view I see, and I still don't have a flashlight! People are talking to me, saying very useful things, but I can't see them. I haven't bumped into anyone who's in here with me, who can direct my black tank search. Someone must have been here before. Build pictures maybe?
Brian:
I agree, not on the books but still supported.
So, for the 709, we need two leads from the sensors to the read-out. Or some combination ganged together at some point.
I looked at the Trimetric installation manual. I was thinking about a voltage drop between the shunt and read-out, but you're right with no current there will be no drop. There are four leads between the shunt and read-out. Two of these carry juice to power the read-out, and two are very high impedance for shunt voltage sensing. They indicate wiring runs can be quite long, 100'+ so the tank sensor leads should work.
Could route the new tank sensors back to the fresh tank and use two of its wires for the SeeLevel. Then use all four wires from the grey tank to remotely locate the Trimetric above the sink where the tank read-out will be. Or just put the Trimetric in the side of the dinette. It's all possible and a matter of choice. I'll have to see how the read-outs would fit in each location.
Lots of thinking without much data though. I haven't looked at the current tank readout to verity there are 12 leads involved.
But, can anyone confirm the black tank sensors are on the curb side of the tank? Has anyone dug into a 19' far enough to find them? If so, how difficult is it to access the correct side of the tank. And what shape is the tank?
Inquiring minds and all. Thank you all for your help.
Quote:
Originally Posted by Brian B-P
Maybe the other models are discontinued (but Garnet still supports them), or they're not sold at retail (only OEM), or some combination of factors like that.
Yes, we have the same interpretation of the model 709 wiring requirements.
The shunt signal is low voltage, but also very low current/high impedance. Small-gauge wire may be fine, but I agree that's a question for the Trimetric people or their manuals.
|
__________________
Hugh Currin
2018 Bigfoot 25'
2018 RAM 2500 Diesel
|
|
|
|
|
07-10-2014, 01:32 AM
|
#11
|
|
Member
Join Date: Nov 2012
Location: Forks, Washington
Trailer: Working on my build list
Posts: 93
|
Since you are considering the model with the pump switch, do you have the right wires from the pump to your proposed mounting location? My research indicates that the tech bulletin on the SeeLevel regarding proper fusing and size of the pump wires is best taken seriously.
I'm planning on having appropriate wires run at build time. Since you are installing in an existing trailer that isn't an option. Unless your joints are going bad, as mine are, leaving the pump on its current switch might be easier. I'm planning for the long term and am trying to get frequently used switches away from the floor so I can reach them as I age.
I think you are correct to pick the Trimetric over another voltage meter so that will reduce the number of wires to the SeeLevel display unit.
|
|
|
|
|
07-10-2014, 09:19 AM
|
#12
|
|
Senior Member
Join Date: Nov 2010
Location: Tucson, AZ, Arizona
Trailer: gone, 19 and 21 & 17B with 5.0 now. gone
Posts: 790
|
tank monitors
Everyone that has a problem with lights being illuminated when they should be off just as my grey tank was for most of the trip last month may want to try what someone else mentioned on the forum or maybe a u-tube item. I put about a cup of liquid dishwasher soap in the grey tank with a half tank of water and drove the first day about 500 miles and drained it out, next day same thing and now all of the sensors seem to be working. I'll really know by the time we get to Bandon.
Related item, I bought a sewer solution to try and then realized that I don't think it will work on the 21 because of the long black piping. I'll put it on the for sale table in
Bandon.
Jack
|
|
|
|
|
07-10-2014, 01:39 PM
|
#13
|
|
Senior Member
Join Date: Jun 2014
Location: Box Elder, South Dakota
Trailer: Bigfoot 25' 2018
Posts: 347
|
WestEnder:
Maybe this differs, but my pump switch is built into the existing tank monitor over the stove/sink. I've assumed other 19s have the same configuration, but this could be an error on my part. I'm confident the wires are OK since they now control the water pump. The only problem could be the SeeLevel switch itself not being up to the job. But it should be as it's made to control the pump.
If the pump switch wasn't embedded into the existing controller I'd leave it alone as you suggest.
The existing tank monitor has a light bar battery voltage indicator and the SeeLevel has a much better indicator. The solar controller also has a battery voltage readout. But, I think the Trimetric, in measuring amp-hours to and from the battery, does a much better job of monitoring the battery state. I do like to keep good track of what's going on with those expensive batteries. So, I'll likely install a Trimetric.
I think the SeeLevel pulls battery voltage and its power from the same leads. I'm sure 12v power is already available at the existing read-out. The Trimetric might run from this power and then require only two leads. However, using four lead for it is safest.
Quote:
Originally Posted by WestEnder
Since you are considering the model with the pump switch, do you have the right wires from the pump to your proposed mounting location? My research indicates that the tech bulletin on the SeeLevel regarding proper fusing and size of the pump wires is best taken seriously.
I'm planning on having appropriate wires run at build time. Since you are installing in an existing trailer that isn't an option. Unless your joints are going bad, as mine are, leaving the pump on its current switch might be easier. I'm planning for the long term and am trying to get frequently used switches away from the floor so I can reach them as I age.
I think you are correct to pick the Trimetric over another voltage meter so that will reduce the number of wires to the SeeLevel display unit.
|
__________________
Hugh Currin
2018 Bigfoot 25'
2018 RAM 2500 Diesel
|
|
|
|
|
07-10-2014, 01:42 PM
|
#14
|
|
Senior Member
Join Date: Jun 2014
Location: Box Elder, South Dakota
Trailer: Bigfoot 25' 2018
Posts: 347
|
Jack:
We just picked up our "new to us" 19 last week. I think we could keep the tank sensors working, as you have, but I'd still like to upgrade the system. The current readout has a resolution of some 33% while the SeeLevel has about 5%. I'm enough of a geek to like the added information.
We're going to try the GEO Method which involves water softener and detergent. But I do have a lot to learn about care of holding tanks. Thanks for the note.
We'll look for you in Bandon, we'll be in A2.
Quote:
Originally Posted by azjack
Everyone that has a problem with lights being illuminated when they should be off just as my grey tank was for most of the trip last month may want to try what someone else mentioned on the forum or maybe a u-tube item. I put about a cup of liquid dishwasher soap in the grey tank with a half tank of water and drove the first day about 500 miles and drained it out, next day same thing and now all of the sensors seem to be working. I'll really know by the time we get to Bandon.
Related item, I bought a sewer solution to try and then realized that I don't think it will work on the 21 because of the long black piping. I'll put it on the for sale table in
Bandon.
Jack
|
__________________
Hugh Currin
2018 Bigfoot 25'
2018 RAM 2500 Diesel
|
|
|
|
|
07-11-2014, 02:18 AM
|
#15
|
|
Member
Join Date: Nov 2012
Location: Forks, Washington
Trailer: Working on my build list
Posts: 93
|
Thanks Hugh, I didn't know that and I sure appreciate the info. I'm still in the planning stage for a 19 of my own and that's very helpful.
|
|
|
|
|
07-11-2014, 11:35 AM
|
#16
|
|
Senior Member
Join Date: Jun 2014
Location: Box Elder, South Dakota
Trailer: Bigfoot 25' 2018
Posts: 347
|
WestEnder:
Our 19' is a 2011 model. I don't know if much has changed since then. I'd suggest you verify details of current models before making decisions. But with ours, the pump switch is included in the tank monitor readout. That is a convenient location.
Thanks.
Quote:
Originally Posted by WestEnder
Thanks Hugh, I didn't know that and I sure appreciate the info. I'm still in the planning stage for a 19 of my own and that's very helpful.
|
__________________
Hugh Currin
2018 Bigfoot 25'
2018 RAM 2500 Diesel
|
|
|
|
|
07-24-2014, 10:52 PM
|
#17
|
|
Senior Member
Join Date: Jun 2014
Location: Box Elder, South Dakota
Trailer: Bigfoot 25' 2018
Posts: 347
|
I have made some progress figuring out the black tank configuration. I talked to Reace while at the Oregon Gathering in Bandon. He indicated the black tank sensors are on the curb side of the tank. The only reasonable way to access them is to cut a hole in the bathroom wall. He offered to send me a cover plate to plug the resulting hole. I'll try to avoid this.
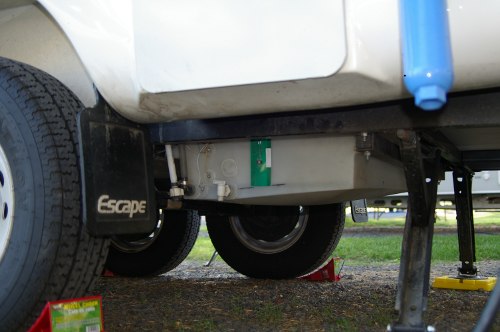
Reace also indicated the tank is rectangular, but tilts up somewhat towards the front to better drain. Our 2011 has a 14 gallon black tank while the new 19's have a 19 gallon tank. I looked at a new 19' and it seems like the tank just extends further into the dinette seat area. Our black tank is 5 1/2" in depth.
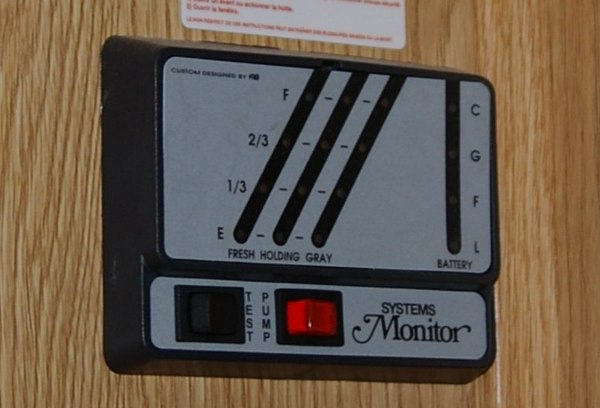
I tracked down a manual for the existing tank monitor from KIB Enterprises. I figured there would be 12 lines up to the readout (four from each tank). However, I pulled the readout today and found only 5 lines to the circuit board. I think they use two for +12v and ground. Then one line from each tank accounting for the other three. After seeing this I figured they are using a resistor network of some kind and decoding the resistance at the readout. From the manual I gather this is what is happening. The four leads from each tank come together in a small red bulb (resistor network?) with only two leads exiting the bulb. Further confirmation.
So, only three lines and a ground from the tanks to the readout. I could use two of the three for a SeeLevel system. However, my current thinking is to mount the SeeLevel readout on the side of the street side dinette. This would be easier to install and wouldn't disable the existing system. I'll likely mount a battery monitor, Trimetric, here also so it won't get lonely. Hopefully it'll be a few years till I can't make it to my knees to read them.
The black tank is 5 1/2" deep, the grey is 6 1/2" deep while the fresh water tank is 8" deep. The fresh water tank has a lip around the top so is not purely rectangular. This shouldn't change the reads much. SeeLevel sensors work on tanks 6"+ deep. They have a shorter sensor which could be used on the black tank. It might be advantageous to use the shorter sensor on the grey tank also.
All the tanks are readily accessible to mount external sensors on. I believe I can route the sensor wires through the hole for the battery leads (battery in the storage box). And 12v is easily accessible under the street side dinette seat. No reason to move the pump switch, so likely get a SeeLevel Model 709 which has no switches (other than to activate the display). I'll likely order one in the next few weeks.
The current monitor works OK, but I do want the added resolution of the SeeLevel. I am getting miss readings from the existing monitor. I suspect I need to refine the tank additives I use. Currently trying the GEO method with water softener and soap. But the grey and black read other than zero after emptying, just after and hours after. If anyone has suggestions on how much of these additives to put in I'd like to hear. Alternately, any other additive which plays better with the sensors.
Well, that's a long post. If you're still with me thanks. If you have ideas or suggestions please post.
Thanks.
__________________
Hugh Currin
2018 Bigfoot 25'
2018 RAM 2500 Diesel
|
|
|
|
|
07-25-2014, 08:06 AM
|
#18
|
|
Senior Member
Join Date: Nov 2010
Location: Tucson, AZ, Arizona
Trailer: gone, 19 and 21 & 17B with 5.0 now. gone
Posts: 790
|
Tank monitors
We are in Ukiah, CA today and for this trip my grey monitors have worked as they should after 20 days. Previous trip to Canada and points south of that for several weeks we always would show 1/3 grey. This trip I put in about a 1/2 cup of liquid dish washer soap with a 1/2 tank of water and drove 500 miles and since then all monitors are correct. I'll now make sure I add a little of that soap near the end of any trip.
Jack
|
|
|
|
|
08-19-2014, 06:49 PM
|
#19
|
|
Senior Member
Join Date: Jun 2014
Location: Box Elder, South Dakota
Trailer: Bigfoot 25' 2018
Posts: 347
|
I finished installation of a SeeLevel tank monitor on our 19. I decided to mount it above the dinette on the street side. It seemed like a convenient place, more than in the lower dinette. I kept the original tank monitor over the sink. Thus the SeeLevel didn't need a pump switch, it's still with the original monitor.
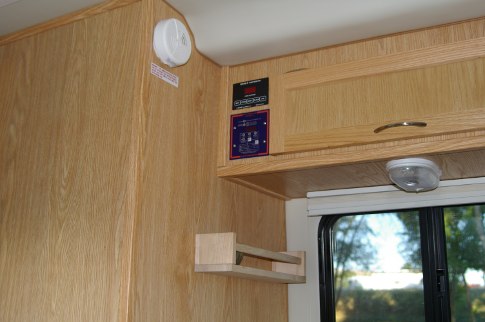 
While I was adding the SeeLevel I also added a Trimetric battery monitor. I ran the wires for both from the readouts, along the front top of the shelf and then down behind the padded corner to the lower dinette. All the wiring for the Trimetric is available under this streetside lower dinette. I finally drilled a hole in the floor for the SeeLevel sensor wires. I needed to feed two leads through here for the fresh and grey tanks. I tied the leads to the propane line back to the grey tank. The sensor was put on the street side next to the electrical probes for the original tank monitor. I joined these grey tank sensor wires to the main leads and exteneded this back to the fresh tank. The SeeLever has two wires from each sensor and all blue sensor leads are tied together (and separately all black leads tied together) and routed to the readout. They went back to the sensor strip on the fresh tank, next to the electrical probes.
The black tank is accessible from the inside of the dinette.
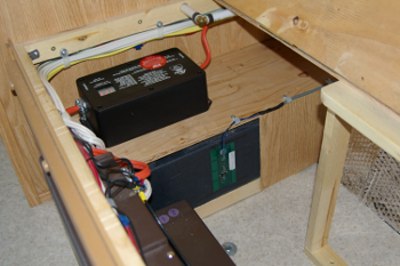
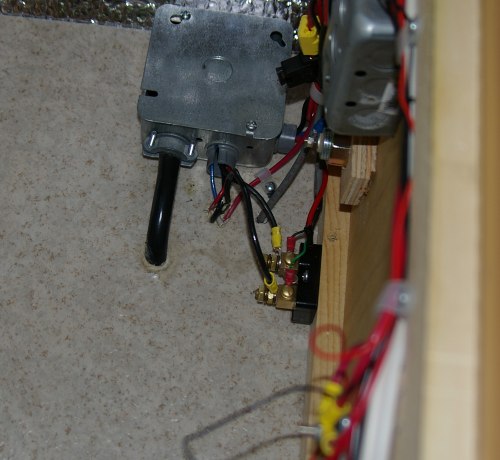
While I was there I installed an EMS (electrical management system). Always handy to have EMS (emergeny medical services) close at hand, or bring EMS (Eastern Mountain Sports) in case you forget some needed gear. Here's a picture of the shunt required for the Trimetric system. I used the 100A shunt (instead of the default 500A) to get a little more resolution. You can also see the SeeLevel sensor wire (gray jacketed) going through the floor.
It wasn't difficult but took some time. Seems anytime I deal with solder and shrink tubing it takes me a long time. Well, any project takes me a long time. Also, I try to avoid errors when cutting holes in our expensive new Escape. I still need to spray the new gages with undercoating and seal the lead through the floor.
__________________
Hugh Currin
2018 Bigfoot 25'
2018 RAM 2500 Diesel
|
|
|
|
|
08-19-2014, 06:57 PM
|
#20
|
|
Site Team
Join Date: Nov 2008
Location: Portland, Oregon
Trailer: 2014 Escape 5.0 TA
Posts: 11,045
|
Good for you Hugh! Looks like you're having fun making your new-to-you Escape truly your own. NEATO!
__________________
Donna D.
Ten Forward
2014 Escape 5.0TA
|
|
|
|
|
|
 Posting Rules
|
You may not post new threads
You may not post replies
You may not post attachments
You may not edit your posts
HTML code is Off
|
|
|
|
 » Recent Discussions
 |
|
|
|
|
|
|
|
|
|
|
|
|
|
|
|
|
|
|
|
|
|
|
|
|
|
|
|
|
|
|

|


 Linear Mode

