 |
|
 08-29-2014, 11:09 AM
|
#61
|
|
Senior Member
Join Date: Sep 2010
Location: Kelowna, British Columbia
Trailer: 2008 Escape 17b
Posts: 1,868
|
I don't see a problem with the word "naysayers"! It's most certainly not a curse word. That said I'm not a moderator.
|

|

|
|
08-29-2014, 11:14 AM
|
#62
|
|
Senior Member
Join Date: Oct 2008
Location: North Vancouver, British Columbia
Trailer: 2009 Escape 17B 2020 Toyota Highlander XLE
Posts: 17,136
|
Not a reprimand, just an observation.
__________________
What happens to the hole when the cheese is gone?
- Bertolt Brecht
|
|
|
|
|
08-29-2014, 07:42 PM
|
#63
|
|
Senior Member
Join Date: Jun 2014
Location: Box Elder, South Dakota
Trailer: Bigfoot 25' 2018
Posts: 347
|
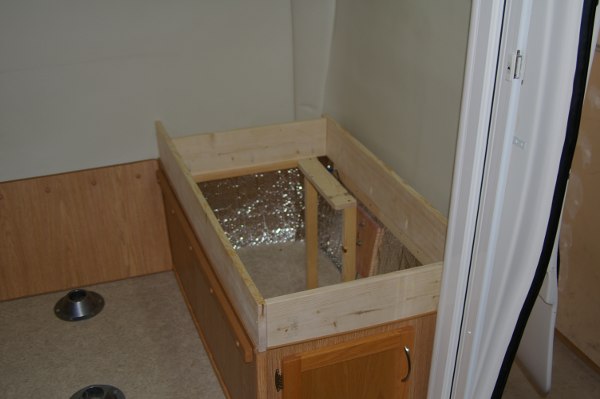
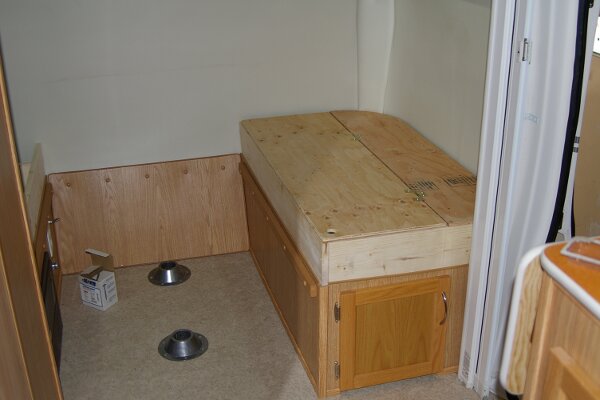
I finished raising our dinette seat. I added 5 1/2" in height. This is the height using 1x6 lumber. This may be too high but it's a lot easier to cut an inch or two off than add. So I'm starting with 5 1/2". The framework is pretty simple, just boxed in with 1x6. I cut new 1x2 side pieces to raise the center support.
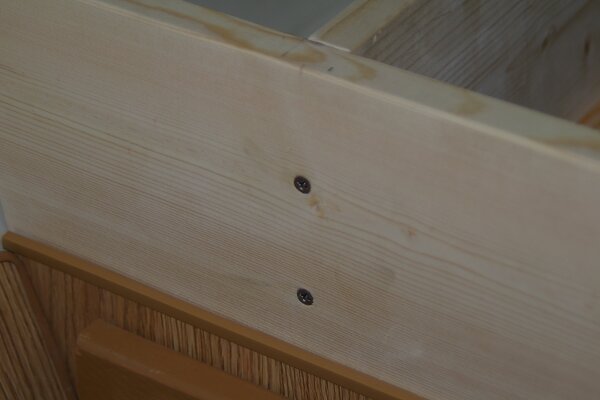
I just used screws to hold the box together.
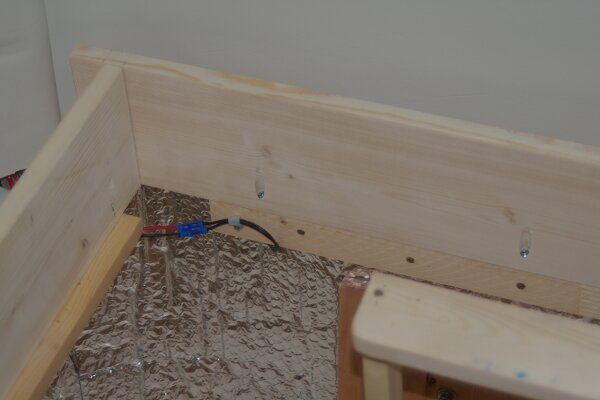
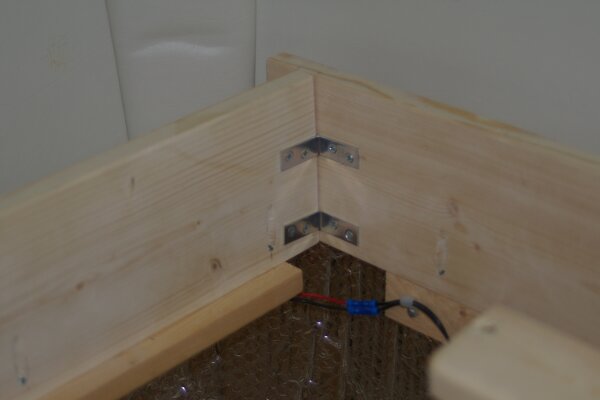
Then held it in place with pocket screws to the existing framing. The front outside corner isn't solid and Escape depended on the plywood seat to hold it together. In that corner I added two angle brackets to take some more load.
I used the original plywood seat base. It fit well although there is 3/4" or so gap at the front. I used the screws ETI did to hold the plywood to the new framing. It opens as before.
Finally I did the same to the street side.
As I mentioned the 5 1/2" is likely too high. We'll use this for some time and if needed cut some height off. This will be fairly easy and I planned for it during construction. It'll take a couple of longer trips to test it out. We won't put in a raised floor yet either. With 5 1/2" higher dinette a higher floor is likely worthwhile. But we'll try it without first.
When we decide on the height, I'll come back and put 1/8" oak plywood and oak trim on to finish up the look. Either just add from the existing panelling up or replace the dinette faces. This will probably depend on whether the floor is raised or not. If the power panel is raised it'll require new faces.
__________________
Hugh Currin
2018 Bigfoot 25'
2018 RAM 2500 Diesel
|
|
|
|
|
08-29-2014, 07:44 PM
|
#64
|
|
Senior Member
Join Date: Jun 2014
Location: Box Elder, South Dakota
Trailer: Bigfoot 25' 2018
Posts: 347
|
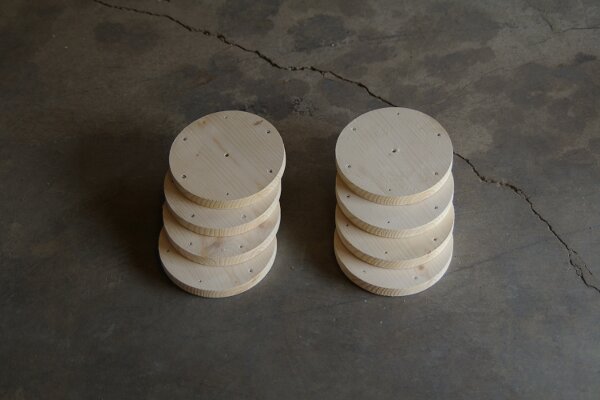
The table seemed relatively high. So, although I raised the dinette 5 1/2" I only raised the table 3". This seems about right. I first cut eight disks from 1x8 pine. Each is 3/4" thick, so two stacks 3" high.
I screwed these together with 1 1/2" screws the same size that ETI used for the table.
Finally put the table back on with the 3" stack in place.
If I lower the dinette I can take out disks and adjust the table by 3/4" increments.
__________________
Hugh Currin
2018 Bigfoot 25'
2018 RAM 2500 Diesel
|
|
|
|
|
08-29-2014, 07:45 PM
|
#65
|
|
Senior Member
Join Date: Jun 2014
Location: Box Elder, South Dakota
Trailer: Bigfoot 25' 2018
Posts: 347
|
So the dinette and table are raised.
To this point it's been fairly easy. If the floor needs to be raised that'll be another thing though. As I said, we need to try this for a few trips and fine tune the dinette height. Then finish off with oak trim and decided whether to raise the floor or not.
I want to thank all those who showed me what you've done. My thinking was corrected by several descriptions and pictures. It's a much better result after hearing from all of you. Thank you.
I'll report back after we've used it for some time.
Happy camping.
__________________
Hugh Currin
2018 Bigfoot 25'
2018 RAM 2500 Diesel
|
|
|
|
|
08-29-2014, 09:08 PM
|
#66
|
|
Senior Member
Join Date: Feb 2010
Location: Phoenix Metro Area, Arizona
Trailer: 2014 Escape 19
Posts: 767
|
As you said - try it and see on the floor.
We raised our benches 2". I want to raise them 2" more AND raise the floor 4" (and raise the table at least 2".) I am not comfortable with the raised benchs and standard floor.
|
|
|
|
|
08-29-2014, 10:07 PM
|
#67
|
|
Senior Member
Join Date: Sep 2013
Location: Ventura County, California
Trailer: 2013 19 Escape
Posts: 7,204
|
Very nice !Pat
|
|
|
|
|
08-30-2014, 02:50 PM
|
#68
|
|
Senior Member
Join Date: Jul 2013
Location: Sarnia, Ontario
Trailer: 2015 Escape 19 sold, 21NE on order
Posts: 130
|
Just get some 1970's platform shoes, and you won't have to raise the floor
|
|
|
|
|
08-30-2014, 03:21 PM
|
#69
|
|
Member
Join Date: May 2013
Posts: 579
|
I hear these are popular ..

Cypher
|
|
|
|
|
08-30-2014, 03:40 PM
|
#70
|
|
Senior Member
Join Date: Sep 2010
Location: Kelowna, British Columbia
Trailer: 2008 Escape 17b
Posts: 1,868
|
It's a good look too !
|
|
|
|
|
08-30-2014, 03:52 PM
|
#71
|
|
Senior Member
Join Date: Nov 2010
Location: Denison, Texas
Trailer: 2015 21'; 2011 19' sold; 4Runner; ph ninezero3 327-27ninefour
Posts: 5,136
|
I like the discs. You could use some as trivets.
__________________
Cathy. Floating Cloud
"Live in the sunshine, swim the sea, drink the wild air.... "
Emerson
|
|
|
|
|
09-01-2014, 11:12 PM
|
#72
|
|
Senior Member
Join Date: Jun 2014
Location: Box Elder, South Dakota
Trailer: Bigfoot 25' 2018
Posts: 347
|
Doug and Karen: Yep. Now we need to live with it for some time.
Pat: Thanks.
Platform shoes. I don't think I could walk with those. I missed the Disco Decade, not by timing but by choice. So, don't have any of those duds in the closet. Oh darn.
Floating Cloud: Those disks are pretty cool. You had me running for the Internet though. Hadn't heard the term "trivets" before. Always called them "coasters" here. But ya, they are cool.
Thanks all.
__________________
Hugh Currin
2018 Bigfoot 25'
2018 RAM 2500 Diesel
|
|
|
|
|
12-21-2014, 08:02 PM
|
#73
|
|
Senior Member
Join Date: Jun 2014
Location: Box Elder, South Dakota
Trailer: Bigfoot 25' 2018
Posts: 347
|
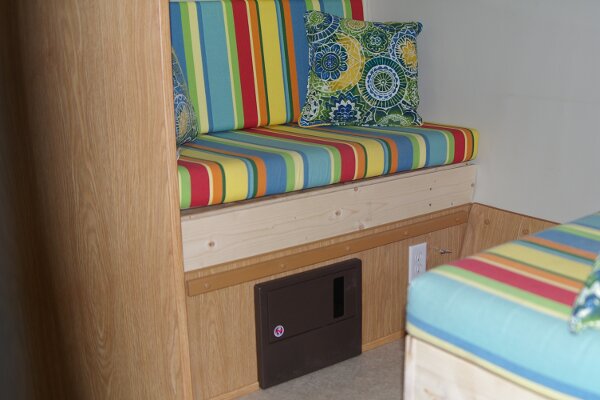
Here is an update on the raised dinette in our 19'. I initially raised it 5 1/2", the width of a 1x6. I thought this was in the ball park but my wife thought it too high. So, I cut off 3/4" and it is now at 4 3/4". This is more comfortable and close to the right height.
I thought the table was initially high so I raised it only 3". This was a little low with the initial dinette lift. However, after dropping it to 4 3/4" the table seems about right.
The stock dinette cushions were a little thin. So, we decided to add 2" of temper foam all around. Temper foam (memory foam) over the stock open cell foam. We also wanted upholstery that wasn't a fabric but a vinyl. The fabric is move comfortable with shorts on, but vinyl is much easier to clean. With two dogs who have no compunction against bounding through mud puddles, the vinyl is preferable. We selected a brown which matches the atomic orange table. We may add a range (oven) later which would require re-surfacing the counter and table. Since atomic orange is no longer available it may have to change. The brown matches now and will match "any" color later.
Looking at the picture before the new cushions, you can see the difference in thickness.
After living with it for a few short trips, I believe a raised floor would make it a lot more comfortable. I'll probably put in a temporary platform 4 3/4" high just to try it. Likely wait for a long trip before making futher changes. After that we can fine tune the heights and/or do the finish work.
Hope this is of interest. Thanks.
__________________
Hugh Currin
2018 Bigfoot 25'
2018 RAM 2500 Diesel
|
|
|
|
|
12-21-2014, 09:58 PM
|
#74
|
|
Senior Member
Join Date: Sep 2013
Location: Ventura County, California
Trailer: 2013 19 Escape
Posts: 7,204
|
Hi Currinh nice work . We ended up with 3 3/4 in high . I did add a piece 3/4 to bottom of table top made it just right . I like your cushions . Someday will do the same . When you stain wood it will match pretty good . I may add a little step that can be removed between table legs that way won't trip on full step up .I forgot to add the ledge piece for table top if I make a bed which I needed to for a Grandaughter . Will get to that . All and all much better sitting a little higher . It is fun to make it our own . Hope to run into you someday and we can compare our mods . Pat
|
|
|
|
|
12-22-2014, 03:05 AM
|
#75
|
|
Senior Member
Join Date: Sep 2014
Location: Seattle, Washington
Trailer: 2015 17B Sold 5/2016
Posts: 343
|
I like the idea of the extra thickness, the ole tail bone's gettin' more sensitive every day 
__________________
Pat
Life is Good
When "Escaping Reality" Sold 5/2016
2012 4Runner
|
|
|
|
|
01-16-2015, 01:01 PM
|
#76
|
|
Senior Member
Join Date: Jun 2014
Location: Box Elder, South Dakota
Trailer: Bigfoot 25' 2018
Posts: 347
|
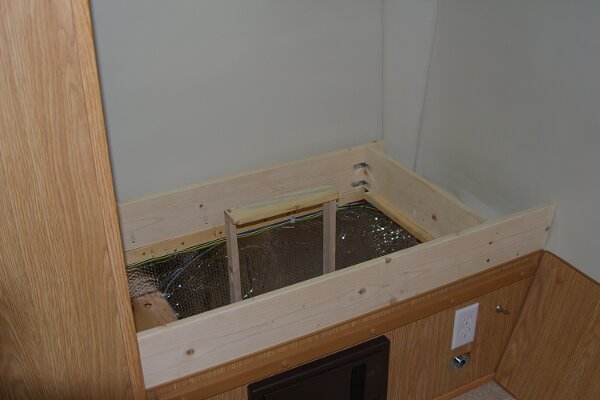
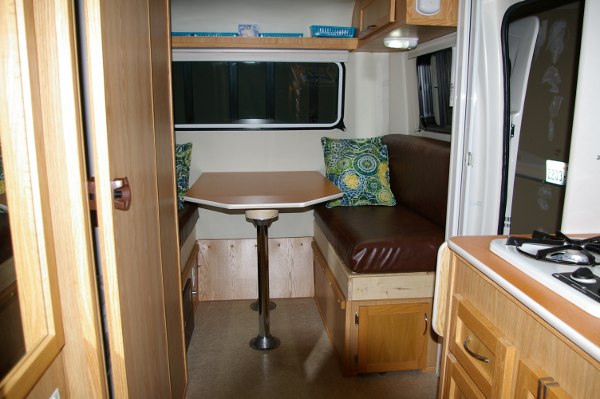
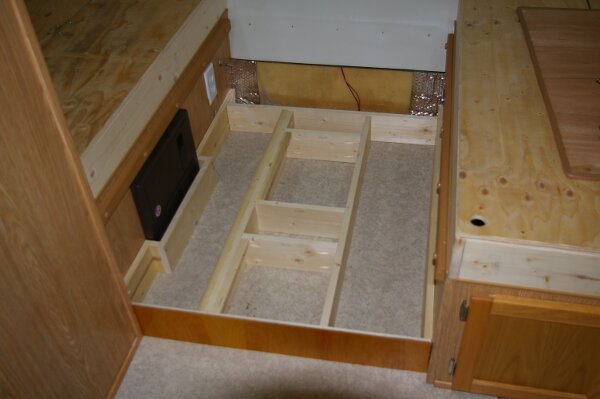
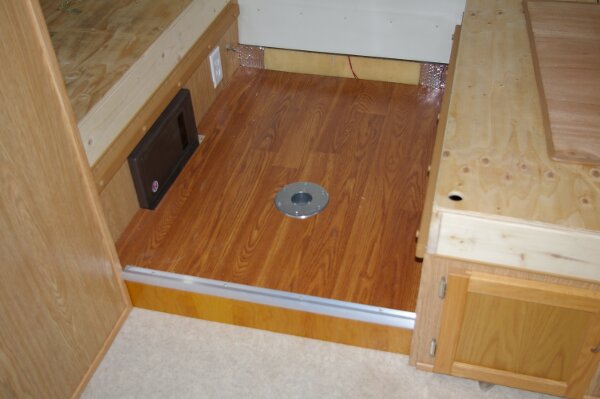
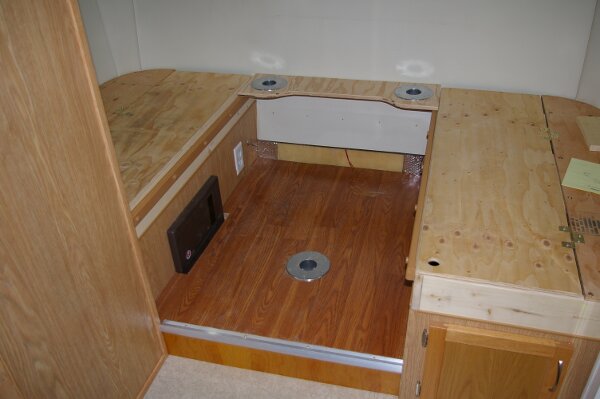
The seat height seems about right when raised 4 3/4". So it's time to put in a raised floor. The first step was to put in 1"x4 1/4" framing to match the amount the seat was raised. The framing is screwed to the side walls.
I decided, for this test, to not raise the electrical panel. I found the access door works fine with the raised floor. Also, the front panel can be removed to access the wiring as I've framed it. This will also come off to allow vacuuming. However, if the whole unit needs to come out the floor would have to come up. I'll see how this works and decided if the panel needs to be raised in the finished version, but for now I haven't.
I floored this framing with 1/2" plywood and cut a hole for a flush mount table leg base.
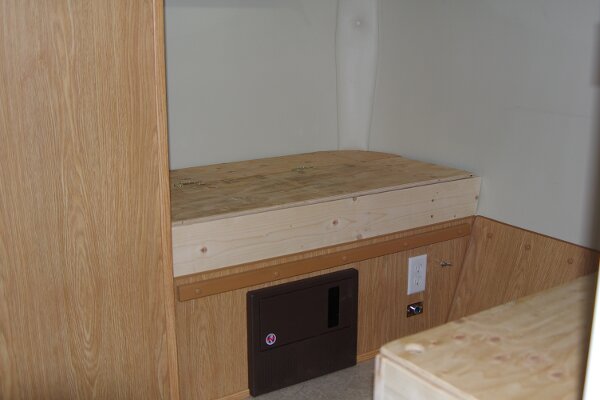
Laminate flooring was installed. I took out the plywood flooring and simply routed the flooring to size. This worked well. Not sure we'll keep this flooring but with routing it'd be very easy to replace with another pattern. The flush mount base and a step trim were added.
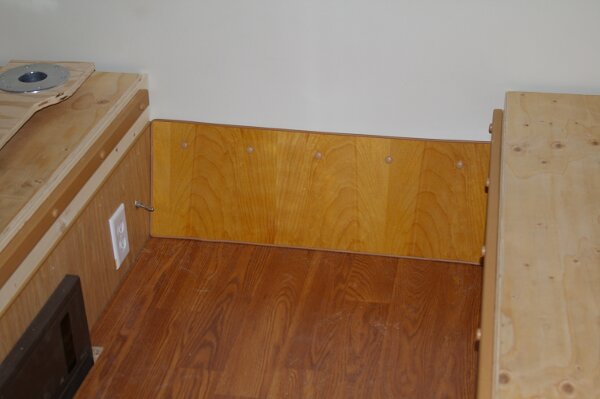
Finally, before dropping something important down the gap, I covered the front with a piece in the same style and mounting as Escape used. I had some finished 1/8" birch ply and used this. I also raised the railes for converting the dinette to a bed.
That's it for the test. If it all works I'll re-panel the side walls to cover the raised dinette walls and put in wood trim. I'd planned on oak but I do like the birch. Maybe a new laminate floor in cork as it has a lot of wood grain now.
__________________
Hugh Currin
2018 Bigfoot 25'
2018 RAM 2500 Diesel
|
|
|
|
|
01-16-2015, 01:07 PM
|
#77
|
|
Senior Member
Join Date: Jun 2014
Location: Box Elder, South Dakota
Trailer: Bigfoot 25' 2018
Posts: 347
|
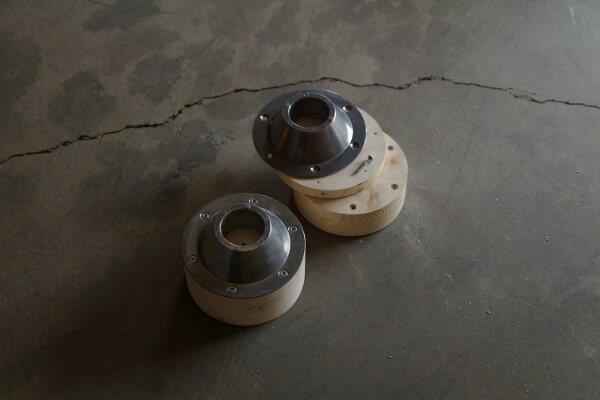
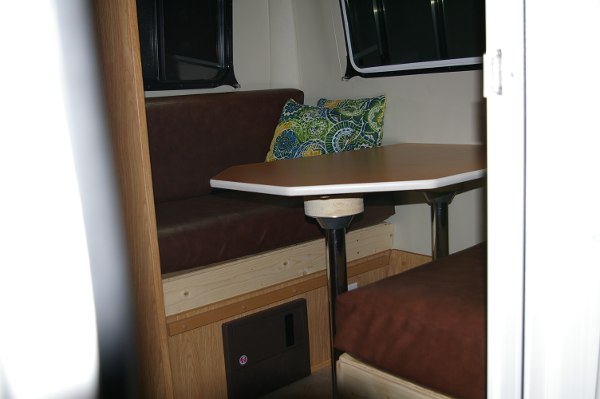
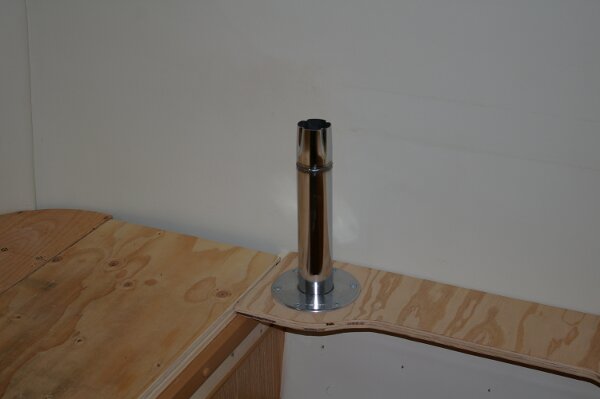
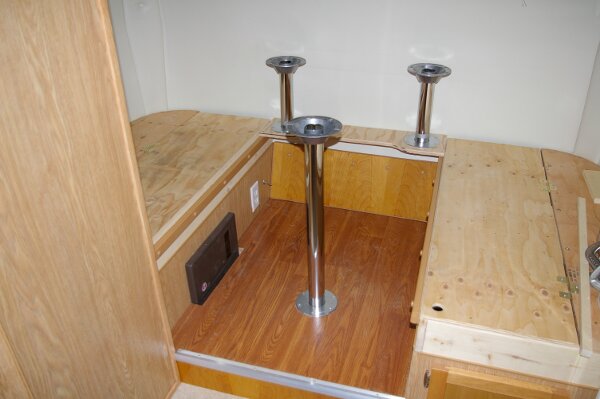
Then on to the table. I don't like the wobbly table with two posts. I thought about putting three posts in, one in the back and two in front. It would have taken up floor space and covered the switch and outlets just above floor level. I found discussions and descriptions of a shelf to stabilize the front table leg.
After considerable thought, and a couple of beers, I decided to combine the two ideas. I put a shelf across the front of the dinette at seat level. At the outside of this I put two flush mount table post bases.
I cut down two posts to give the right table height. Turns out the original table leg, mounted in the flush mount in the floor, gave a good height. That's about 1 1/2" lower than stock (relative to dinette seats).
I was careful to keep both shortened posts straight and the same length. But when I put it all together I found one post taper mounted 1/2" further into the bases than the others. So, one base was 1/2" low, I love modern quality control. I shimmed the table on that corner 1/2" to match the other two.
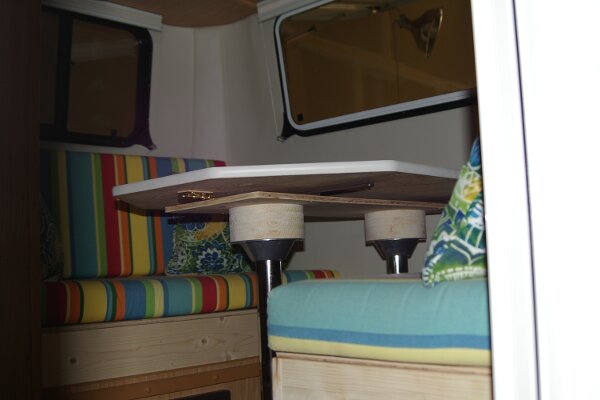
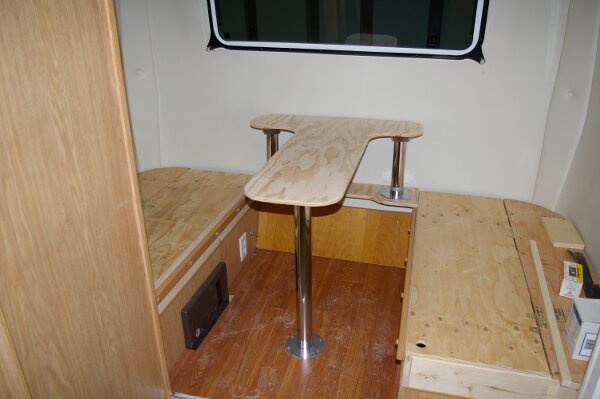
Here's what it looks like with the legs and no table.
I planned to make the shelf with leg bases removable to allow the bed to be made-up. But I found the table, with stock cut outs at the front, still fit. It sticks out 6" or so but should work fine. With the flush mount bases the cusions will fit fine for the bed. Nice option although we very seldom if ever set up the bed. So I installed the shelf with "premanent" wood screws. This shelf will be remade or covered when finish work is undertaken.
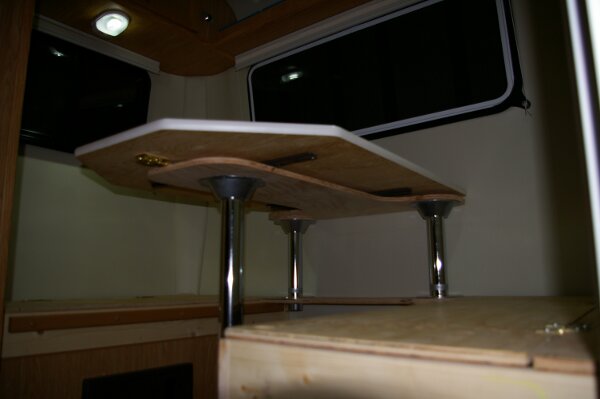
A new platform was made from 1/2" ply.
And the table with slides moved to the new platform.
__________________
Hugh Currin
2018 Bigfoot 25'
2018 RAM 2500 Diesel
|
|
|
|
|
01-16-2015, 01:09 PM
|
#78
|
|
Senior Member
Join Date: Jun 2014
Location: Box Elder, South Dakota
Trailer: Bigfoot 25' 2018
Posts: 347
|
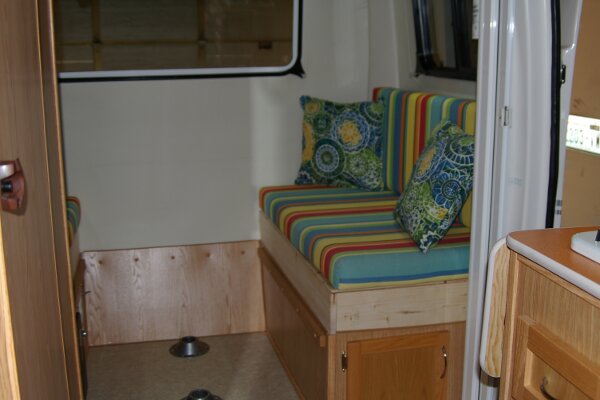
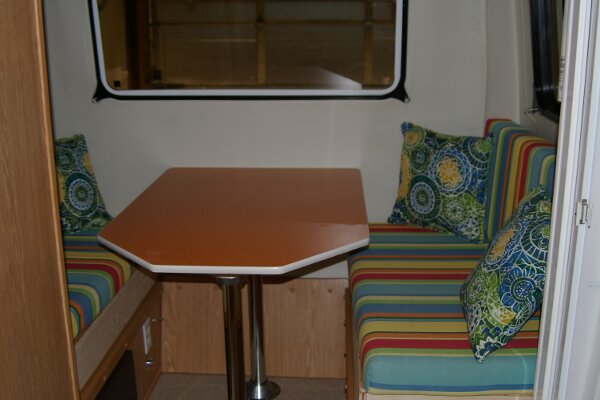
Finally, our dinette and floor are raised 4 3/4" for visibility. The three leg system for the table works very well. Very solid and leaves floor space for a dog or two. A shelf is now available for charging cell phones, Kindles, etc.
I'm happy with the mod. It even somehow separates the dining area from the kitchen, makes the trailer feel larger.
We'll try this for a couple of trips. If all is well I'll then do the finish work.
Thanks for following along.
__________________
Hugh Currin
2018 Bigfoot 25'
2018 RAM 2500 Diesel
|
|
|
|
|
01-16-2015, 05:14 PM
|
#79
|
|
Senior Member
Join Date: Sep 2013
Location: Ventura County, California
Trailer: 2013 19 Escape
Posts: 7,204
|
Quote:
Originally Posted by currinh

Finally, our dinette and floor are raised 4 3/4" for visibility. The three leg system for the table works very well. Very solid and leaves floor space for a dog or two. A shelf is now available for charging cell phones, Kindles, etc.
I'm happy with the mod. It even somehow separates the dining area from the kitchen, makes the trailer feel larger.
We'll try this for a couple of trips. If all is well I'll then do the finish work.
Thanks for following along. |
Oh my Currinh I love what you did . I am getting ideas here . I still keep thinking how to make mine better . Pat
|
|
|
|
|
01-16-2015, 05:16 PM
|
#80
|
|
Senior Member
Join Date: Sep 2013
Location: Ventura County, California
Trailer: 2013 19 Escape
Posts: 7,204
|
Have one ? The electrical panel at the bottom has some venting . That is what I was concerned about . Do you think it will be a problem ? Pat
|
|
|
|
|
|
 Posting Rules
|
You may not post new threads
You may not post replies
You may not post attachments
You may not edit your posts
HTML code is Off
|
|
|
|
 » Recent Discussions
 |
|
|
|
|
|
|
|
|
|
|
|
|
|
|
|
|
|
|
|
|
|
|
|
|
|
|
|
|
|
|

|


 Linear Mode

