 |
 05-31-2014, 09:50 AM
|
#1
|
|
Senior Member
Join Date: Jul 2013
Location: Corinth, Mississippi
Trailer: 2014 19' Escape - 2023 JGC-L Summit
Posts: 193
|
Thanks for the ideas
Thanks to those of you who have posted your modifications on the forum and provided ideas for me and others to personalize our Escapes. I'll admit I've freely collected many of your ideas of things to add or change since I started following this forum 18 months ago. In the past few weeks, I've incorporated some of them. I doubt if I'm done yet, but I thought I would share what I've recently completed.
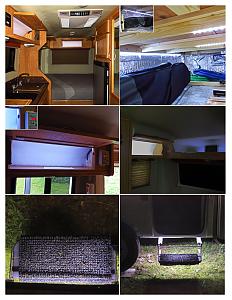
Lights
After I ordered a couple of 5 meter rolls of LED strip lights and a 10 pc package of rocker toggle switches, I kind of got carried away. I ended up with a switched strip of LED lights in all 6 Overhead cabinets, 1 underneath the counter, 1 underneath the bed, and 1 along the back side of the rear storage area. Couldn't find a place to use that 10th switch, and I still have lights left so the storage box is still a possibility  . I added a dimmer to the LED strip on the inside lip of the overhead shelf in the front but all others are quite bright; no more wondering what's in the back corners of the cabinets! I also added a short LED strip on the bottom of the trailer to light the step. The power source for that light was the front outside light so the step light is activated by the porch light switch inside the trailer.
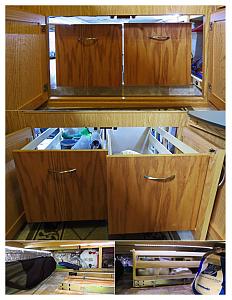
Storage
Added a couple of light weight shelves to the wardrobe, a roll-out metal shelf under the counter, a shelf over the door to collect the odds and ends that always seemed to end up on top of the counter, and drawers under the bed. I used 28" drawer slides that are made for RV's from eDirectHardware and they lock quite securely when fully closed. The design guy (me) didn't realize the RH door under the bed didn't fully open because of interference with the handle on the door under the refrigerator  .The drawers are functional, but I suspect I'll redo them to correct my mistake.

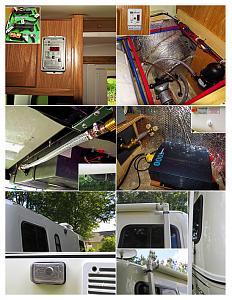
Other
Installed a Trimetric 2030RV meter with the shunt located right on the battery. I could have installed the shunt inside under the seat with the rest of the electrical stuff, but the location I chose was the easiest to access. If the shunt location becomes a problem, I can always move it inside. I also replaced the cable ETI installed to connect the two batteries together with the same size cable as used for the inverter, 4 gauge. Installed an accumulator for the water pump and hinged the cover over the water pump area for improved access to this area. Added an LED light to the WH switch to indicate when the switch is on. Added a Camco Quickie Flush to each of the waste tanks. I replaced the vinyl hose that came with the units with heavier duty hose and used elbows to more directly route the hose to the outlets. Nope, didn't bother me too much to drill a hole in the side of the trailer  .
Haven't done much to the outside other than applying a coat of Rejex and cleaning off the putty squeeze out around the windows. I have installed a length of RV gutter along the edge of the roof on the curb side as well as shorter lengths over the front and rear side windows on the street side, a couple of awning deflappers, and screens to block flying and crawling insects access to the various vents.
|

|

|
|
05-31-2014, 10:16 AM
|
#2
|
|
Senior Member
Join Date: Sep 2013
Location: Vancouver, BC, British Columbia
Trailer: 19'
Posts: 326
|
How did you attach the shunt to the battery.
|
|
|
|
|
05-31-2014, 11:00 AM
|
#3
|
|
Senior Member
Join Date: Jan 2014
Location: North Van., British Columbia
Trailer: 2014 Escape 19, sold; 2019 Escape 21, Sept. 2019
Posts: 8,809
|
Wow, you've been busy, that's a lot of work, nicely done.
Some of those items are also on my to-do list. How's the accumulator working? I've also had them on other systems and I like how they allow for small amounts of water to keep flowing without having to turn on the pump. I see the comments that the pump is a by-pass type and doesn't need an accumulator but I'm going to install one anyway. Glad you've done though so now I know it doesn't affect how the pump operates. Or does it?
Ron
|
|
|
|
|
05-31-2014, 01:54 PM
|
#4
|
|
Senior Member
Join Date: Jul 2012
Location: Albuquerque, New Mexico
Trailer: 2013 Escape 19
Posts: 251
|
Very nice work. Really like all the lights. Where did you find a bug screen for the furnace? I haven't found one that fits, most are too big.
Dave
|
|
|
|
|
05-31-2014, 02:07 PM
|
#5
|
|
Site Team
Join Date: Nov 2008
Location: Portland, Oregon
Trailer: 2014 Escape 5.0 TA
Posts: 11,049
|
Quote:
Originally Posted by DonF

....Haven't done much to the outside other than applying a coat of Rejex and cleaning off the putty squeeze out around the windows.
|
I just purchased a bottle of Rejex, plan on applying it to the wheel wells and maybe the nose of the 5er. Let me (us) know how it works out for you. I guess you applied it all OVER the trailer? Hummmm.
|
|
|
|
|
05-31-2014, 03:24 PM
|
#6
|
|
Senior Member
Join Date: Jul 2013
Location: Corinth, Mississippi
Trailer: 2014 19' Escape - 2023 JGC-L Summit
Posts: 193
|
Quote:
Originally Posted by jamie beers
How did you attach the shunt to the battery.
|
Even thought the shunt was pretty much held in place by the stiffness of the cables connected to it, I used a piece of 3M adhesive tape between the shunt base and battery top.
|
|
|
|
|
05-31-2014, 03:27 PM
|
#7
|
|
Senior Member
Join Date: Jul 2013
Location: Corinth, Mississippi
Trailer: 2014 19' Escape - 2023 JGC-L Summit
Posts: 193
|
Quote:
Originally Posted by Ron in BC
Wow, you've been busy, that's a lot of work, nicely done.
Some of those items are also on my to-do list. How's the accumulator working? I've also had them on other systems and I like how they allow for small amounts of water to keep flowing without having to turn on the pump. I see the comments that the pump is a by-pass type and doesn't need an accumulator but I'm going to install one anyway. Glad you've done though so now I know it doesn't affect how the pump operates. Or does it?
Ron |
Ron,
Haven't had the trailer out of the back yard since installing the accumulator so not yet sure if it will reduce the cycling of the pump when using small amounts of water. I did run the pump quite a bit after the accumulator was installed and noticed no affect as to how the pump operates.
|
|
|
|
|
05-31-2014, 03:32 PM
|
#8
|
|
Senior Member
Join Date: Jul 2013
Location: Corinth, Mississippi
Trailer: 2014 19' Escape - 2023 JGC-L Summit
Posts: 193
|
Quote:
Originally Posted by dave1
Very nice work. Really like all the lights. Where did you find a bug screen for the furnace? I haven't found one that fits, most are too big.
Dave
|
Dave,
Found the bug screen on Amazon, Amazon.com: Camco 42140 Flying Insect Screen - FUR 100: Automotive
|
|
|
|
|
05-31-2014, 03:37 PM
|
#9
|
|
Senior Member
Join Date: Jul 2013
Location: Corinth, Mississippi
Trailer: 2014 19' Escape - 2023 JGC-L Summit
Posts: 193
|
Quote:
Originally Posted by Donna D.
I just purchased a bottle of Rejex, plan on applying it to the wheel wells and maybe the nose of the 5er. Let me (us) know how it works out for you. I guess you applied it all OVER the trailer? Hummmm.
|
Donna,
I applied the Rejex to everything except the roof. I used a Turtle Wax product I had on hand for the roof area. Haven't had a chance to see if it is easier to clean off the bugs and dirt than it was before the Rejex, but I'm hoping for the best .
|
|
|
|
|
05-31-2014, 08:01 PM
|
#10
|
|
Site Team
Join Date: Nov 2008
Location: Portland, Oregon
Trailer: 2014 Escape 5.0 TA
Posts: 11,049
|
I hope for the best too. Here you didn't put it on the roof. THAT and the nose of the 5er are two more places I hope to use it. If you like it and tell us, I'll use it EVERYWHERE 
|
|
|
|
|
06-01-2014, 05:29 AM
|
#11
|
|
Senior Member
Join Date: Sep 2009
Location: Southwick, Massachusetts
Trailer: None, sold my 2014 5.0TA
Posts: 7,124
|
Don,
What did you use for the rain gutter, the EZE? Looks good all along the roof line, can hardly tell it's there. Did you look into using extensions on the ends? Don't know if they work with the EZE.
How's the small accumulator tank working out for you? I put a 2 gallon in on my hybrid but would like to try a smaller one in the Escape for space savings.
Bob
__________________
Happy Motoring
Bob
|
|
|
|
|
06-01-2014, 08:24 AM
|
#12
|
|
Senior Member
Join Date: Jul 2012
Location: Albuquerque, New Mexico
Trailer: 2013 Escape 19
Posts: 251
|
Quote:
Originally Posted by DonF
|
Don
Thats the one I've been looking at, seems to be the closest fit.
Thanks
Dave
|
|
|
|
|
06-02-2014, 09:11 AM
|
#13
|
|
Senior Member
Join Date: Jul 2013
Location: Corinth, Mississippi
Trailer: 2014 19' Escape - 2023 JGC-L Summit
Posts: 193
|
Quote:
Originally Posted by padlin
Don,
What did you use for the rain gutter, the EZE? Looks good all along the roof line, can hardly tell it's there. Did you look into using extensions on the ends? Don't know if they work with the EZE.
How's the small accumulator tank working out for you? I put a 2 gallon in on my hybrid but would like to try a smaller one in the Escape for space savings.
Bob
|
Bob,
Yes I did use the EZE Ultra White RV Gutter from Essential Products. I did not think about extensions on the end, I just terminated the gutter to match the molded in feature on the trailer.
Haven't been out with the trailer since installing the accumulator tank. Did run the pump through various cycles after installing the accumulator and I think it will do what I had hoped it would.
|
|
|
|
|
 Posting Rules
|
You may not post new threads
You may not post replies
You may not post attachments
You may not edit your posts
HTML code is Off
|
|
|
|
 » Recent Discussions
 |
|
|
|
|
|
|
|
|
|
|
|
|
|
|
|
|
|
|
|
|
|
|
|
|
|
|
|
|
|
|

|


 Linear Mode

