 |
 07-28-2019, 01:16 PM
|
#1
|
|
Senior Member
Join Date: Jul 2018
Location: Cottonwood, Arizona
Trailer: 2019 5.0TA pulled by Ram 3500 diesel dually
Posts: 286
|
Umbra hook installation questions
Like so many others I'll be adding Umbra Hooks in a few locations, including having ETI do some installs @ orientation and others later.
I've seen pictures in their showroom of the hooks in the locations I'm initially interested in so I know that I'll want a 2-hook & 3-hook to begin with. I also have a little Umbra cubby shelf and an over-door single hook.
Amazon offers 3, 5 & 8 hook Umbras so I bought an 8 with the intention of cutting it into a 2 and 2 3s. Of course, cutting down a longer one means that the manufactured mounting is no longer valid - if even compatible with the rv "studs" to begin with.
What method does ETI use to mount these? They are made with keyhole mounting holes on the back for hidden mounting. I can not imagine that ETI would route new keyholes but instead would drill thru the Umbra and screw from the front. If I was doing it I would use fat flat head screws that get countersunk, allowing for the possibility of a decorative plug.
I'm asking because, tho I can not predrill holes since I don't know the proper locations, I can check my screw supply and ensure I have the appropriate drill bits and plan to get some plugs.
Is there anything I need to look out for when cutting the long one? There is a spline embedded in the back that looks like it might be covering whatever is used for hinging the hooks. Is this hinge material plastic, metal? Is there several short "hinges" or one long one (safe to cut between the hooks)?
|

|

|
|
07-28-2019, 02:22 PM
|
#2
|
|
Senior Member
Join Date: Feb 2010
Location: Oswego, New York
Trailer: 2017 Escape 21C, 2018 Ford F150
Posts: 5,370
|
Quote:
Originally Posted by StillCampin

Like so many others I'll be adding Umbra Hooks in a few locations, including having ETI do some installs @ orientation and others later.
I've seen pictures in their showroom of the hooks in the locations I'm initially interested in so I know that I'll want a 2-hook & 3-hook to begin with. I also have a little Umbra cubby shelf and an over-door single hook.
Amazon offers 3, 5 & 8 hook Umbras so I bought an 8 with the intention of cutting it into a 2 and 2 3s. Of course, cutting down a longer one means that the manufactured mounting is no longer valid - if even compatible with the rv "studs" to begin with.
What method does ETI use to mount these? They are made with keyhole mounting holes on the back for hidden mounting. I can not imagine that ETI would route new keyholes but instead would drill thru the Umbra and screw from the front. If I was doing it I would use fat flat head screws that get countersunk, allowing for the possibility of a decorative plug.
I'm asking because, tho I can not predrill holes since I don't know the proper locations, I can check my screw supply and ensure I have the appropriate drill bits and plan to get some plugs.
Is there anything I need to look out for when cutting the long one? There is a spline embedded in the back that looks like it might be covering whatever is used for hinging the hooks. Is this hinge material plastic, metal? Is there several short "hinges" or one long one (safe to cut between the hooks)?
|
I don't know if they are still using the same mounting technique, but in my August 2017 21 they used countersunk flat head screws inside the folding hook, so they are not visible when closed.
As to the continuous hinge, it is a fairly hard steel rod. I killed a 12" power miter box fine toothed blade when I did the "cut & install" in my previous 17...
|
|
|
|
|
07-28-2019, 03:05 PM
|
#3
|
|
Senior Member
Join Date: Jul 2018
Location: Cottonwood, Arizona
Trailer: 2019 5.0TA pulled by Ram 3500 diesel dually
Posts: 286
|
Thank you.
Quote:
Originally Posted by Vermilye
I don't know if they are still using the same mounting technique, but in my August 2017 21 they used countersunk flat head screws inside the folding hook, so they are not visible when closed.
|
That makes sense & maybe even better than exposed with a plug. The hooks themselves are curved so actual countersinking wouldn't be required. And if the wall support at attachment was horizontal the location wouldn't be critical.
Quote:
Originally Posted by Vermilye
As to the continuous hinge, it is a fairly hard steel rod. I killed a 12" power miter box fine toothed blade when I did the "cut & install" in my previous 17...
|
I was afraid it was continuous and anticipated metal. I did not bring my sabre saw to use a metal blade so I think I'll make a thin pass and then use a Dremel metal wheel to go thru the hinge pin material.
|
|
|
|
|
07-28-2019, 03:50 PM
|
#4
|
|
Senior Member
Join Date: May 2013
Location: ..., New Mexico
Trailer: 2013 Esc19/'14 Silvrado
Posts: 4,193
|
This may be of some use to you. The homeboy front side coat hooks I made screw directly into support framing. The ones at the right are screwed down from inside the cabinet.
__________________
Myron
"A billion here, a billion there...add it all up and before you know it you're talking real money." Everett Dirkson
|
|
|
|
|
07-28-2019, 04:44 PM
|
#5
|
|
Senior Member
Join Date: Jul 2018
Location: Cottonwood, Arizona
Trailer: 2019 5.0TA pulled by Ram 3500 diesel dually
Posts: 286
|
If the bathroom wall (5.0) has framing support in that area (upper left in the pic) then I may revisit the locations that my $25 is paying ETI to install @ orientation.
__________________
Tom W
( 5.0TA, "Gray Ghost" )
|
|
|
|
|
07-28-2019, 05:25 PM
|
#6
|
|
Senior Member
Join Date: Nov 2015
Location: Baytown, Texas
Trailer: 2017 21' Escape - upgraded version
Posts: 2,697
|
Quote:
Originally Posted by StillCampin
If the bathroom wall (5.0) has framing support in that area (upper left in the pic) then I may revisit the locations that my $25 is paying ETI to install @ orientation.
|
A stud finder will tell you where they are.
https://www.amazon.com/Zircon-StudSe.../dp/B01HTFHOEI
__________________
Normal people believe that if it ain't broke, don't fix it.
Engineers believe in fixing it so that it never breaks.
|
|
|
|
|
07-28-2019, 06:04 PM
|
#7
|
|
Senior Member
Join Date: May 2013
Location: ..., New Mexico
Trailer: 2013 Esc19/'14 Silvrado
Posts: 4,193
|
Made this change recently. That 1x4x23" cross piece for the storage bins screws into easily found corner framing. You can also detect the framing by tapping lightly with a hammer until it doesn't sound hollow in there.
__________________
Myron
"A billion here, a billion there...add it all up and before you know it you're talking real money." Everett Dirkson
|
|
|
|
|
07-28-2019, 06:20 PM
|
#8
|
|
Senior Member
Join Date: Aug 2015
Location: Benton County, Iowa
Trailer: 2013 Escape 21 Classic Number 6, pulled by 2018 Toyota Highlander
Posts: 8,254
|
Stud finder
Quote:
Originally Posted by tdf-texas
|
I got one of these. Every time I picked it up and turned it on it started to beep.
Iowa Dave
__________________
Aint no trouble jacking a double Burma Shave
Dave
|
|
|
|
|
07-28-2019, 06:25 PM
|
#9
|
|
Senior Member
Join Date: Apr 2017
Location: DFW, Texas
Trailer: 2018 21 Sept 7 2018
Posts: 1,073
|
So your related to Charlie Brown
|
|
|
|
|
07-28-2019, 06:45 PM
|
#10
|
|
Senior Member
Join Date: Jul 2018
Location: Cottonwood, Arizona
Trailer: 2019 5.0TA pulled by Ram 3500 diesel dually
Posts: 286
|
Quote:
Originally Posted by tdf-texas
A stud finder will tell you where they are.
|
I've never used one tho I figure finding a 2x4 or 2x6 would definately be doable but are they actually useful for the framing in an RV?
|
|
|
|
|
07-28-2019, 07:14 PM
|
#11
|
|
Senior Member
Join Date: Aug 2015
Location: Benton County, Iowa
Trailer: 2013 Escape 21 Classic Number 6, pulled by 2018 Toyota Highlander
Posts: 8,254
|
Relates
Quote:
Originally Posted by Oldtimer
So your related to Charlie Brown
|
Arent we all?
Iowa Dave
__________________
Aint no trouble jacking a double Burma Shave
Dave
|
|
|
|
|
07-28-2019, 07:23 PM
|
#12
|
|
Senior Member
Join Date: Nov 2015
Location: Baytown, Texas
Trailer: 2017 21' Escape - upgraded version
Posts: 2,697
|
Quote:
Originally Posted by StillCampin
I've never used one tho I figure finding a 2x4 or 2x6 would definately be doable but are they actually useful for the framing in an RV?
|
It will tell you where the center and the edges of the framing is.
__________________
Normal people believe that if it ain't broke, don't fix it.
Engineers believe in fixing it so that it never breaks.
|
|
|
|
|
07-28-2019, 07:36 PM
|
#13
|
|
Senior Member
Join Date: Sep 2015
Location: Port Townsend, Washington
Trailer: 2010 17B MATT, then 2017 19 Lilly
Posts: 1,584
|
This is how ETI installed our Umbra hooks:
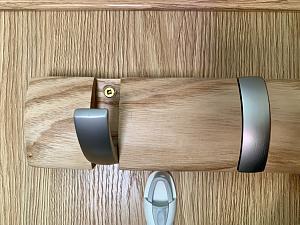
This is how they installed our Umbra cubbies:
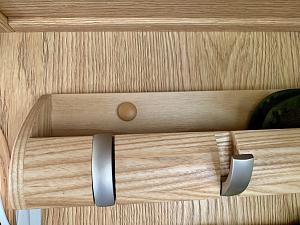
The button cap conceals the screw head.
__________________
💩-p+☕️+n
|
|
|
|
|
07-28-2019, 08:07 PM
|
#14
|
|
Site Team
Join Date: Nov 2008
Location: Portland, Oregon
Trailer: 2014 Escape 5.0 TA
Posts: 11,040
|
Quote:
Originally Posted by Iowa Dave
I got one of these. Every time I picked it up and turned it on it started to beep.
Iowa Dave
|
You wish. ROFL 
__________________
Donna D.
Ten Forward
2014 Escape 5.0TA
|
|
|
|
|
07-29-2019, 12:55 AM
|
#15
|
|
Senior Member
Join Date: Nov 2017
Location: Placerville, California
Trailer: 2018 Escape 17A double dinette
Posts: 1,520
|
That got a good chuckle, Dave.
Tom, ETI cut down the umbra hooks I took to fit the spots I chose.
__________________
--Time and trouble will tame an advanced young woman, but an advanced older woman is uncontrollable by any earthly force. --Dorothy Sayers
|
|
|
|
|
| Thread Tools |
|
|
| Display Modes |
 Linear Mode Linear Mode
|
 Posting Rules
|
You may not post new threads
You may not post replies
You may not post attachments
You may not edit your posts
HTML code is Off
|
|
|
|
 » Recent Discussions
 |
|
|
|
|
|
|
|
|
|
|
|
|
|
|
|
|
|
|
|
|
|
|
|
|
|
|
|
|
|
|

|


