 |
|
 01-20-2019, 08:47 AM
|
#1
|
|
Senior Member
Join Date: Dec 2015
Location: In a house, New Jersey
Trailer: Used to own a 17B and a 19 Escape
Posts: 136
|
Door Frame Seal - 2nd Generation
Hello. I have a 2018 19 that I picked up last year and the refridgerator was recently replaced under warranty. Long story short the only way Dometic would help me with the warranty was if I took it to an authorized Dometic service center. Well the service center told me they had to take off the front door to get the new fridge in the camper. So now my front door is not seated properly and has a ton of caulk around it. I was hoping someone would be kind enough to take some pictures of the front door of the 2nd gen 19 so that I can see how the door was seated into the camper shell from the factory. I'm trying to decide if I should take off the door and re-install it, but I can't remember how tight the original factory installation was. I'm concerned if I take it off the door frame that I may end up stripping some of the threads of the door frame and causing more issues. Thank you in advance for any help.
|

|

|
|
01-20-2019, 09:04 AM
|
#2
|
|
Senior Member
Join Date: Feb 2018
Location: alpharetta, Georgia
Trailer: 2014 21' Escape
Posts: 494
|
You are WAY nicer then me, the owner and or manager of this repair shop SHOULD take care of an issue they created.
I'm sure someone will post a picture soon, maybe reach out to ETI directly.
Enjoy the journey.
Steve
|
|
|
|
|
01-20-2019, 09:26 AM
|
#3
|
|
Senior Member
Join Date: Dec 2015
Location: In a house, New Jersey
Trailer: Used to own a 17B and a 19 Escape
Posts: 136
|
Quote:
Originally Posted by stratos175

You are WAY nicer then me, the owner and or manager of this repair shop SHOULD take care of an issue they created.
I'm sure someone will post a picture soon, maybe reach out to ETI directly.
Enjoy the journey.
Steve
|
Thanks Steve. It may not be as bad as I think it is but I don't remember there being caulk around the door from the factory. In my mind it isn't worth the aggrevation trying to get the service center to fix it. I would rather do it the right way myself. I would have repaired the fridge myself but Dometic Technical Support wouldn't even talk to me.
Thanks,
Chris
|
|
|
|
|
01-20-2019, 09:34 AM
|
#4
|
|
Senior Member
Join Date: Jun 2010
Location: Central, Pennsylvania
Trailer: Escape#5 2022 E19
Posts: 26,268
|
You should be able to look at Escapes website pictures as your unit would be the same as the new units. Here is one of mine
__________________
Jim
Sometime life gets in the way of living.......
|
|
|
|
|
01-20-2019, 09:37 AM
|
#5
|
|
Senior Member
Join Date: May 2013
Location: ..., New Mexico
Trailer: 2013 Esc19/'14 Silvrado
Posts: 4,193
|
Well I'm confused. So.... They removed the door by unscrewing the hinges? Then replaced the door but added a lot of caulk - around the hinges? And now your door is not aligned correctly - because they screwed the hinges back in place incorrectly??
__________________
Myron
"A billion here, a billion there...add it all up and before you know it you're talking real money." Everett Dirkson
|
|
|
|
|
01-20-2019, 09:51 AM
|
#6
|
|
Senior Member
Join Date: Dec 2015
Location: In a house, New Jersey
Trailer: Used to own a 17B and a 19 Escape
Posts: 136
|
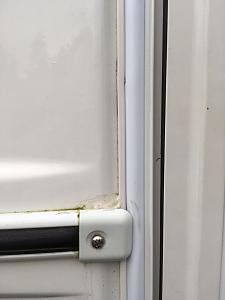
They removed the whole door frame that is installed in the camper shell. Sorry I wasn't clear on that in the original post. The door is aligned and closes fine. It is the gap between the camper shell and door frame that I'm looking at. I can't zoom in close enough to see how the frame sits in the fiberglass camper shell on any of the pictures I found online. I should have attached pictures in the original post. I have attached them here. I'm trying to figure out if there was a gap like in these pictures from the factory. I don't recall.
|
|
|
|
|
01-20-2019, 10:10 AM
|
#7
|
|
Senior Member
Join Date: Jun 2010
Location: Central, Pennsylvania
Trailer: Escape#5 2022 E19
Posts: 26,268
|
I believe if you remove that piece of trim you will see the attaching screws and better idea of gap, the plastic trim just squeezes off/on.
__________________
Jim
Sometime life gets in the way of living.......
|
|
|
|
|
01-20-2019, 10:15 AM
|
#8
|
|
Senior Member
Join Date: Dec 2015
Location: In a house, New Jersey
Trailer: Used to own a 17B and a 19 Escape
Posts: 136
|
Quote:
Originally Posted by cpaharley2008
I believe if you remove that piece of trim you will see the attaching screws and better idea of gap, the plastic trim just squeezes off/on.
|
Do you have caulk on yours like I have in the first picture where the outside of the door frame meets the camper shell?
|
|
|
|
|
01-20-2019, 10:32 AM
|
#9
|
|
Senior Member
Join Date: Nov 2015
Location: Baytown, Texas
Trailer: 2017 21' Escape - upgraded version
Posts: 2,697
|
Quote:
Originally Posted by ichrisdr
They removed the whole door frame that is installed in the camper shell. Sorry I wasn't clear on that in the original post. The door is aligned and closes fine. It is the gap between the camper shell and door frame that I'm looking at. I can't zoom in close enough to see how the frame sits in the fiberglass camper shell on any of the pictures I found online. I should have attached pictures in the original post. I have attached them here. I'm trying to figure out if there was a gap like in these pictures from the factory. I don't recall.
|
My 21' trailer has caulk along the top of the rain guard but no caulk showing on either side of the outside or inside of the door. I think that the RV dealer totally screwed up your door.
edit: looking at the pics - time to wash the trailer!
__________________
Normal people believe that if it ain't broke, don't fix it.
Engineers believe in fixing it so that it never breaks.
|
|
|
|
|
01-20-2019, 11:05 AM
|
#10
|
|
Senior Member
Join Date: Sep 2015
Location: Port Townsend, Washington
Trailer: 2010 17B MATT, then 2017 19 Lilly
Posts: 1,584
|
I just took these of our 2017 19 door framing. I used a dark card to try to better represent the 3D curvature. Hope this helps.
 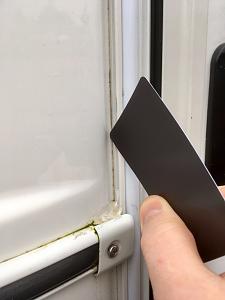 
Yuck, ours needs a bath.
__________________
💩-p+☕️+n
|
|
|
|
|
01-20-2019, 11:18 AM
|
#11
|
|
Senior Member
Join Date: Sep 2016
Location: Bremerton, Washington
Trailer: 2019 5.0 TA
Posts: 1,141
|
Might I suggest you contact ETI about getting a new door trim gasket. It does not appear to me that the factory install uses chalk except on the rain guard at the top. It looks like the trim provides the seal. But the shop that did this work kind of ruined the gasket with their horrible caulking job. It will be easy enough to remove the chalk from the fiberglass with a plastic scraper so you don't damage the gel coat, but I don't know about the trim. I would show the pictures to ETI and get their advice.
__________________
- Arnie & Paula & Kizzy the rat terrier
https://www.arniesea.com
- 2019 5.0 TA, 2017 Tundra Platinum.
- Bremerton, WA
|
|
|
|
|
01-20-2019, 11:29 AM
|
#12
|
|
Senior Member
Join Date: Sep 2016
Location: Bremerton, Washington
Trailer: 2019 5.0 TA
Posts: 1,141
|
Quote:
Originally Posted by sclifrickson
Yuck, ours needs a bath.
|
Hmmm, yes I recognize that Western Washington mold! 
This is what I use to spot clean the belly band and that black runoff from the window gaskets on the classic framed windows. It seems to keep the mold from growing back too as a bonus! I bet you can find it at the Co-op or the Mercantile in P.T.
__________________
- Arnie & Paula & Kizzy the rat terrier
https://www.arniesea.com
- 2019 5.0 TA, 2017 Tundra Platinum.
- Bremerton, WA
|
|
|
|
|
01-20-2019, 11:29 AM
|
#13
|
|
Senior Member
Join Date: Oct 2017
Location: Kelowna, British Columbia
Trailer: 2018 Escape 19
Posts: 2,718
|
There is a lease a 1/4 inch dip at the front and rear of the door after the seal was applied.
Thanks for posting. This is a good example for people to take lots of pictures before they have any work done. Floors, counter tops, ceiling and exterior.
Here are a few more pictures. Hope this helps.
|
|
|
|
|
01-20-2019, 11:31 AM
|
#14
|
|
Senior Member
Join Date: Nov 2015
Location: Baytown, Texas
Trailer: 2017 21' Escape - upgraded version
Posts: 2,697
|
Quote:
Originally Posted by sclifrickson
|
Both our trailers don't have caulking such as the OP's.
You know - when it's cold outside, it's hard to get motivated to get wet washing the trailer. Hopefully, it will have a warm day before we leave for Quartzite. 
__________________
Normal people believe that if it ain't broke, don't fix it.
Engineers believe in fixing it so that it never breaks.
|
|
|
|
|
01-20-2019, 11:32 AM
|
#15
|
|
Senior Member
Join Date: Dec 2015
Location: In a house, New Jersey
Trailer: Used to own a 17B and a 19 Escape
Posts: 136
|
Thank you for the pictures!! This helps a lot. As I suspected it looks like the service tech couldn't get the door frame seated into the fiberglass shell properly, or didn't take the time. Like noted above maybe I need to replace the gasket seal. As soon as it warms up a little I'm going to pull all the caulk out and see what the actual gap is. I'll reach out to ETI to get their thoughts.
Thanks again,
Chris
|
|
|
|
|
01-20-2019, 12:06 PM
|
#16
|
|
Senior Member
Join Date: Oct 2017
Location: Kelowna, British Columbia
Trailer: 2018 Escape 19
Posts: 2,718
|
If you run a straight edge along the slide of the trailer the door frame will be reset by 3/8 of an inch.
|
|
|
|
|
01-20-2019, 12:15 PM
|
#17
|
|
Senior Member
Join Date: Dec 2015
Location: In a house, New Jersey
Trailer: Used to own a 17B and a 19 Escape
Posts: 136
|
Quote:
Originally Posted by Eggscape
If you run a straight edge along the slide of the trailer the door frame will be reset by 3/8 of an inch.
|
Thanks. I think I have that same ruler. haha
|
|
|
|
|
01-20-2019, 12:16 PM
|
#18
|
|
Senior Member
Join Date: Jun 2010
Location: Central, Pennsylvania
Trailer: Escape#5 2022 E19
Posts: 26,268
|
You need to remove the plastic molding that covers the metal strip which is the attaching point for the door to get a better feel for measurements.
__________________
Jim
Sometime life gets in the way of living.......
|
|
|
|
|
01-20-2019, 12:25 PM
|
#19
|
|
Senior Member
Join Date: Dec 2015
Location: In a house, New Jersey
Trailer: Used to own a 17B and a 19 Escape
Posts: 136
|
Quote:
Originally Posted by cpaharley2008
You need to remove the plastic molding that covers the metal strip which is the attaching point for the door to get a better feel for measurements.
|
Ok thank you. I emailed ETI so I'll see what Reace says.
This forum is great. So many helpful people. 
Once I figure this out I'll report back so that it can be documented for future reference.
|
|
|
|
|
01-20-2019, 04:15 PM
|
#20
|
|
Senior Member
Join Date: Jun 2010
Location: Central, Pennsylvania
Trailer: Escape#5 2022 E19
Posts: 26,268
|
I hope it was worth it, does the refer now work?
__________________
Jim
Sometime life gets in the way of living.......
|
|
|
|
|
|
| Thread Tools |
|
|
| Display Modes |
 Linear Mode Linear Mode
|
 Posting Rules
|
You may not post new threads
You may not post replies
You may not post attachments
You may not edit your posts
HTML code is Off
|
|
|
|
 » Recent Discussions
 |
|
|
|
|
|
|
|
|
|
|
|
|
|
|
|
|
|
|
|
|
|
|
|
|
|
|
|
|
|
|

|


