 |
|
 10-02-2022, 06:52 PM
|
#1
|
|
Member
Join Date: Aug 2020
Location: Edmonton, Alberta
Trailer: 2021 5.0TA
Posts: 97
|
Electrical Panel Inspection...oh oh
Based on a number of comments on here and fb suggesting a close look at the electrical panel, added that inspection to my winterization work. 2021 5.0, have not opened the cover previously.
On initial quick look, two major issues. The main breaker wire was not inside the lug, rather jammed between the screw head and the body of the breaker. We have been fortunate for two summers, as that is a classic series arc or high resistance connection. The screw was fully down and tight, so this wasn't a loose and slipped out situation.
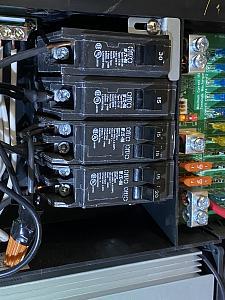
Looking further, I noted a dual 15 amp breaker Eaton BR type with two conductors under each lug. BR breakers are not rated for more than one conductor. (second from the bottom in the photo)
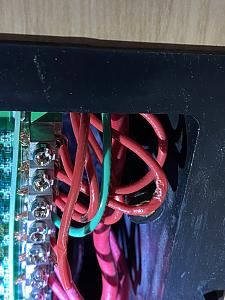
Second, two DC wires were caught under the cover when it was tightened. One wire flattened, the other crushed to the point the insulation split.
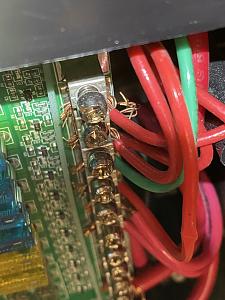
On the DC side found one wire that broke off at the clamp (looked like it was over cut when stripped) and a second that had a number of strands bent back.
While I've been generally positive about the electrical installation quality of everything I've seen and worked on, this led me to swear out loud. The 30 amp lead outside the breaker lug is about as awful installation practice as you can get. Picking up a few code violations and poor practices means I'll be looking further tomorrow.
So, thanks to all who posted advice about inspecting your electrics. I spent today re-working those problems, and I'll convert the breakers to single leads tomorrow.
I did electrical forensics for about 6 years, and each of those faults are ones I've seen lead to significant failure.
For those who aren't as comfortable with the electrical side, this sort of inspection could be done by any RV tech or electrician.
|

|

|
|
10-02-2022, 07:25 PM
|
#2
|
|
Senior Member
Join Date: Oct 2017
Location: Kelowna, British Columbia
Trailer: 2018 Escape 19
Posts: 2,720
|
It is good that you bring attention to this ongoing problem so that people new to the forum check their panel
even if it is only to check that the screws are tight.
|
|
|
|
|
10-02-2022, 09:05 PM
|
#3
|
|
Member
Join Date: Mar 2019
Location: La Selva Beach, California
Trailer: Escape 19 2020
Posts: 95
|
Saw your post on the FB group page. Thanks for bringing this up, We have a 2020 19 and I haven't looked closer at the electric either. This bears taking off the panel covers for sure. I was impressed however by the wiring runs and the neatness of the electrical work that I saw in ours, but that was in 2020!
|
|
|
|
|
10-02-2022, 09:16 PM
|
#4
|
|
Senior Member
Join Date: Mar 2016
Location: Burlington Twp., New Jersey
Trailer: 2010 Escape 19
Posts: 7,146
|
Quote:
Originally Posted by sameo416

The main breaker wire was not inside the lug, rather jammed between the screw head and the body of the breaker. We have been fortunate for two summers, as that is a classic series arc or high resistance connection. The screw was fully down and tight, so this wasn't a loose and slipped out situation.
The 30 amp lead outside the breaker lug is about as awful installation practice as you can get. Picking up a few code violations and poor practices means I'll be looking further tomorrow.
|
Wow! That is really, really bad and makes it clear that Escapes QC is lacking. Im really surprised (but glad) that you didnt have an issue with that in two years of travel!
|
|
|
|
|
10-02-2022, 09:38 PM
|
#5
|
|
Senior Member
Join Date: Jan 2014
Location: North Van., British Columbia
Trailer: 2014 Escape 19, sold; 2019 Escape 21, Sept. 2019
Posts: 8,810
|
Good grief, that's disappointing.
Quite frankly it looks like something I'd expect from a DIYer that had never before wired anything and didn't bother doing a little research on how to do simple wiring correctly.
Definitely a major lack of QC. As my teacher's used to say, improvement needed. 
Ron
|
|
|
|
|
10-02-2022, 09:38 PM
|
#6
|
|
Member
Join Date: Aug 2020
Location: Edmonton, Alberta
Trailer: 2021 5.0TA
Posts: 97
|
We still love our 5.0, and the overall wiring quality is still better than the mass produced trailers Ive seen. Our build happened as they were ramping up production so some speed/training issues are not surprising. But youd normally catch those with enhanced QA/QC.
|
|
|
|
|
10-03-2022, 12:33 AM
|
#7
|
|
Senior Member
Join Date: Jul 2021
Location: 50 miles S of Atlanta, Georgia
Trailer: 2008 BigfootRV 25B21RB
Posts: 289
|
Given what you have found, I would pull the panel out and look at the 12v grounds on the back.
For the 12v connections to the fuse panel, instead of flayed wires under setscrews cutting them in two. I would cut them clean and install ferrules. The ferrules and tooling are not very expensive and make for a very nice job. My fuse panel had a different type of terminal strip so I used forked spade connectors (after first trying the ferrules but concluded the spades were the better way), but my ground bar looked horrible and I redid it with ferrules. (I have a Bigfoot, quality was just as bad.)
Those double taps are best remedied by running a short pigtail from the breaker and then using a 3 wire WAGO nuts to connect the pigtail to the two circuits.

Ground bar before

Ground bar after ferrule install

Charles
__________________
'03 Ram 2500 CTD, 5.9HO PacBrake six speed std cab long bed Leer top and 2008 Bigfoot 25B21RB.. Previously, 2008 Thor Freedom Spirit 180, SOLD! 2007 Winnebago View 23H Motorhome, SOLD!
|
|
|
|
|
10-03-2022, 01:21 AM
|
#8
|
|
Senior Member
Join Date: Feb 2021
Location: Maplewood, Minnesota
Trailer: 2021 Escape 21NE
Posts: 239
|
Quote:
Originally Posted by sameo416
Based on a number of comments on here and fb suggesting a close look at the electrical panel, added that inspection to my winterization work. 2021 5.0, have not opened the cover previously.
On initial quick look, two major issues. The main breaker wire was not inside the lug, rather jammed between the screw head and the body of the breaker. We have been fortunate for two summers, as that is a classic series arc or high resistance connection. The screw was fully down and tight, so this wasn't a loose and slipped out situation.
Attachment 65041
Looking further, I noted a dual 15 amp breaker Eaton BR type with two conductors under each lug. BR breakers are not rated for more than one conductor. (second from the bottom in the photo)
Second, two DC wires were caught under the cover when it was tightened. One wire flattened, the other crushed to the point the insulation split.
Attachment 65042
On the DC side found one wire that broke off at the clamp (looked like it was over cut when stripped) and a second that had a number of strands bent back.
Attachment 65043
While I've been generally positive about the electrical installation quality of everything I've seen and worked on, this led me to swear out loud. The 30 amp lead outside the breaker lug is about as awful installation practice as you can get. Picking up a few code violations and poor practices means I'll be looking further tomorrow.
So, thanks to all who posted advice about inspecting your electrics. I spent today re-working those problems, and I'll convert the breakers to single leads tomorrow.
I did electrical forensics for about 6 years, and each of those faults are ones I've seen lead to significant failure.
For those who aren't as comfortable with the electrical side, this sort of inspection could be done by any RV tech or electrician. |
I was checking the WFCO power center in our 21 NE again this evening. I have done remediation on a number of electrical installations in our new trailer. Shortly after delivery, I added a busbar, which should have been done at the time of installation of the power center. From the Operator's Manual for the WF-8900LiS Series, which includes the 8955 installed our trailer:
As a last step, install a separate bus bar in a location behind the converter. This bus bar can be purchased from a local home center or hardware store. For the WF-8935LiS/8945LiS/8955LiS, run an 8 AWG wire from the NEG- lug on the top left of the DC fuse board to this bus bar. For the WF-8965LiS/8975LiS, run a 6 AWG wire. Connect the battery negative wire to this bus bar along with all the negative DC load wires. Also, run a wire from the bus bar to chassis ground.
See the "before and after photos".
From the Escape website:
Warranty
Proper maintenance will help avoid situations where the Manufacturers Limited Two-Year Warranty will not cover items due to neglect.
Would the term "neglect" apply to the manufacturer's work or to the work that is done on behalf of, or by the unwitting purchaser, to remediate the defects in manufacturing?
|
|
|
|
|
10-03-2022, 06:44 AM
|
#9
|
|
Senior Member
Join Date: Jun 2020
Location: St. Louis, Missouri
Trailer: "Side Effect" 2022 21C
Posts: 1,374
|
Yikes!
|
|
|
|
|
10-03-2022, 09:44 AM
|
#10
|
|
Member
Join Date: Aug 2020
Location: Edmonton, Alberta
Trailer: 2021 5.0TA
Posts: 97
|
I came across that note in the WFCO manual as well. I’d previously found that ground stud on the panel holding 10 or more ground leads, but the bolt had not been tightened so the whole mess was loose. I’ll be adding a bus bar this week too.
The warranty question bothered me too. If Escape fails to follow manufacturer’s advice, and there’s a problem, the manufacturer could decline coverage.
The other one I wasn’t impressed with was placing the main system fuse right at the battery terminal. Those types of fuses are not meant to be load bearing, and should be in a fuse holder. I corrected that when I added a shunt. Recently saw the new solar Escape is installing and it looks very close to what I designed, so they’re picking up their game somewhat.
|
|
|
|
|
10-03-2022, 09:53 AM
|
#11
|
|
Member
Join Date: Aug 2020
Location: Edmonton, Alberta
Trailer: 2021 5.0TA
Posts: 97
|
Thanks, I’ll take a look at ferrules. The neutral is a bit of a mess for sure. I’m not a fan of stranded conductors. .
I was planning on pig tailing the breakers, but thought I’ll look for the Eaton CH type which is rated for two conductors.
|
|
|
|
|
10-03-2022, 10:22 AM
|
#12
|
|
Senior Member
Join Date: Feb 2010
Location: Oswego, New York
Trailer: 2017 Escape 21C, 2018 Ford F150
Posts: 5,373
|
Quote:
Originally Posted by sameo416
I came across that note in the WFCO manual as well. Id previously found that ground stud on the panel holding 10 or more ground leads, but the bolt had not been tightened so the whole mess was loose. Ill be adding a bus bar this week too.
The warranty question bothered me too. If Escape fails to follow manufacturers advice, and theres a problem, the manufacturer could decline coverage.
The other one I wasnt impressed with was placing the main system fuse right at the battery terminal. Those types of fuses are not meant to be load bearing, and should be in a fuse holder. I corrected that when I added a shunt. Recently saw the new solar Escape is installing and it looks very close to what I designed, so theyre picking up their game somewhat.
|
While it isn't a main fuse (it is for the inverter), it is poor workmanship. I had 2 200 amp fuses (same placement) fail in my 2017 21C due to flexing(the element mechanically broken, not opened due to over current). I also replaced it with an external fuse holder.
|
|
|
|
|
10-03-2022, 11:37 AM
|
#13
|
|
Member
Join Date: Oct 2017
Location: Springfield, Virginia
Trailer: Escape 19 (July 2018) pulled by F-150 (3.5 ecoboost)
Posts: 81
|
Quote:
Originally Posted by sameo416
For those who aren't as comfortable with the electrical side, this sort of inspection could be done by any RV tech or electrician.
|
For those of us who are comfortable but not knowledgeable (yes, this is a dangerous combination), I would be interested in learning how make proper connections and identify those that are not (at least on the 12v side). From reading this Forum it seems that many electrical mysteries are eventually traced to poor or failing connections. Is there a resource or two that presents proper technique and hardware?
__________________
----
John
|
|
|
|
|
10-03-2022, 12:38 PM
|
#14
|
|
Senior Member
Join Date: Jan 2014
Location: North Van., British Columbia
Trailer: 2014 Escape 19, sold; 2019 Escape 21, Sept. 2019
Posts: 8,810
|
These days probably watching a Youtube video or two would be a good start. I did notice one that said it was a Beginners guide to 12 volt wiring. Although I'd never take information from one video as being absolutely correct. There seem to be a lot of folks making videos without the full technical skills to back it up. But watch several and it becomes obvious who doesn't know their stuff.
I remember when I was in Grade 8 we had a small hand book that showed things like doing a Western Union splice etc. Every time that I do one or related splices I remember that book. Even at that age there was some pride in doing neat work.
I have to say that I had the good fortune to grow you being able to watch a variety of skilled technical people do various things. Despite all the resources available I don't think that anything beats having a skilled mentor show you not only how to do the technical aspect but also the hand-eye ordination required to take needle nose pliers etc. and bend, twist and place the wire behind a terminal. Loved learning skills like that from a skilled person. Made the hair on the back of my neck stand up.
Ron
|
|
|
|
|
10-03-2022, 01:56 PM
|
#15
|
|
Senior Member
Join Date: Jul 2021
Location: 50 miles S of Atlanta, Georgia
Trailer: 2008 BigfootRV 25B21RB
Posts: 289
|
Quote:
Originally Posted by sameo416
Thanks, I’ll take a look at ferrules. The neutral is a bit of a mess for sure. I’m not a fan of stranded conductors. .
I was planning on pig tailing the breakers, but thought I’ll look for the Eaton CH type which is rated for two conductors.
|
The Eaton CH breakers are the old Crouse-Hind design and they will not fit in that panel due to the design of the stab connection or the hook at the bottom of them.
The Eaton BR breakers are the old Bryant design and they are generally interchangeable with Siemens, GE, Square D Homeline (which is designed and approved for two wires), and a few others. Code says you can use whatever the manufacturer approves. Major panelboard manufacturers of course only approve their own breakers, however companies such as WFCO, Parallax, and Progressive Industries don't make breakers so they will list the approved breaker brands and series.
I cannot copy it but here is an example of the approved breakers from a WFCO Distribution center manual. Go to page 6 to find the list.
https://wfcoelectronics.com/wp-conte...-Manual-RP.pdf
You should be able to find the manual for your panel on the WFCO website.
Crimpers for the ferrules are found on Amazon and will come with ferrules that have insulated sleeves that in some cases prevent proper installation in a terminal. I ended up buying plain ferrules from https://www.ferrulesdirect.com/ who also has crimpers, but rather expensive ones. You can select the length of the ferrule along with the diameter. For the Buss bar, I used 15mm so as to have some sticking out.
Charles
__________________
'03 Ram 2500 CTD, 5.9HO PacBrake six speed std cab long bed Leer top and 2008 Bigfoot 25B21RB.. Previously, 2008 Thor Freedom Spirit 180, SOLD! 2007 Winnebago View 23H Motorhome, SOLD!
|
|
|
|
|
10-03-2022, 02:01 PM
|
#16
|
|
Member
Join Date: Aug 2020
Location: Edmonton, Alberta
Trailer: 2021 5.0TA
Posts: 97
|
Quote:
Originally Posted by 2Travelers
For those of us who are comfortable but not knowledgeable (yes, this is a dangerous combination), I would be interested in learning how make proper connections and identify those that are not (at least on the 12v side). From reading this Forum it seems that many electrical mysteries are eventually traced to poor or failing connections. Is there a resource or two that presents proper technique and hardware?
|
Its a good question. As I was posting on fb was thinking, Now how to answer the people who arent sure how to take the cover off the panel safely?
Its hard to do well without some background or that experienced person to show you how to use needlenose pliers to bend a wire into the terminal, and the appropriate profanity to use when it slips.
There are few resources out there apart from the solar self-help books and websites, but as noted the quality of these can vary a lot. Ive watched YouTube videos where self-taught are explaining things incorrectly. One resource that is excellent is Mike Sokol, who is an engineer and electrician. Hes written a good intro book on rv elec safety and has a collection of articles online: https://rvelectricity.com/. I really appreciate his writing.
There are a couple books out that look ok. One is a UK pub so some translation is required. Caravan Motorhome Electrics complete guide, author has good background. Other is Understanding Your RV's "BATTERY POWER": 12-Volt Electricity and Understanding Your RV's "SHORE POWER": 120-Volt Electricity. Authors background is avionics which is also promising. Ive not reviewed either.
|
|
|
|
|
10-03-2022, 02:04 PM
|
#17
|
|
Senior Member
Join Date: Jul 2021
Location: 50 miles S of Atlanta, Georgia
Trailer: 2008 BigfootRV 25B21RB
Posts: 289
|
When I removed the old hard wired shore cord, I converted it to an extension cord by adding a female tt30 end. Here are pics of that, and you need to use ferrules with fine stranded cord.
Yes, that is a cat in the background of the first pic.
Charles
__________________
'03 Ram 2500 CTD, 5.9HO PacBrake six speed std cab long bed Leer top and 2008 Bigfoot 25B21RB.. Previously, 2008 Thor Freedom Spirit 180, SOLD! 2007 Winnebago View 23H Motorhome, SOLD!
|
|
|
|
|
10-03-2022, 02:04 PM
|
#18
|
|
Member
Join Date: Aug 2020
Location: Edmonton, Alberta
Trailer: 2021 5.0TA
Posts: 97
|
Thanks. Just realized the issue with CH breakers, so picked up another BR. And was just going to ask about ferrule suppliers, so thanks again.
I’m really cautious about discount electrical supplies on Amazon as there is a fair amount of junk being sold there.
|
|
|
|
|
10-03-2022, 03:32 PM
|
#19
|
|
Senior Member
Join Date: Oct 2015
Location: Kent, Ohio
Trailer: 2017 21c Sold, 2023 Bigfoot 25RQ
Posts: 1,393
|
After 4 years and before I sold my 21 c I did some upgrades and wiring improvements for the wfco. I replaced the converter with A progressive dynamics wildcat kit, added a sub panel and inverter and got all the circuits on their own breakers. I also found early on poor crimping on the battery cable that vibrated off after a few months. I also added a solar cut off switch using ferrules to be able to disconnect the panels safely from the solar charger. The wiring was minimally competent.
|
|
|
|
|
10-03-2022, 06:03 PM
|
#20
|
|
Member
Join Date: Oct 2017
Location: Springfield, Virginia
Trailer: Escape 19 (July 2018) pulled by F-150 (3.5 ecoboost)
Posts: 81
|
Thank you for the recommended resources and approach to learning proper technique. In my first couple years I spent a fair deal of time reading the " 12v Side of Life" which helped me to sort out what did what, how to decide what to use when, and to recognize when I had a problem. I am a bit late to the game but I do want to learn how to play well and have fun.
__________________
----
John
|
|
|
|
|
|
 Posting Rules
|
You may not post new threads
You may not post replies
You may not post attachments
You may not edit your posts
HTML code is Off
|
|
|
|
 » Recent Discussions
 |
|
|
|
|
|
|
|
|
|
|
|
|
|
|
|
|
|
|
|
|
|
|
|
|
|
|
|
|
|
|

|


 Linear Mode

