 |
|
 08-01-2022, 09:20 PM
|
#21
|
|
Senior Member
Join Date: Jan 2014
Location: North Van., British Columbia
Trailer: 2014 Escape 19, sold; 2019 Escape 21, Sept. 2019
Posts: 8,810
|
Yes, there's a time and place for wet sanding but usually that's if the damage has created scratches that need to be blended in.
Ron
|

|

|
|
08-01-2022, 09:29 PM
|
#22
|
|
Site Team
Join Date: Dec 2017
Location: Mid Left Coast, California
Trailer: 2014 Escape 21
Posts: 5,155
|
yeah... the gel coat is NOT super thick, and if you remove it, the ugly rough fiberglass surface will start to show through. a coarse heavy cut 'cleaner' is like 2000 or 3000 grit, a fine cut cleaner is quite a bit finer than that. the other thing about the cleaner compounds, they are designed to break down quite fast with rubbing, so you only get the full cut on the first application and as you rub them in they get finer and finer.
|
|
|
|
|
08-01-2022, 10:06 PM
|
#23
|
|
Member
Join Date: Jun 2017
Location: Central valley, California
Trailer: 2021 Escape 5.0
Posts: 89
|
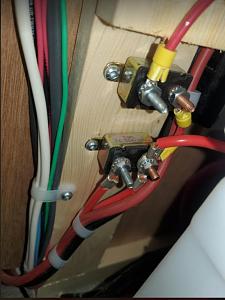
Quote:
Originally Posted by hugh

My picture is under the passenger side dinette bench, on a 21C with the "basic" (not U-shaped) dinette. There's a set of connections / thermal breakers behind the battery right where the wires disappear to cross to the other bench seat. Not sure I would have noticed it, had i not removed the factory installed battery and battery box.
Here's an uncropped version of the same pic, which shows the location a little better.
|
And the crimper divot is on the wrong side as well. It needs to be in the back, opposite of where the wire connector is split.
|
|
|
|
|
08-01-2022, 10:52 PM
|
#24
|
|
Senior Member
Join Date: Jan 2014
Location: North Van., British Columbia
Trailer: 2014 Escape 19, sold; 2019 Escape 21, Sept. 2019
Posts: 8,810
|
Quote:
Originally Posted by John in Santa Cruz
yeah... the gel coat is NOT super thick, and if you remove it,
|
Definitely requires a very cautious patient approach.
My first attempt at similar situations is to use this super hi-tech approach that my body came equipped with. Sometimes I wet the item with soap and then use my fingernail to skritch away at it.  Depends on the substance but it can work very well sometimes.
Ron
|
|
|
|
|
08-01-2022, 11:34 PM
|
#25
|
|
Senior Member
Join Date: Oct 2008
Location: North Vancouver, British Columbia
Trailer: 2009 Escape 17B 2020 Toyota Highlander XLE
Posts: 17,136
|
I wouldn't do anything except send a photo and description to ETI, and then wait for a response. Anything you do to remedy the situation could make it worse and form an excuse for ETI to do nothing.
__________________
What happens to the hole when the cheese is gone?
- Bertolt Brecht
|
|
|
|
|
08-01-2022, 11:45 PM
|
#26
|
|
Site Team
Join Date: Dec 2017
Location: Mid Left Coast, California
Trailer: 2014 Escape 21
Posts: 5,155
|
meh. if there's enough wire to spare (you probably need maybe 1/2" of slack), snip it off, trim it properly, crimp it properly onto the correct sized ring terminal, bolt it down, and move on. true, you need a suitable size crimper, and those usual red/blue/yellow stripper-crimpers will NOT do any wires over 10 gauge properly (guessing this is AWG 8 wire?). I have a crimper here that does 8, 6, 4, 2, 1, and 1/0 gauges quite nicely. you can strip big wires with a box cutter or xacto knife if you're careful, just cut around the insulation without cutting any strands, then remove the 'tube' with needlenose pliers.
these are cheap tools but have cut and crimped many heavy gauge battery cables for me quite effectively.
https://www.amazon.com/gp/product/B00MVE48Z6
|
|
|
|
|
08-03-2022, 06:09 PM
|
#27
|
|
Senior Member
Join Date: Jun 2020
Location: St. Louis, Missouri
Trailer: "Side Effect" 2022 21C
Posts: 1,374
|
Since our 21C will be ready in October I mentioned the cut strands and loose connectors to Escape. Samuel had one of the electricians do a spot check on the floor. This is what he sent back.
|
|
|
|
|
08-03-2022, 08:10 PM
|
#28
|
|
Senior Member
Join Date: Mar 2016
Location: Burlington Twp., New Jersey
Trailer: 2010 Escape 19
Posts: 7,146
|
Quote:
Originally Posted by hugh
What I'd _really_ like to hear back from them is how best to clean/fix my shower wall. The propane tank cover was stored in the bathroom during transport and ground a bunch of black dirt into the wall. (why they "packed" the cover in there without at least some padding, I'll never know)
|
How about a Mr. Clean Magic Eraser?
|
|
|
|
|
08-03-2022, 11:36 PM
|
#29
|
|
Senior Member
Join Date: Mar 2021
Location: Richmond, Virginia
Trailer: 2022 Escape 21C
Posts: 269
|
Quote:
Originally Posted by WillyB
Since our 21C will be ready in October I mentioned the cut strands and loose connectors to Escape. Samuel had one of the electricians do a spot check on the floor. This is what he sent back.
|
That looks a lot better. Mine must have been made on a Friday.
|
|
|
|
|
08-03-2022, 11:45 PM
|
#30
|
|
Senior Member
Join Date: Mar 2021
Location: Richmond, Virginia
Trailer: 2022 Escape 21C
Posts: 269
|
Quote:
Originally Posted by John in Santa Cruz
meh. if there's enough wire to spare (you probably need maybe 1/2" of slack), snip it off, trim it properly, crimp it properly onto the correct sized ring terminal, bolt it down, and move on. true, you need a suitable size crimper, and those usual red/blue/yellow stripper-crimpers will NOT do any wires over 10 gauge properly (guessing this is AWG 8 wire?). I have a crimper here that does 8, 6, 4, 2, 1, and 1/0 gauges quite nicely. you can strip big wires with a box cutter or xacto knife if you're careful, just cut around the insulation without cutting any strands, then remove the 'tube' with needlenose pliers.
these are cheap tools but have cut and crimped many heavy gauge battery cables for me quite effectively.
https://www.amazon.com/gp/product/B00MVE48Z6 |
Well, why repair, when you can just rip it all out and start over? (just kidding, of course) 
But in this case, I actually did remove those wires and breakers as part of some re-work for my lithium / inverter installation. That short 12v wire is in my scrap pile, as I needed a slightly longer one in the new arrangement.
|
|
|
|
|
08-04-2022, 06:44 PM
|
#31
|
|
Senior Member
Join Date: Mar 2021
Location: Richmond, Virginia
Trailer: 2022 Escape 21C
Posts: 269
|
So I heard back from Escape today on the bathroom wall "cleaning". They recommended using acetone to remove the mark, so I'll probably give that a try.
|
|
|
|
|
08-08-2022, 01:23 PM
|
#32
|
|
Senior Member
Join Date: Jul 2015
Location: Mike in Puget Sound, Washington
Trailer: Escape 21 & Jeep GC 5.7 (Previous 2012 Casita FD17 & 2010 Audi Q5)
Posts: 236
|
Quote:
Originally Posted by hugh
So I heard back from Escape today on the bathroom wall "cleaning". They recommended using acetone to remove the mark, so I'll probably give that a try.
|
Years back when we drafted with ink-on-mylar, I ordered acetone from a drafting supplies salesman who would come by the office. We used the acetone to remove the textured surface (tooth) from the mylar film.
When he delivered the order, I saw that he had stopped by the local hardware and picked up a can of acetone. I commented on this and he said it wasn't something they stocked, but he picked it up to provide us the service.
The interesting part to me was that he ran major fireworks displays as a sideline, the kind where they shoot the high aerial displays off of barges, etc. He commented that he was never so nervous transporting the pyrotechnical materials as he was just driving down the street to our office with the acetone in his car.
Personally, in order to remove the rub marks from the propane cover on the fiberglass gel coat, I would try a Mr. Clean magic eraser first, or perhaps a soft white drafting eraser as I would have no use for the extra acetone and it is pretty volatile stuff to keep around.

I use the white eraser to remove scuffs and marks on Behr interior paint and it works really well, so maybe it would do the trick here.
__________________
You must learn from other peoples mistakes. You cant possibly live long enough to make them all yourself. - Sam Levenson
|
|
|
|
|
08-08-2022, 01:53 PM
|
#33
|
|
Senior Member
Join Date: Jul 2015
Location: Mike in Puget Sound, Washington
Trailer: Escape 21 & Jeep GC 5.7 (Previous 2012 Casita FD17 & 2010 Audi Q5)
Posts: 236
|
Quote:
Originally Posted by Jwinfrey
And the crimper divot is on the wrong side as well. It needs to be in the back, opposite of where the wire connector is split.
|
Crimping with the dimple on the split side of the connector can definitely cause a failure. It can result in broken conductor strands, or even allow the wire to slip completely out of the connector; ask me how I know! 
I suspect that Steve Dunham would be rolling in his grave if he saw the pictures on this thread. Hopefully he's finding something better to do, maybe chasing the elusive lunkers up in Canada.
__________________
You must learn from other peoples mistakes. You cant possibly live long enough to make them all yourself. - Sam Levenson
|
|
|
|
|
08-08-2022, 02:30 PM
|
#34
|
|
Senior Member
Join Date: Mar 2016
Location: Burlington Twp., New Jersey
Trailer: 2010 Escape 19
Posts: 7,146
|
Quote:
Originally Posted by Civilguy
Personally, in order to remove the rub marks from the propane cover on the fiberglass gel coat, I would try a Mr. Clean magic eraser first, or perhaps a soft white drafting eraser as I would have no use for the extra acetone and it is pretty volatile stuff to keep around.
|
I suggested the same a few posts ago. I would try that or a fiberglass-specific cleaner. It is interesting to note that West Marine specifically states to never use acetone on gel coat. I'd at least try a few other things before resorting to acetone.
|
|
|
|
|
08-08-2022, 04:59 PM
|
#35
|
|
Senior Member
Join Date: Jul 2015
Location: Mike in Puget Sound, Washington
Trailer: Escape 21 & Jeep GC 5.7 (Previous 2012 Casita FD17 & 2010 Audi Q5)
Posts: 236
|
Quote:
Originally Posted by rubicon327
I suggested the same a few posts ago.
|
Hey, me too! 
Quote:
Originally Posted by rubicon327
I'd at least try a few other things before resorting to acetone.
|
I used mineral spirits in the 80's to clean up the bugs and road tar off the enamel on a mid-70's Plymouth. It was so much faster than bug and tar remover, and it was so much more economical too! Then the damage to the paint emerged, over time... 
So, yeah, maybe try a mild cleaner or something specifically intended for use on fiberglass before hauling out the big guns and doing some unintended damage to the gel coat.
__________________
You must learn from other peoples mistakes. You cant possibly live long enough to make them all yourself. - Sam Levenson
|
|
|
|
|
08-08-2022, 07:43 PM
|
#36
|
|
Senior Member
Join Date: Mar 2021
Location: Richmond, Virginia
Trailer: 2022 Escape 21C
Posts: 269
|
Thanks for the suggestions everyone. As it turns out, I already had a can of acetone sitting around (for solvent welding ABS), so I gave it a try.
It did a good job removing the black scuff mark, and as far as I can tell, hasn't dissolved / damaged any other part of the gel-coat. I do have a "matte" area from the original abrasion that could use some polishing, but that's not surprising.
Now I'm onto fixing the "carpentry" for the convection oven. The oven came loose because half the trim-plate screws weren't actually screwed into anything.
|
|
|
|
|
08-08-2022, 07:49 PM
|
#37
|
|
Senior Member
Join Date: May 2020
Location: Overbrook, Kansas
Trailer: 2021 E19 (Padawan)
Posts: 1,978
|
Acetone will clean gelcoat, but rinse it well with water after. Its a last resort cleaner for gelcoat.
__________________
Randy & Barb
1998 C 2500 (Cruncher) and 2021 Ranger (Yoda)
|
|
|
|
|
08-08-2022, 07:52 PM
|
#38
|
|
Site Team
Join Date: Dec 2017
Location: Mid Left Coast, California
Trailer: 2014 Escape 21
Posts: 5,155
|
Quote:
Originally Posted by brroberts
Acetone will clean gelcoat, but rinse it well with water after. Its a last resort cleaner for gelcoat.
|
it evaporates so fast there's little point in rinsing it.
|
|
|
|
|
08-08-2022, 08:03 PM
|
#39
|
|
Senior Member
Join Date: Mar 2017
Location: Tacoma, Washington
Trailer: 2021 21NE
Posts: 474
|
A quality fiberglass boat manufacturer told me acetone harms gelcoat. They said use only as a last resort and rinse with lots of water or use alcohol.
|
|
|
|
|
08-09-2022, 12:13 PM
|
#40
|
|
Senior Member
Join Date: Jul 2022
Location: Silicon Valley, California
Trailer: 2023 Escape 21C
Posts: 141
|
I'm late to this discussion, but 'll play the role of hypothetical apologist.
Quote:
Originally Posted by hugh
It could be worse, but I came across this connection in my new 21C. This is the ring terminal on the main battery feed.
This one connection seems to show just about everything you can do wrong when crimping a connector: cutting/damaging strands, leaving strands outside the crimp, and removing too much insulation.
|
I have a comparatively innocent explanation for this. I've seen this frequently in mountain-top ham and other two-way radio repeater systems I've worked on.
That explanation might be: "supply chain"
When you don't have the right sized lug for the wire you're terminating, you can often fit the wire into the next smaller lug by leaving out a few strands. Having a slightly smaller wire gage for a millimeter or less will not affect the resistance or electrical performance of the connection in a significant way (at least for the short term).
Doing this is ugly, it makes a more fragile connection, and probably violates some code somewhere. But it gets the product out the door when the absence of a financially insignificant part delays completion and delivery of a major product.
Quote:
Originally Posted by hugh
If it was me, I'd at least have thrown some heat shrink on there to hide it. |
OTOH, one could argue that it's more dishonest to hide such flaws.
For the record, I'd be disappointed if I saw this on my trailer.
__________________
Inhabiting "Peregination", an E21C. Take a micro-vacation with nature sounds!
--... ...--
ad·ven·ture: (noun) An endeavor in which more than half of the fun is in telling the tale afterwards.
|
|
|
|
|
|
 Posting Rules
|
You may not post new threads
You may not post replies
You may not post attachments
You may not edit your posts
HTML code is Off
|
|
|
|
 » Recent Discussions
 |
|
|
|
|
|
|
|
|
|
|
|
|
|
|
|
|
|
|
|
|
|
|
|
|
|
|
|
|
|
|

|


 Linear Mode

