 |
|
 12-23-2017, 09:28 AM
|
#1
|
|
Member
Join Date: Jun 2016
Location: Kelowna, British Columbia
Trailer: 2010 19'
Posts: 27
|
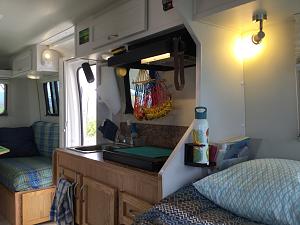
2010 19 Decor Updates and Painting
For anyone whos considering painting their interior or other updates, thought we would share our experience....
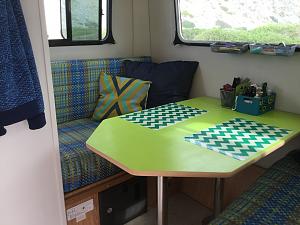
We love our 2010 19 Escape and spend a significant part of the year in it, primarily winters in Baja. But we never felt really at home with its decor. The trailer was bought used and the original owners had went with the standard finishes, which are functional and coordinate nicely. However, no disrespect to Escape, its just not my personal taste.
The main thing was the oak cabinetry. Never been a fan of golden-coloured wood and I feel it makes the space feel more closed-in than it needs to. So we painted all the uppers and the bathroom-to-refrigerator side a cream to match the vinyl ceiling and walls.
It was a lot of work! We sanded all the wood, then did two coats of cabinet primer, followed by three coats of high-quality kitchen cabinet semi-gloss paint. I LOVE how much it brightens the space! Weve now been living with it for almost three months and it seems to be holding up well. It takes being scrubbed to wash off any dirt and the only part thats peeled is a small section of the floor moulding. We might tackle the lower cabinets next summer, or leave them as contrast.
Then we wanted to add some bright pops of colour. We found the lime/blue/brown plaid at Fabricland and decided to just create slip-covers for the upholstered seating rather than having them professionally recovered. We also like to sit higher to see out of the windows so we cut and added 4 styrofoam to the base of the seats. Happy with the results, but its clear the drapery fabric I chose is not heavy duty enough for seating...its already pilling quite heavily and will likely only last this season. But now we know what we like and can invest in better quality fabric and professional sewing next year.
With the table we considered getting a new piece of laminate, but I didnt really want to choose another pattern to compete with the fabric and kitchen countertop...I just wanted a solid pop colour. So instead thought wed just try painting over the current laminate, and so far its working great! I know bright lime is not to everyones taste but it works for us. We peeled off the trim, sanded the laminate, painted two coats of cabinet primer, sprayed on several coats of lime Rustoleum, and finished with several coats of clear varnish and re-installed the trim (after sanding off most of its faux wood look).
Our older model fridge had the oak panelling on it, and we decided to cover it with faux chrome diamond plate to add some shine. Its a product called Fascade - they also make faux pressed tin ceiling panels - and we had some leftover from a home reno project. Its thin plastic and just needs to be installed with industrial adhesive. Added it to the cabinets above and below to balance the look.
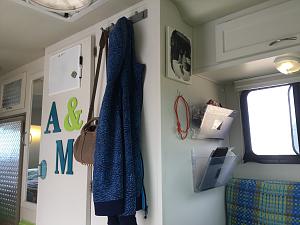
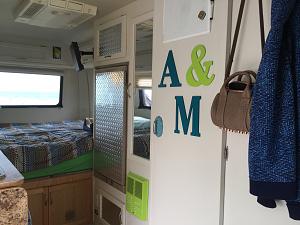
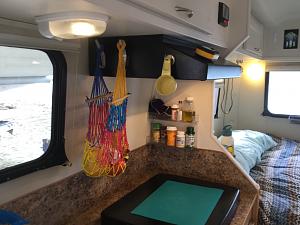
The other thing that we needed to tackle was organization. Extra hooks, plastic file holders, a few boxes adhered to the table with museum putty, a spice rack, and everything that we reach for on a daily basis is close at hand. A whiteboard on the bathroom door makes it easy to create shopping lists or reminders. And some wall art and pillows in matching colours completes the look!
|

|

|
|
12-23-2017, 09:38 AM
|
#2
|
|
Senior Member
Join Date: Oct 2012
Location: Bellingham and Glacier, Washington
Trailer: 2013 Escape 15A
Posts: 2,052
|
WOW...nice job!
__________________
Karen Hulford
2013 Escape 15A, "Egbert"
'93 Ford 150 XLT or
'22 GMC Acadia Denali
|
|
|
|
|
12-23-2017, 10:17 AM
|
#3
|
|
Senior Member
Join Date: May 2013
Location: ..., New Mexico
Trailer: 2013 Esc19/'14 Silvrado
Posts: 4,193
|
I share your thoughts and opinion about the oak look and have given much thought to doing something about it. Finally decided it was too big a job for me to tackle and I dropped the idea. Decided it was too much masking, too much risk it would peel or wear off when cleaned, too much of a chance I would create errors that would drive me nuts, or that I would later hate the new look but would be stuck with it, etc. Now I see what you have done and I'm blown away.
 
__________________
Myron
"A billion here, a billion there...add it all up and before you know it you're talking real money." Everett Dirkson
|
|
|
|
|
12-23-2017, 10:18 AM
|
#4
|
|
Senior Member
Join Date: Oct 2013
Location: Phoenix, Arizona
Trailer: 2015 Escape 19 "Seventy Degrees"
Posts: 3,495
|
Very nice work! I used the cabinet paint process on kitchen cabinets in a condo I redid 2years ago and they have held up very well. I think you’ll be pleased with the durability.
|
|
|
|
|
12-23-2017, 10:44 AM
|
#5
|
|
Member
Join Date: Jun 2016
Location: Kelowna, British Columbia
Trailer: 2010 19'
Posts: 27
|
Quote:
Originally Posted by MyronL

I share your thoughts and opinion about the oak look and have given much thought to doing something about it. Finally decided it was too big a job for me to tackle and I dropped the idea. Decided it was too much masking, too much risk it would peel or wear off when cleaned, too much of a chance I would create errors that would drive me nuts, or that I would later hate the new look but would be stuck with it, etc. Now I see what you have done and I'm blown away.
|
Thanks MyronL! Yes, it was a big job but very much worth it. Of course it helps that the hubby is retired and has a garage so time & space werent issues. We took off the doors and did them in the garage on a table assembly-line style, and then with the doors gone all the walls were smooth and easy to do.
It really wasnt too much masking, really only around the blind tops and floor. Along the ceiling and walls, we just used a 6-inch plastic drywall knife tucked between the beading and the vinyl.
Of course theres also the option of getting a professional painter to do it if cost isnt a factor! :-)
|
|
|
|
|
12-23-2017, 01:39 PM
|
#6
|
|
Senior Member
Join Date: Nov 2010
Location: Denison, Texas
Trailer: 2015 21'; 2011 19' sold; 4Runner; ph ninezero3 327-27ninefour
Posts: 5,136
|
Love the lime table!
__________________
Cathy. Floating Cloud
"Live in the sunshine, swim the sea, drink the wild air.... "
Emerson
|
|
|
|
|
12-23-2017, 02:06 PM
|
#7
|
|
Senior Member
Join Date: Sep 2013
Location: Ventura County, California
Trailer: 2013 19 Escape
Posts: 7,204
|
Really opened up your trailer ! Very cool ! Pat
|
|
|
|
|
12-23-2017, 02:07 PM
|
#8
|
|
Senior Member
Join Date: Mar 2016
Location: Burlington Twp., New Jersey
Trailer: 2010 Escape 19
Posts: 7,146
|
That looks fantastic. Nice work.
Just out of curiosity how does your bathroom door latch and operate with that type of handle?
|
|
|
|
|
12-23-2017, 05:33 PM
|
#9
|
|
Senior Member
Join Date: Nov 2015
Location: Abbotsford, British Columbia
Trailer: 2011 19'
Posts: 223
|
Wow! Very nice transformation. We also put 4 inches of foam on the benches and made a couple of small 4 inch high boxes decorated with sticky carpet tiles, to put our feet on as they wouldn't touch the floor without them. Like you, we got some fabric at Fabricland and wrapped the foam and the bench as one unit. (We didn't cover the bench back). We only used big safety pins to attach the fabric. They are not visible and after one season of use, worked very well. We may go look for a different fabric this year and do the back as well, now that we know it can be done.
|
|
|
|
|
12-23-2017, 06:22 PM
|
#10
|
|
Member
Join Date: Jun 2016
Location: Kelowna, British Columbia
Trailer: 2010 19'
Posts: 27
|
Quote:
Originally Posted by rubicon327
That looks fantastic. Nice work.
Just out of curiosity how does your bathroom door latch and operate with that type of handle?
|
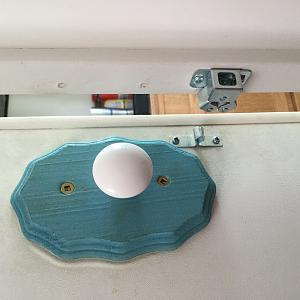
Thank you! Funny you noticed that....that was an oops! As I was taking the door latch apart in prep for painting, my husband warned me Make sure you keep all the parts and remember how they all fit. Of course that didnt happen and I broke some parts trying to re-install it. So we just got two plaques of wood from a hobby store and handles to cover the holes from the orginal latch, and then installed a - forget the name of it...the same ones that close the cupboard doors - those two little wheels and tension mount. Here is a picture from the inside. It doesnt lock anymore but with just the two of us, who worries about locking!?!?
|
|
|
|
|
12-23-2017, 06:26 PM
|
#11
|
|
Senior Member
Join Date: May 2015
Location: Seatac, Washington
Trailer: "The Trailer", 2nd Gen 21' & a 2017 Tundra CrewMax in Blazing Blue Pearl
Posts: 2,888
|
Quote:
Originally Posted by BajaZephyr
(snip) We also like to sit higher to see out of the windows so we cut and added 4 styrofoam to the base of the seats.
(snip) I know bright lime is not to everyones taste but it works for us.
(snip) a few boxes adhered to the table with museum putty,
|
Styrofoam? Doesn't that make an awful lot of noise? Like sitting on a foam cooler? I'm assuming you mean cushion foam. 
Nope, I would not pick lime green in a million (okay, bazillion) years, but it is very eye catching and looks great with your fabric. (course many wouldn't pick the purple that I did for our fabric.) 
Do be careful with the Museum Putty (aka Quake Hold). I've used it for years with my animal figurines (used to sell it through a business I had many years ago). Over time it can create an oily finish on either/both surfaces. I've had it happen with both the white putty and the clear gel. I don't use it any longer.
If you're wanting to keep things in place while in transit, maybe that rubbery stuff you put under rugs would work for you. You know, the stuff with padding and openings in it? Yeah, that stuff. A friend uses that under stuff on her table in her motorhome and it keeps everything in place while she's driving. Me, I just shove stuff on either the bed or in cabinets.
Love what you did with the trailer. And how you painted the furnace cover.
Next up - change the formica? 
Thanks for sharing. 
|
|
|
|
|
12-23-2017, 06:26 PM
|
#12
|
|
Member
Join Date: Jun 2016
Location: Kelowna, British Columbia
Trailer: 2010 19'
Posts: 27
|
Quote:
Originally Posted by Old Fulica
Wow! Very nice transformation. We also put 4 inches of foam on the benches and made a couple of small 4 inch high boxes decorated with sticky carpet tiles, to put our feet on as they wouldn't touch the floor without them. Like you, we got some fabric at Fabricland and wrapped the foam and the bench as one unit. (We didn't cover the bench back). We only used big safety pins to attach the fabric. They are not visible and after one season of use, worked very well. We may go look for a different fabric this year and do the back as well, now that we know it can be done.
|
Cool - interesting to hear how you did this too! Smart idea about the safety pins! We just used some thin rope to pull the fabric taut in the back.
|
|
|
|
|
12-23-2017, 06:38 PM
|
#13
|
|
Member
Join Date: Jun 2016
Location: Kelowna, British Columbia
Trailer: 2010 19'
Posts: 27
|
Quote:
Originally Posted by NW Cat Owner
Styrofoam? Doesn't that make an awful lot of noise? Like sitting on a foam cooler? I'm assuming you mean cushion foam.
Nope, I would not pick lime green in a million (okay, bazillion) years, but it is very eye catching and looks great with your fabric. (course many wouldn't pick the purple that I did for our fabric.)
Do be careful with the Museum Putty (aka Quake Hold). I've used it for years with my animal figurines (used to sell it through a business I had many years ago). Over time it can create an oily finish on either/both surfaces. I've had it happen with both the white putty and the clear gel. I don't use it any longer.
If you're wanting to keep things in place while in transit, maybe that rubbery stuff you put under rugs would work for you. You know, the stuff with padding and openings in it? Yeah, that stuff. A friend uses that under stuff on her table in her motorhome and it keeps everything in place while she's driving. Me, I just shove stuff on either the bed or in cabinets.
Love what you did with the trailer. And how you painted the furnace cover.
Next up - change the formica?
Thanks for sharing. |
Nope, really styrofoam. The kind used to insulate concrete walls, so very firm. Much cheaper than firm foam. But the original Escape cushions are on top, and the whole thing is wrapped with quilted fabric pulled taut underneath so there has been no noise or shifting at all!
Thanks for the tip about Musuem Putty...will keep monitoring it. I did read about the potential for staining in the instructions, but since neither the table finish or the boxes we are using are precious thought wed give it a go. We go over some very bumpy dirt roads in Baja so I dont think that foam underlay would stop everything from spilling all over the place! Youre right...we could just store it all properly away during transit, but I gotta say its so handy to just have all those little things close at hand without having to worry about packing/unpacking them...things like reading glasses, hand sanitizer, hairbrushes, nail clippers, lip balm, etc.
Purple - I love purple! And it goes great with lime green 
|
|
|
|
|
12-23-2017, 07:53 PM
|
#14
|
|
Senior Member
Join Date: May 2015
Location: Seatac, Washington
Trailer: "The Trailer", 2nd Gen 21' & a 2017 Tundra CrewMax in Blazing Blue Pearl
Posts: 2,888
|
Quote:
Originally Posted by BajaZephyr
Purple - I love purple! And it goes great with lime green |
I've used the combination in some cards I've made, but not really in the trailer. Although I know some of the pillow (and fleece blanket) fabric has lime green in it, so I guess that counts. This isn't all of the pillows as I made more after this was taken. And I just got through making napkins with the leftover fabric from the pillow covers. (Yeah, got a cat theme going in the trailer.)
|
|
|
|
|
12-24-2017, 07:56 PM
|
#15
|
|
Member
Join Date: Jun 2016
Location: Kelowna, British Columbia
Trailer: 2010 19'
Posts: 27
|
Quote:
Originally Posted by NW Cat Owner
I've used the combination in some cards I've made, but not really in the trailer. Although I know some of the pillow (and fleece blanket) fabric has lime green in it, so I guess that counts. This isn't all of the pillows as I made more after this was taken. And I just got through making napkins with the leftover fabric from the pillow covers. (Yeah, got a cat theme going in the trailer.) |
Love it! And love cats but hubby is allergic :-(
|
|
|
|
|
03-03-2018, 12:44 AM
|
#16
|
|
Member
Join Date: Apr 2017
Location: Seattle, Washington
Trailer: 2018 17B
Posts: 45
|
I love your white cabinetry! I like the contrast with the wood cabinetry on the bottom. It really opens your trailer up and makes it look very modern. Beautiful transformation!
|
|
|
|
|
03-03-2018, 08:22 AM
|
#17
|
|
Senior Member
Join Date: Mar 2013
Location: n/a, Texas
Trailer: Escape
Posts: 729
|
Great look for the cabinets. And a solid color table brightens the dining area. Congratulations on the courage to make the changes and to share the results! Question... How did you prep the stick on oak look material on the face of the cabinet?
|
|
|
|
|
12-03-2018, 09:00 AM
|
#18
|
|
Member
Join Date: Jun 2016
Location: Kelowna, British Columbia
Trailer: 2010 19'
Posts: 27
|
Quote:
Originally Posted by Viajante
Great look for the cabinets. And a solid color table brightens the dining area. Congratulations on the courage to make the changes and to share the results! Question... How did you prep the stick on oak look material on the face of the cabinet?
|
Hi there Viajante! Sorry I’m so late getting back to you...haven’t been on this forum forever! Not exactly sure what area you are referring to, but with all the walls/cabinetry/edges, we did the same thing - light sand, 2 coats of high quality primer, and 3 coats of cabinet paint. It’s all held up spendidly.
Only problem is now we are thinking of upgrading to a 5.0T and would have to do the whole thing over again! 
|
|
|
|
|
12-03-2018, 01:17 PM
|
#19
|
|
Senior Member
Join Date: Jun 2010
Location: Central, Pennsylvania
Trailer: Escape#5 2022 E19
Posts: 26,268
|
Quote:
Originally Posted by BajaZephyr
Hi there Viajante! Sorry Im so late getting back to you...havent been on this forum forever! Not exactly sure what area you are referring to, but with all the walls/cabinetry/edges, we did the same thing - light sand, 2 coats of high quality primer, and 3 coats of cabinet paint. Its all held up spendidly.
Only problem is now we are thinking of upgrading to a 5.0T and would have to do the whole thing over again! |
Well now that you have told us, you have to post pictures......
__________________
Jim
Sometime life gets in the way of living.......
|
|
|
|
|
12-03-2018, 01:23 PM
|
#20
|
|
Senior Member
Join Date: Oct 2008
Location: North Vancouver, British Columbia
Trailer: 2009 Escape 17B 2020 Toyota Highlander XLE
Posts: 17,136
|
Quote:
Originally Posted by cpaharley2008
Well now that you have told us, you have to post pictures......
|
Post #1 this thread??
__________________
What happens to the hole when the cheese is gone?
- Bertolt Brecht
|
|
|
|
|
|
 Posting Rules
|
You may not post new threads
You may not post replies
You may not post attachments
You may not edit your posts
HTML code is Off
|
|
|
|
 » Recent Discussions
 |
|
|
|
|
|
|
|
|
|
|
|
|
|
|
|
|
|
|
|
|
|
|
|
|
|
|
|
|
|
|

|


 Linear Mode

