 |
|
 04-03-2022, 07:08 PM
|
#1
|
|
Senior Member
Join Date: Jul 2015
Location: Mike in Puget Sound, Washington
Trailer: Escape 21 & Jeep GC 5.7 (Previous 2012 Casita FD17 & 2010 Audi Q5)
Posts: 236
|
Bulldog Collar-Lok versus Curt Sleeve-Lock Coupler
This is a Tale of Two Couplers. Or, maybe, three, depending on your perspective.
I recently purchased a Bulldog Part No. 028287 7,000# Collar-Lok low-profile latch coupler. When it arrived, I was underwhelmed. It was rusty, the locking mechanism was too stiff to operate by hand, and the casting had significant weld spatter on the interior surfaces which would bear on the tow ball.
I wrote an email briefly outlining my observations to the seller's customer service folks. After two business days, I had seen nothing. I checked my spam and junk folders, then resent my email with a note indicating that I had not seen a reply. There was no reply on the next day, Friday.
So, having looked at a couple of alternatives to the Bulldog, I ordered a Curt Model 25217 7,000# Sleeve-Lock, from a different vendor. I figured I would compare the quality of the two couplers and then return one of them.
__________________
You must learn from other peoples mistakes. You cant possibly live long enough to make them all yourself. - Sam Levenson
|

|

|
|
04-03-2022, 07:34 PM
|
#2
|
|
Senior Member
Join Date: Jul 2015
Location: Mike in Puget Sound, Washington
Trailer: Escape 21 & Jeep GC 5.7 (Previous 2012 Casita FD17 & 2010 Audi Q5)
Posts: 236
|
There's a clear winner here...
Bulldog versus Curt (Ram)
Weight: 12.2 lbs. vs. 13.6 lbs.
Steel Plate Thickness: 0.19" vs. 0.20".
Powdercoat Finish: Gray with rust vs. Black with chips.
Tongue Jack Mounting: Three irregularly-shaped die-stamped holes vs. 3 threaded holes.
Mechanism: Stiff, probably spring-loaded (the mechanism is currently too stiff to tell) vs. Smooth-operating spring-loaded collar.
Neck Casting: Hollow vs. Solid.
Casting Interior: Irregularly-shaped with weld spatter vs. Round with paint gobs.
Safety Pin Chain: Figure 8 vs. Twisted links
Squareness: The angle of the sides from the top surface of the steel plate section on the Bulldog are about 92 degrees, with the sides splayed out at the bottom, vs. 90-degrees on the Curt which is nicely vertical to facilitate close contact with A-frame when welding.
Price (Delivered): $107.88 vs. $67.33 (both prices are without the local and state sales taxes I paid).
For those in the States who may be interested, a vendor on eBay currently offers the Ram Model CA-5196-B at $46.04 + $13.26 shipping = $59.30 delivered.
Summary: Both of these units are now manufactured offshore. Both are rated at 7,000 lbs. The Curt came with a vinyl sticker proudly proclaiming its Curt branding, but the casting says "RAM", and it is sold elsewhere under the "Ram" branding. This is something I had suspected after looking at images of the two "brands" online.
In general, the fabrication, fit and finish on the Curt (Ram) is much better. That's ironic given that I am replacing the fussy Ram coupler which was installed on the 21 at the factory.
I had picked a vendor who offered free returns on the Curt because I didn't know which one of the couplers I would be sending back when I ordered it. Today, I would buy the Ram as it looks to be the same item offered at a lower price.
__________________
You must learn from other peoples mistakes. You cant possibly live long enough to make them all yourself. - Sam Levenson
|
|
|
|
|
04-03-2022, 07:40 PM
|
#3
|
|
Senior Member
Join Date: Jul 2015
Location: Mike in Puget Sound, Washington
Trailer: Escape 21 & Jeep GC 5.7 (Previous 2012 Casita FD17 & 2010 Audi Q5)
Posts: 236
|
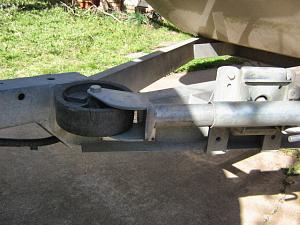
Here's a few pics:
__________________
You must learn from other peoples mistakes. You cant possibly live long enough to make them all yourself. - Sam Levenson
|
|
|
|
|
04-03-2022, 09:07 PM
|
#4
|
|
Senior Member
Join Date: Aug 2015
Location: Benton County, Iowa
Trailer: 2013 Escape 21 Classic Number 6, pulled by 2018 Toyota Highlander
Posts: 8,259
|
Good Report
I can see why you were concerned. Its indeed disappointing to buy products that dont live up their reputation. Unfortunately yours is not especially a rare case. Theres one thing about buying locally when possible. You can see what youre getting before you pay for it.
Iowa Dave
__________________
Aint no trouble jacking a double Burma Shave
Dave
|
|
|
|
|
04-03-2022, 09:07 PM
|
#5
|
|
Senior Member
Join Date: Jul 2021
Location: 50 miles S of Atlanta, Georgia
Trailer: 2008 BigfootRV 25B21RB
Posts: 289
|
Thank you, this is interesting. The couple of Bulldog couplers I have had to deal with in the past didn't impress me. This somewhat cinches that thinking.
One consideration is that the coupler needs to be installed prior to setting up a weight distributing hitch as you will have to move the bar or chain mounts. Depending on what is installed where on a trailer tongue this may be easy to impossible.
Charles
__________________
'03 Ram 2500 CTD, 5.9HO PacBrake six speed std cab long bed Leer top and 2008 Bigfoot 25B21RB.. Previously, 2008 Thor Freedom Spirit 180, SOLD! 2007 Winnebago View 23H Motorhome, SOLD!
|
|
|
|
|
04-03-2022, 09:40 PM
|
#6
|
|
Senior Member
Join Date: Jul 2015
Location: Mike in Puget Sound, Washington
Trailer: Escape 21 & Jeep GC 5.7 (Previous 2012 Casita FD17 & 2010 Audi Q5)
Posts: 236
|
Quote:
Originally Posted by CharlesinGA

One consideration is that the coupler needs to be installed prior to setting up a weight distributing hitch as you will have to move the bar or chain mounts. Depending on what is installed where on a trailer tongue this may be easy to impossible.
Charles
|
Yes, after a couple of years of foot-dragging, I just purchased a WDH.
So, getting the coupler replaced is actually step one of that project.
__________________
You must learn from other peoples mistakes. You cant possibly live long enough to make them all yourself. - Sam Levenson
|
|
|
|
|
04-04-2022, 08:00 AM
|
#7
|
|
Senior Member
Join Date: Nov 2008
Location: Janesville, WI, Wisconsin
Trailer: Escape 19 (sold) Escape 21 2014
Posts: 1,883
|
I have a Bulldog with the same weld splatters on the inside. I wonder if it is not by design? Mine is also a hard to release mechanism and the latch lever takes effort. I keep a rubber hammer handy and a pair of gloves due to a pinch factor. All said, it is a much improved design over the original RAM coupler.
Thanks for a thorough review.
__________________
Paul and Janet Braun
2003 Toyota 4Runner V8 now 2012 Toyota Sequoia V8
Escape 19' 2010 now 2014 Escape 21'
|
|
|
|
|
04-04-2022, 12:01 PM
|
#8
|
|
Senior Member
Join Date: Jul 2015
Location: Mike in Puget Sound, Washington
Trailer: Escape 21 & Jeep GC 5.7 (Previous 2012 Casita FD17 & 2010 Audi Q5)
Posts: 236
|
The original vendor who I purchased the Bulldog from replied to my previous emails this morning.
I let them know I had purchased the Curt-branded Ram coupler from another vendor, considered it to be of better quality, and would be installing the Curt/Ram on my trailer.
They are going to send me an RMA with a free return-shipping label, which I thought very nice of them.
They are also apparently going to update their website to reflect some of this feedback. I'll be interested to see what they do in that regard.
Oh, and the price on the Bulldog just increased from $91.00 to $95.55! 
__________________
You must learn from other peoples mistakes. You cant possibly live long enough to make them all yourself. - Sam Levenson
|
|
|
|
|
04-04-2022, 02:00 PM
|
#9
|
|
Senior Member
Join Date: Dec 2012
Location: Edmonton, Alberta
Trailer: 1979 Boler B1700
Posts: 14,935
|
Quote:
Originally Posted by fudge_brownie
I have a Bulldog with the same weld splatters on the inside. I wonder if it is not by design?
|
As they say in software development, "that's not a bug - that's a feature!" 
In software or couplers, it's a defect.
Quote:
Originally Posted by fudge_brownie
Mine is also a hard to release mechanism and the latch lever takes effort. I keep a rubber hammer handy and a pair of gloves due to a pinch factor. All said, it is a much improved design over the original RAM coupler.
|
I have a yoke-type coupler (Atwood, not Ram); I don't need any tools and it works fine, without a risk of pinching me. 
|
|
|
|
|
04-04-2022, 02:15 PM
|
#10
|
|
Senior Member
Join Date: Apr 2015
Location: Redmond, Washington
Trailer: 2015 E19'
Posts: 311
|
Quote:
Originally Posted by fudge_brownie
I have a Bulldog with the same weld splatters on the inside. I wonder if it is not by design? Mine is also a hard to release mechanism and the latch lever takes effort. I keep a rubber hammer handy and a pair of gloves due to a pinch factor. All said, it is a much improved design over the original RAM coupler.
Thanks for a thorough review.
|
Agreed - very much improved over (at least) my original coupler.
Although my Bulldog had no weld splatter inside the ball socket - just a little bit on the outside that chipped off easily before painting - to me a real compelling issue is the fact that my Bulldog moved the vertical center-line of the tongue jack rearwards by maybe 5/8" or 3/4". I ended up hacking off the rearmost part of the round clearance hole for the jack in the lower support cross-piece to allow for the new rearward-er location, and attached a new cross-piece between the main frame rails - see details:
https://www.escapeforum.org/forums/f...ade-20156.html
in particular starting with Post #59.
This allowed the jack to be positioned by the Bulldog in its moved-rearward location, and still retain the side-to-side and front-rear support for the lower portion of the jack. The Ram will apparently maintain the same front-to-rear location that lines up with the original cross-piece clearance hole. Reason enough in my mind to go with the Ram instead of the Bulldog. Plus, with the threads already tapped into the Ram, you can avoid having to - with no small amount of difficulty and frustration - feed from below and then hold the loose nuts and washers in position while tightening the bolts from above. A real PITB.
The seemingly extra layers in the pics below are just some 1/32" sheets of foamy stuff sandwiched between the metal plates to prevent chaffing off the rustoeum paint down to bare metal. I actually added 2 new plates - one scooted forward and to one side, and the other scooted rearward and to the other side - to help secure the jack both forward-and-backwards as well as side-to-side, since the holes in the new plates were somewhat sloppy.
And a potential added bonus for some people is that the Bulldog (don't know about the Ram) adds maybe 1.5" - 1.75" additional clearance between the rear of the TV and the stuff (e.g. jack crank handle) on the tongue.
Tip-O-The-Day: My hitch also has a hard-to-move collar pull-back paddle lever. I just start pushing the lever with one hand and grab the collar with the other and pull back on the collar. That helps it get into a sliding kinda mood and I can then lever it backwards from there quite easily.
__________________
Critical Thinking and Moderation - The Other National Deficit
|
|
|
|
|
04-04-2022, 04:12 PM
|
#11
|
|
Senior Member
Join Date: Jul 2015
Location: Mike in Puget Sound, Washington
Trailer: Escape 21 & Jeep GC 5.7 (Previous 2012 Casita FD17 & 2010 Audi Q5)
Posts: 236
|
Quote:
Originally Posted by Great Eggstrications
The Ram will apparently maintain the same front-to-rear location that lines up with the original cross-piece clearance hole.
|
Quote:
Originally Posted by rbryan4
Mine is not a Bulldog, but a RAM. Sold on E-trailer.
The jack hole lined right up to the hole in the cross member on this one, with no mods required.
|
Thanks! I had read that thread, but had completely forgotten the part about the Ram Sleeve-lock coupler aligning well with the lower hole for the tongue jack. I had been waiting to see if the Ram might avoid the difficulties you had in aligning the tongue jack, so now I'm hopeful.
In fact, I had originally been put off from buying the Ram by multiple reviews indicating that one side(!) of the steel was poorly aligned and required shimming to the A-frame. However, as I noted earlier, it appears that both sides are actually a dead-on-balls-accurate 90-degrees, at least so far my old drafting triangles indicate.
 My current checklist for the installation includes:
1) checking the distance from the fronts of the axle mounts to the coupler, and
2) checking the tongue jack mounting hole's relation to the lower hole.
Any other thoughts are welcome. I expect to have some driveway concrete poured this next week and will be taking the trailer in for welding in the next week or so following at least five days of wet-cure for the new driveway section.
__________________
You must learn from other peoples mistakes. You cant possibly live long enough to make them all yourself. - Sam Levenson
|
|
|
|
|
04-04-2022, 05:26 PM
|
#12
|
|
Site Team
Join Date: Jun 2014
Location: Canyon Lake, Texas
Trailer: 2015 19 "Past Tents", 2021 F150 Lariat 2.7L EB
Posts: 10,222
|
Mike, I've heard reports from others that the jack hole didn't line up properly with the RAM coupler. I'm thinking there may be some variations in how the a-frames were built over time?
In any case, be prepared to have to do some minor mods if it doesn't line up perfectly.
__________________
"You can't buy happiness, but you can buy an RV. And that is pretty close."
|
|
|
|
|
04-05-2022, 11:36 PM
|
#13
|
|
Senior Member
Join Date: Jul 2015
Location: Mike in Puget Sound, Washington
Trailer: Escape 21 & Jeep GC 5.7 (Previous 2012 Casita FD17 & 2010 Audi Q5)
Posts: 236
|
The concrete pour appears to be on schedule, so I'm trying to think of any other welding that I might want to have done next week.
I've noticed that the 4" HSS steel frame under the coupler is open at the front. Has anyone capped that off to prevent it from taking in water and road salt?
I have seen some folks on the fiberglass forum mention spraying the interior of their frames with rust preventive treatments. Personally, I'm not that motivated, but it sure seems like closing off the rectangular openings at the front of the frame would be a good thing.
Does anyone have any opinions or thoughts on this?
__________________
You must learn from other peoples mistakes. You cant possibly live long enough to make them all yourself. - Sam Levenson
|
|
|
|
|
04-05-2022, 11:39 PM
|
#14
|
|
Senior Member
Join Date: Jul 2015
Location: Mike in Puget Sound, Washington
Trailer: Escape 21 & Jeep GC 5.7 (Previous 2012 Casita FD17 & 2010 Audi Q5)
Posts: 236
|
Quote:
Originally Posted by rbryan4
Mike, I've heard reports from others that the jack hole didn't line up properly with the RAM coupler. I'm thinking there may be some variations in how the a-frames were built over time?
In any case, be prepared to have to do some minor mods if it doesn't line up perfectly.
|
Thanks, I'll continue to hope for the best, meaning that my welder is prepared for the worst!
__________________
You must learn from other peoples mistakes. You cant possibly live long enough to make them all yourself. - Sam Levenson
|
|
|
|
|
04-06-2022, 01:35 AM
|
#15
|
|
Senior Member
Join Date: Apr 2015
Location: Redmond, Washington
Trailer: 2015 E19'
Posts: 311
|
Quote:
Originally Posted by Civilguy
The concrete pour appears to be on schedule, so I'm trying to think of any other welding that I might want to have done next week.
I've noticed that the 4" HSS steel frame under the coupler is open at the front. Has anyone capped that off to prevent it from taking in water and road salt?
I have seen some folks on the fiberglass forum mention spraying the interior of their frames with rust preventive treatments. Personally, I'm not that motivated, but it sure seems like closing off the rectangular openings at the front of the frame would be a good thing.
Does anyone have any opinions or thoughts on this?
|
Hey Civilguy - we meet again!
I was thinking about doing that when I had my new Bulldog welded on. The pic shows how accessible it would be to do it - so should be no problem with the coupler out of the way. Was glad to see the bead running along the joint.
Had some pretty good (bad) rust going on after the first 5.5 years, and it's never seen salted roads. That's when the wife says "Stop worrying about everything and let's go camping".
Long, long ago, I had the oh-so-clever idea to fish the coax for my rear camera through the the D/S frame rail and back to the rear - out of the way and protected, far away from all the 120AC, and maybe (?) extra shielded somewhat. So before the new coupler could be welded, I had to pull it out to avoid the heat. I ended up split-looming it and wire tying it along the original 12DC wiring bundles underneath, along the 7-pin cable, and then to a nice water resistant 2-wire connector by the ball mount receiver. After welding was all done, I got a fresh can of rustoleum 'rust stopper' or whatever it's called, and sprayed the inside of the frame rails as far back in as it would reach and called it done. FWIW, I've peeked under there a few times right after towing in the rain, and around the openings area and a bit inside the frame and it looked quite dry. But puddle splashes?? Anyhow, figured I would keep it open and airy in case any water were to get in.
I had actually asked Reace way back when we were ordering the trailer if there would be any option to intercept the frame between frame fab and trailer assembly and galvanize or cad plate it, and, not surprisingly, he looked at me like I was crazy and said "Nope - no way". But I tried...
__________________
Critical Thinking and Moderation - The Other National Deficit
|
|
|
|
|
04-06-2022, 04:15 PM
|
#16
|
|
Senior Member
Join Date: Jul 2015
Location: Mike in Puget Sound, Washington
Trailer: Escape 21 & Jeep GC 5.7 (Previous 2012 Casita FD17 & 2010 Audi Q5)
Posts: 236
|
Quote:
Originally Posted by Great Eggstrications
Had some pretty good (bad) rust going on after the first 5.5 years, and it's never seen salted roads.
|
Aargh! My Eyes!! Now I can't un-see it!!!
__________________
You must learn from other peoples mistakes. You cant possibly live long enough to make them all yourself. - Sam Levenson
|
|
|
|
|
04-06-2022, 04:47 PM
|
#17
|
|
Senior Member
Join Date: Mar 2018
Location: Tulsa, Oklahoma
Trailer: 2012 E19
Posts: 1,755
|
It's unfortunate that galvanizing is not offered on more trailer frames. My Hauley's frame is galvanized, and at 9 years old it looks quite good. It's probably been towed at least 150,000 miles.

__________________
Losing weight puts one at much greater risk of becoming thin.
|
|
|
|
|
04-07-2022, 07:49 PM
|
#18
|
|
Senior Member
Join Date: Jul 2015
Location: Mike in Puget Sound, Washington
Trailer: Escape 21 & Jeep GC 5.7 (Previous 2012 Casita FD17 & 2010 Audi Q5)
Posts: 236
|
Nice! Alan's Wesco trailers should be around for quite a while.
__________________
You must learn from other peoples mistakes. You cant possibly live long enough to make them all yourself. - Sam Levenson
|
|
|
|
|
04-12-2022, 02:05 PM
|
#19
|
|
Senior Member
Join Date: Jul 2020
Location: Victoria, Texas
Trailer: 21C Jan. 15, 2021
Posts: 358
|
Quote:
Originally Posted by Civilguy
The concrete pour appears to be on schedule, so I'm trying to think of any other welding that I might want to have done next week.
I've noticed that the 4" HSS steel frame under the coupler is open at the front. Has anyone capped that off to prevent it from taking in water and road salt?
I have seen some folks on the fiberglass forum mention spraying the interior of their frames with rust preventive treatments. Personally, I'm not that motivated, but it sure seems like closing off the rectangular openings at the front of the frame would be a good thing.
Does anyone have any opinions or thoughts on this?
|
Ordered the Curt sleeve lock. Received it today, and its nicely finished. Spoke to local trailer repair shop and bringing it in next week for the install. They said 2-3 hours at 85.00/hr.
Would a little spray foam seal the two open frames? Or does it need to breath?
Thank you for your insight.
|
|
|
|
|
04-12-2022, 02:47 PM
|
#20
|
|
Senior Member
Join Date: Jul 2015
Location: Mike in Puget Sound, Washington
Trailer: Escape 21 & Jeep GC 5.7 (Previous 2012 Casita FD17 & 2010 Audi Q5)
Posts: 236
|
Quote:
Originally Posted by Dcboyd
Would a little spray foam seal the two open frames? Or does it need to breath?
Thank you for your insight.
|
I don't have any insight here but will be interested to see what others might know.
__________________
You must learn from other peoples mistakes. You cant possibly live long enough to make them all yourself. - Sam Levenson
|
|
|
|
|
|
 Posting Rules
|
You may not post new threads
You may not post replies
You may not post attachments
You may not edit your posts
HTML code is Off
|
|
|
|
 » Recent Discussions
 |
|
|
|
|
|
|
|
|
|
|
|
|
|
|
|
|
|
|
|
|
|
|
|
|
|
|
|
|
|
|

|


 Linear Mode

