Dinette Table Modifications - Escape Trailer Owners Community
Journey with Confidence RV GPS App RV Trip Planner RV LIFE Campground Reviews RV Maintenance Take a Speed Test Free 7 Day Trial ×

Go Back   Escape Trailer Owners Community > Escape Tech > Modifications and Alterations
Click Here to Login
Register Files FAQ Community Calendar Today's Posts Search Log in
Reply
 
Thread Tools Display Modes
 
Old 04-02-2021, 04:15 PM   #1
Junior Member
 
Join Date: Oct 2015
Location: Appling, Georgia
Trailer: 2015 5.0TA
Posts: 22
Dinette Table Modifications

Attached is a PDF document and lots of pictures describing how we modified our dinette table using a Springfield pedestal and linear bearings. I hope you find this information useful.
Attached Files
File Type: pdf Escape Table modification.pdf (389.7 KB, 274 views)
Vin and Janice is offline   Reply With Quote
Old 04-02-2021, 06:19 PM   #2
Senior Member
 
sofmerc's Avatar
 
Join Date: Jun 2020
Location: St Augustine, Florida
Trailer: 5.0 TA Delivered 4/7/22
Posts: 925
I like it and may have to steal your idea... I was sure I was going with U shaped dinette..until I saw a post last week with table mod and now yours as well...
__________________
2022 5.0TA . F150 4 wheel drive, EB 3.5 Andersen ultimate hitch. Trailer delivered 4/22. Jack
sofmerc is offline   Reply With Quote
Old 04-02-2021, 07:42 PM   #3
Senior Member
 
Join Date: Nov 2012
Location: Little Rock, Arkansas
Trailer: 2014 Escape 19' and 2016 GMC Yukon SLT SUV.
Posts: 500
Send a message via AIM to Tonny LR
Excellent Table modification. Thank you for sharing. Would you please share the dimensions the sub base and the source for bolts and bar nuts/knobs.

Tonny LR
Tonny LR is offline   Reply With Quote
Old 04-02-2021, 10:35 PM   #4
Junior Member
 
Join Date: Oct 2015
Location: Appling, Georgia
Trailer: 2015 5.0TA
Posts: 22
glad you like it.... steal away ....lol
Vin and Janice is offline   Reply With Quote
Old 04-02-2021, 10:44 PM   #5
Junior Member
 
Join Date: Oct 2015
Location: Appling, Georgia
Trailer: 2015 5.0TA
Posts: 22
Tonny,
The base overall dimensions are 16"W x 29"L x .5" thick plywood. We set the bearing blocks at 14" outside to outside on the width of the base and 16" outside to outside on the length. All of our nuts, bolts, and knobs were purchased at our local Lowes Hardware store. Let me know if you need any additional information.
Vin and Janice is offline   Reply With Quote
Old 04-03-2021, 08:06 AM   #6
Senior Member
 
Join Date: Nov 2012
Location: Little Rock, Arkansas
Trailer: 2014 Escape 19' and 2016 GMC Yukon SLT SUV.
Posts: 500
Send a message via AIM to Tonny LR
Hello Vin and Janice,
Thank you very much for the helpful info. I plan to follow your instructions to do the modification. Currently my table top mounted on the ETI sub-base and Springfield pedestal is very wobbly.

Tonny LR
Tonny LR is offline   Reply With Quote
Old 04-03-2021, 11:47 AM   #7
Junior Member
 
Join Date: Oct 2015
Location: Appling, Georgia
Trailer: 2015 5.0TA
Posts: 22
We sized our linear bearing rail to maximize the slide side to side travel but still fit between the bed rails (when in the bed position) and ended up purchasing a 800mm length (31.5") linear bearing rail assembly. We approximately have a 3/4" clearance on each side between the end of the bearing rail and the bed rails when in the lowered position. I only mention this because I have no idea how the dinettes compare in size between your 19 and our 5.0.
Vin and Janice is offline   Reply With Quote
Old 04-04-2021, 11:28 PM   #8
Senior Member
 
Join Date: May 2015
Location: Bellingham, Washington
Trailer: 5.0 TA "Sea'scape"
Posts: 278
Vin and Janice,

Great idea here! I've read through your excellent PDF file with all the instructions, measurements and specifications. I still want to make sure your modification will work with our 5.0 table and the Springfield pedestal (unknown model) that ETI installed. Other folks may similarly want to make sure their table can lower all the way down to rest on the horizontal wood bed rails fastened to the front of the seats.

It seems we need to make sure that all of the following components together are together short enough to allow the table top to rest on the bed rails.

#1. Pedestal Model and Height. You chose the 28" 1660230 Springfield pedestal. It lowers to a height of 12-3/4" which it seems is the distance from the floor to the top of the flat aluminum plate mounted on the pedestal.

Click image for larger version

Name:	Springfield Pedestals.jpg
Views:	10
Size:	186.8 KB
ID:	54726

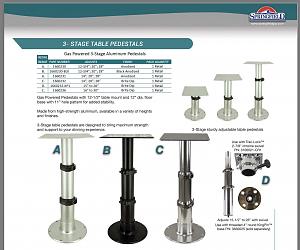
The other similar pedestals don't lower quite so far; they only go down to 14", 15" or 16". I wonder if there's a model number marked on the pedestal so I don't have to take my table top off to see how far the pedestal will push down.

#2. The plywood sub base attaches to the top of the pedestal. I can't tell how thick it is; guess I'll have to go measure.

#3. The rail and bearing block set that you attached to the top of the plywood sub base is here: https://www.amazon.com/OrangeA-Linea...6B/ref=sr_1_4? The description of the rail shows it to be 1.5" high but there's no measurement shown for the bearing block. Do you have the total height of the bearing block mounted on the rail?

So it seems the total of #1, #2 and #3 needs to be less that the height of the top of the bed rails which, in your case anyway, is 17-3/8".

I'l be checking my bed rail height and the thickness of the sub base in a couple of days. I hope I can find a model number on my Springfield pedestal or just take the top off and push it down all the way. So if you could give me the height of the rail and bearing block together, I'll be able to calculate whether I can use them as sliders for my table. Here's hoping!
Hawkeye Ed is offline   Reply With Quote
Old 04-06-2021, 09:23 PM   #9
Junior Member
 
Join Date: Oct 2015
Location: Appling, Georgia
Trailer: 2015 5.0TA
Posts: 22
Hello Hawkeye Ed,
I went back and double checked my measurements again so I'm a little late responding.
You are correct - the minimum pedestal height, plus the sub-base, plus the linear bearing rail height (2”) are all critical measurements.
In our case:
The pedestal at its lowest position is 12-3/4", plus 1/2" for the thickness of the sub-base, plus an addition 2" for the height of the bearing rail assembly has us at 15-1/4". This is a couple of inches lower than our bed rail height which works out great for us. Our table top is ¾” thick. When fully extended our table is 31-1/4” from the floor to top of table.

Keep in mind that not all pedestals are equal as some will only stop at certain stage heights where as the model we selected can be locked in at any height between the lowest and highest position.

Maybe Escape can provide you with the pedestal model number of the unit they installed in your rig. I can tell you the pedestal we ordered did not have any identifying marks on it.

For anyone that is wanting to use the linear rail bearings, be aware the bearing blocks MUST be perfectly aligned. You need the blocks in a straight line so that the bearing rail can be inserted easily and not in a bind restricting the rail movement.

We purchased our pedestal and bearing rails on-line and purchased all of our miscellaneous items from Lowes. We utilized Lowes # 139701 bar knob to attach the sub-base to the pedestal. We felt the bar knobs were a good option in the event we ever wanted to separate the table top assembly from the pedestal. We then utilized Lowes # 755531 M6 1.0 25mm machine screw to attach the bearing blocks to the sub-base. Attach these blocks loosely at first, slide in the bearing rail and then finish tightening down the blocks (just make sure the rail slides back and forth easily). Next, we placed the table top onto the bearing rail and pushed the table down to rest on the bed rails. At this point the table top is not attached yet because we needed to make sure the bearing rails were spaced evenly (side to side) between the bed rails. Once the bearing rail and table top were properly positioned, we crawled underneath and secured the rail to the table top in just a couple of places (this is easier than it sounds). We then raised the pedestal to its highest position and continued to secure the rail to the table top from underneath. Finally, make sure to use a locking system of some type to secure the table from any movement during traveling. Having it secured is very important as this table top slides VERY EASILY even with a bunch of stuff sitting on top.
Let us know if you need any additional information.
V&J
Vin and Janice is offline   Reply With Quote
Reply


Posting Rules
You may not post new threads
You may not post replies
You may not post attachments
You may not edit your posts

BB code is On
Smilies are On
[IMG] code is On
HTML code is Off
Trackbacks are Off
Pingbacks are Off
Refbacks are Off


» Featured Campgrounds

Reviews provided by

Disclaimer:

This website is not affiliated with or endorsed by Escape Trailer Industries or any of its affiliates. This is an independent, unofficial site.


All times are GMT -5. The time now is 02:31 PM.


Powered by vBulletin® Version 3.8.8 Beta 4
Copyright ©2000 - 2024, vBulletin Solutions, Inc.
Copyright 2023 Social Knowledge, LLC All Rights Reserved.