 |
|
 11-20-2018, 05:35 PM
|
#1
|
|
Senior Member
Join Date: Jun 2014
Location: Box Elder, South Dakota
Trailer: Bigfoot 25' 2018
Posts: 347
|
Hatch Door Structure ?
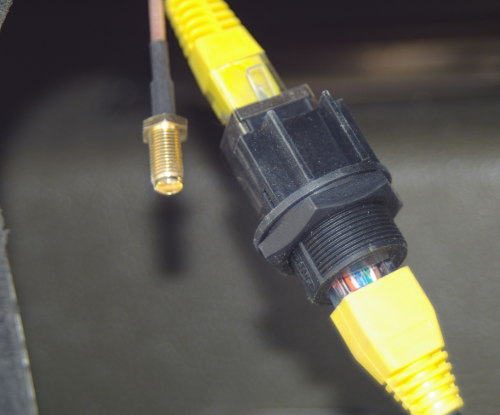
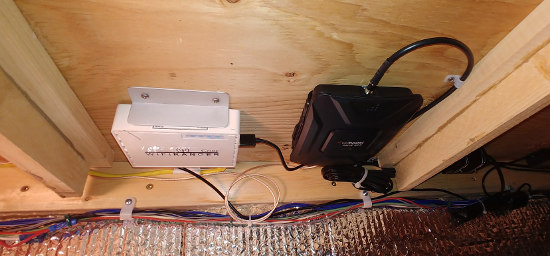
I've installed a WiFi Ranger and WeBoost in our '19. These have removable outside antennas which connect through a "panel plug". One plug for ethernet (WiFi Ranger) and one for coax (WeBoost). I don't want to put more holes in our shell, so have routed these to the hatch door under the beds. I figure to put these plugs through that door rather than the shell itself. The plugs are like this:
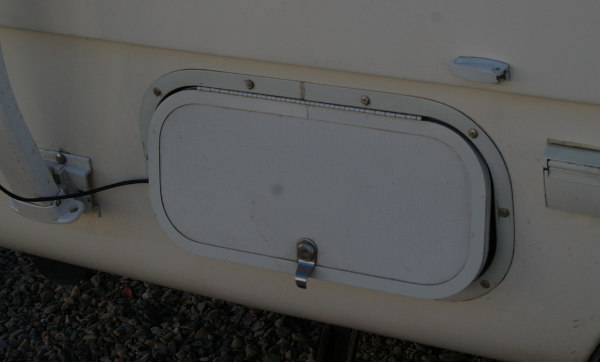
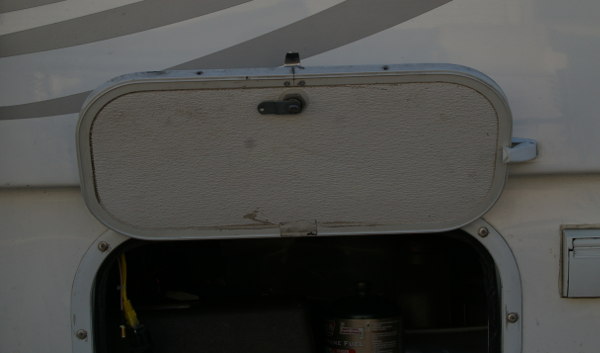
The plugs are to mount on a thin panel. However, the hatch door is some 1/2" thick. Here are pics on the outside and inside of our door. (Yes, I was able to put the hatch clasp back on with double sided tape. We'll see how long this lasts.)
I'd like to cut a large hole into the inside of the door, but only a small hole in the outer most skin. Otherwise I'll cut a large hole through and put a mounting plate on the outside. The first option would be cleanest.
So my question. Does anyone know the structure of these hatch doors? They seem to have a hard skin inside and out. What is the core made of? Would it be possible to cut a "large" hole from the inside leaving the outer skin intact?
Thank you for any help.
Hugh
__________________
Hugh Currin
2018 Bigfoot 25'
2018 RAM 2500 Diesel
|

|

|
|
11-20-2018, 08:56 PM
|
#2
|
|
Senior Member
Join Date: Oct 2017
Location: Kelowna, British Columbia
Trailer: 2018 Escape 19
Posts: 2,720
|
I would drill through the foam core door from the back with the pilot/center bit but stop before the main cutter touched the outer skin. Then I would enlarge the small pilot hole for the jack.
|
|
|
|
|
11-21-2018, 05:15 AM
|
#3
|
|
Senior Member
Join Date: Sep 2009
Location: Southwick, Massachusetts
Trailer: None, sold my 2014 5.0TA
Posts: 7,124
|
Not that I've done it but I believe it's just the 2 layers of thin skin and solid foam filler.
I'd drill a 1/2" hole thru the inner skin to see what it is. Then either do like Eggscape says or use a small trim router, 1/4" straight bit, and maybe a template if you don't want to go freehand.
__________________
Happy Motoring
Bob
|
|
|
|
|
11-21-2018, 06:19 AM
|
#4
|
|
Senior Member
Join Date: Jun 2010
Location: Central, Pennsylvania
Trailer: Escape#5 2022 E19
Posts: 26,268
|
I have cut thru some, the inner core is loose foam bubbles held together with a glue, flimsy exterior covering. Just seal good for water leaks.
__________________
Jim
Sometime life gets in the way of living.......
|
|
|
|
|
11-21-2018, 08:26 AM
|
#5
|
|
Senior Member
Join Date: Oct 2008
Location: Calgary, Alberta
Trailer: 2017 Escape 5.0 TA
Posts: 15,552
|
Why not put it in the shell. That seems like a bit of a "non-professional" (for lack of a better word) solution. The skin of the hatch door is way to wimpy in my opinion, and you would have to deal with the hassle of the cable being in the way when using the hatch.
If for some reason at some time in the future you no longer need the plug you could just do an easy fibreglass repair.
__________________
2017 Escape 5.0 TA
2015 Ford F150 Lariat 3.5L EcoBoost
2009 Escape 19 (previous)
Most folks are about as happy as they make up their minds to be. Abraham Lincoln
|
|
|
|
|
11-21-2018, 08:57 AM
|
#6
|
|
Senior Member
Join Date: Aug 2017
Location: Hope, Indiana
Trailer: Escape 21
Posts: 277
|
Quote:
Originally Posted by Jim Bennett

Why not put it in the shell. That seems like a bit of a "non-professional" (for lack of a better word) solution. .
|
What Jim said. Theyre called access hatches, and a wire or cable would somewhat limit the access, and look like an afterthought. Which it is. Coax and Ethernet jacks, are pretty common and mounting them elsewhere would and should work out just fine.
My vote is to put it in the shell.
__________________
Trent
|
|
|
|
|
11-21-2018, 10:09 AM
|
#7
|
|
Senior Member
Join Date: Jan 2014
Location: North Van., British Columbia
Trailer: 2014 Escape 19, sold; 2019 Escape 21, Sept. 2019
Posts: 8,812
|
Well if we're voting mine is downwards through the floor and use an automotive type firewall grommet. This allows for expansion if other cables are required at a later date.
Ron
|
|
|
|
|
11-21-2018, 10:26 AM
|
#8
|
|
Senior Member
Join Date: Aug 2017
Location: Hope, Indiana
Trailer: Escape 21
Posts: 277
|
Quote:
Originally Posted by Ron in BC
Well if we're voting mine is downwards through the floor and use an automotive type firewall grommet. This allows for expansion if other cables are required at a later date.
Ron
|
That would be ok, provided the OP knows that the floor is riding on channels/pontoons. Drilling into the top of the channel/pontoons might be preferred, so the jacks or cables don’t drop down and impede moisture, since those channels supposedly; act as a drain.
__________________
Trent
|
|
|
|
|
11-21-2018, 10:43 AM
|
#9
|
|
Senior Member
Join Date: Jun 2010
Location: Central, Pennsylvania
Trailer: Escape#5 2022 E19
Posts: 26,268
|
and the bottom does not have the foam spray........
__________________
Jim
Sometime life gets in the way of living.......
|
|
|
|
|
11-21-2018, 10:48 AM
|
#10
|
|
Senior Member
Join Date: Oct 2017
Location: Kelowna, British Columbia
Trailer: 2018 Escape 19
Posts: 2,720
|
Quote:
Originally Posted by Eggscape
I would drill through the foam core door from the back with the pilot/center bit but stop before the main cutter touched the outer skin. Then I would enlarge the small pilot hole for the jack.
|
To clarify...this is an answer to how I would drill the door...as asked...not how I would install the jacks in my trailer.
As always a lot of good points and it would not be the first time that input has changed someone’s mind.
|
|
|
|
|
11-21-2018, 11:13 AM
|
#11
|
|
Senior Member
Join Date: Aug 2017
Location: Hope, Indiana
Trailer: Escape 21
Posts: 277
|
First, find out how others here have added access jacks to their Escapes. Then, copy them. Otherwise, I would look inside cabinets and benches for a good place to put the jack. If the equipment is on or in a cabinet, then look for adding the jack(s) to the outside, through the back of the cabinet. Maybe above the belly band, at cabinet level. If the equipment is low and in a rear bench area, then maybe it can exit hidden behind the bumper, or near a taillight.
__________________
Trent
|
|
|
|
|
11-21-2018, 11:26 AM
|
#12
|
|
Senior Member
Join Date: Jan 2014
Location: North Van., British Columbia
Trailer: 2014 Escape 19, sold; 2019 Escape 21, Sept. 2019
Posts: 8,812
|
Quote:
Originally Posted by Rrgramps
That would be ok, provided the OP knows that the floor is riding on channels/pontoons. Drilling into the top of the channel/pontoons might be preferred, so the jacks or cables dont drop down and impede moisture, since those channels supposedly; act as a drain.
|
Quote:
Originally Posted by cpaharley2008
and the bottom does not have the foam spray........
|
I've found the best place to drop cables through the floor is at the rear where the curve underneath ends. No pontoon there, only the sides. There's a frame bolt there that acts as a reference point so you can see where to locate the hole from both the interior and exterior. Even if there was foam there the drill bit would show you where the hole was.
I've installed so much electronics over the years, some of which get replaced or added to. I like to drill oversize and use a flexible grommet so that in the future I don't have to drill another hole to add something else.
Ron
|
|
|
|
|
11-21-2018, 02:44 PM
|
#13
|
|
Senior Member
Join Date: Jun 2014
Location: Box Elder, South Dakota
Trailer: Bigfoot 25' 2018
Posts: 347
|
OK. You're all changing my mind. I don't think the cables on the back of the hatch would be a problem, the way we use it. Not optimum though, a trade off. It also sounds like the outside skin on the door is very thin and wimpy. My original though was to go through the trailer wall, but I do hate to. Sounds like I'm back to this idea.
The cables go up a mast on the rear bumper. They are disconnected for travel. The electronics are mounted under the bed.
So the cable connections should go in the lower rear of the trailer, near the mast. But with easy access for connections. Maybe under the tail light? If mounted in the shell, one problem may be the thickness of the fiberglass. The plugs are for a thin panel so a thick wall could be a problem. Does anyone know the wall thickness near the tail lights, or lower down?
Thank you for your help so far. I have a much better idea of what's in the hatch wall. And the comments of going through the trailer wall likely shifted me back to this design.
Thanks.
Quote:
Originally Posted by Ron in BC
I've found the best place to drop cables through the floor is at the rear where the curve underneath ends. No pontoon there, only the sides. There's a frame bolt there that acts as a reference point so you can see where to locate the hole from both the interior and exterior. Even if there was foam there the drill bit would show you where the hole was.
I've installed so much electronics over the years, some of which get replaced or added to. I like to drill oversize and use a flexible grommet so that in the future I don't have to drill another hole to add something else.
Ron
|
Ron: I don't think I can go through the floor, since cables are connected each time an antenna is needed. But the grommets may be a good idea. Do you have a link for these, I'm not sure exactly what you mean. It could solve the wall thickness problem and protect the cables inside the trailer. Thanks.
Hugh
__________________
Hugh Currin
2018 Bigfoot 25'
2018 RAM 2500 Diesel
|
|
|
|
|
11-21-2018, 04:08 PM
|
#14
|
|
Senior Member
Join Date: Jan 2014
Location: North Van., British Columbia
Trailer: 2014 Escape 19, sold; 2019 Escape 21, Sept. 2019
Posts: 8,812
|
That's exactly the situation that I had originally. I ran the cables down and out to the rear bumper. They went into a plastic waterproof box. I'd then hook up when I used the TV antenna etc. That was before I decided to go the Mike Lewis route and put my wi-fi and TV antennas on extendable poles. So now I have no need to disconnect each time as the antennas are always hooked up in the lowered position.
Unfortunately I'm at sea right now between Madiera and the Canary Islands so I don't have access to the photos on my home computer. I went to an auto wrecker and got a few grommets that normally go through the firewall of a car. They're great because they have a tapered boot that allows for one or several cables. Easy to seal up and easy to open up and add more wires or cables.
Ron
|
|
|
|
|
01-21-2019, 06:18 PM
|
#15
|
|
Senior Member
Join Date: Jun 2014
Location: Box Elder, South Dakota
Trailer: Bigfoot 25' 2018
Posts: 347
|
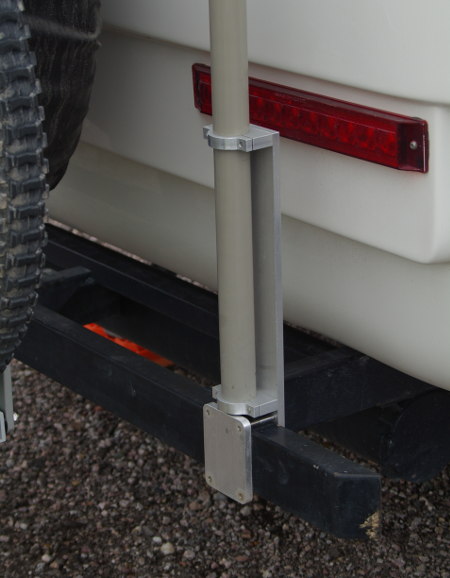
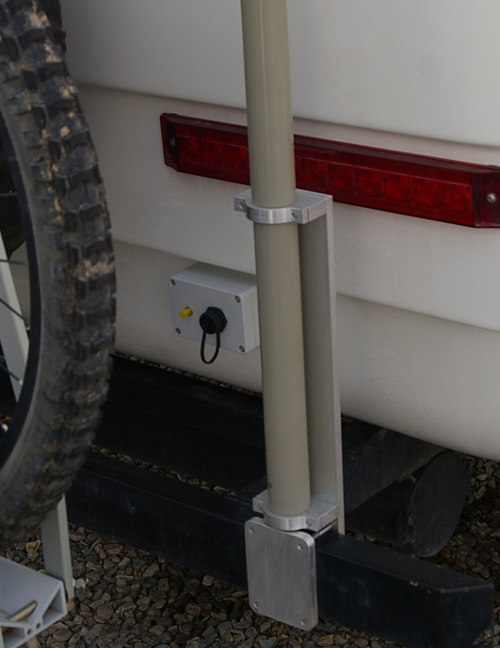
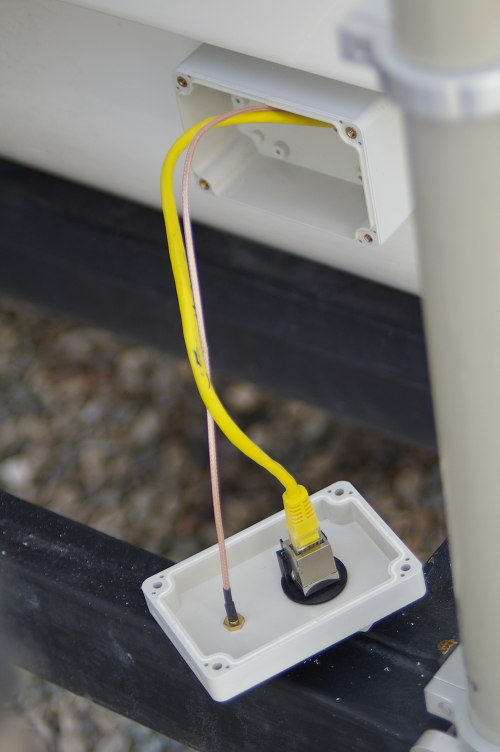
So, I finished installing the wiring for our WeBoost and WiFi Ranger. I took everyones advice and mounted them to the back of the trailer near the mast. I mounted a weatherproof plastic box under the passenger tail light with VHB tape. I brought the two cables through a 1/2" hole in the box and trailer wall. Then mounted the two connectors to the box cover.
So if down the road I need to change the connectors I can just change the box cover. Or, at most, change the whole box for a larger one. It also protects the cable attachments. They would be more susceptible to damage if protruding from the trailer wall to the inside.
I think it will work well. Still need to caulk around the box/trailer joint. But other than that it's done.
Thanks for all the help.
__________________
Hugh Currin
2018 Bigfoot 25'
2018 RAM 2500 Diesel
|
|
|
|
|
01-21-2019, 08:00 PM
|
#16
|
|
Senior Member
Join Date: Oct 2017
Location: Kelowna, British Columbia
Trailer: 2018 Escape 19
Posts: 2,720
|
Nice job however I would want to kill the power to transmitters before I went to bed and slept but a few inches away from them. 
|
|
|
|
|
01-21-2019, 09:04 PM
|
#17
|
|
Senior Member
Join Date: Nov 2018
Location: Northern California, California
Trailer: 2019 Escape 21
Posts: 762
|
For people who are hesitant to drill a hole in their trailer, or are experimenting with different setups, this flat RG6 coax cable allows one to snake a connection through the hatch door and shell while also allowing the hatch door to close.
https://www.amazon.com/Ghost-Jumper-...SN5KXAYD96XAS6
|
|
|
|
|
01-21-2019, 11:32 PM
|
#18
|
|
Senior Member
Join Date: Oct 2017
Location: Kelowna, British Columbia
Trailer: 2018 Escape 19
Posts: 2,720
|
Interesting product.
All my technical knowledge of coax and how it works is a little stressed to see it flat up against metal framing. I know it is insulated but the critical relationship between the inner and outer core is kind of nullified against the metal. It will conduct of course...I am just not sure at what efficiency.
I would rest a lot easier if it was used on a wooden or plastic window frame.
|
|
|
|
|
01-22-2019, 05:30 AM
|
#19
|
|
Senior Member
Join Date: Sep 2009
Location: Southwick, Massachusetts
Trailer: None, sold my 2014 5.0TA
Posts: 7,124
|
Back in the day, we had long runs of coax snaked thru underfloor metal wire ways and had no issues with it.
__________________
Happy Motoring
Bob
|
|
|
|
|
01-22-2019, 12:05 PM
|
#20
|
|
Senior Member
Join Date: Oct 2017
Location: Kelowna, British Columbia
Trailer: 2018 Escape 19
Posts: 2,720
|
Quote:
Originally Posted by padlin
Back in the day, we had long runs of coax snaked thru underfloor metal wire ways and had no issues with it.
|
That is perfect because it was proper coax.
Coax can go against almost anything and still keep it’s designed performance. However if you pinch coax you change the relationship between the outer and center core thus changing its electrical qualities.
When you flatten two wires and put them side by side they are no longer even coax...they are just two conductors.
For instance, the one unit under the bed is designed to be connected to coax. Once the coax stops it treats the next non coax object to be the properly designed antenna. If one was to use this non coax window adaptor the unit could very well treat that as a poorly designed antenna and everything after the adapter in null and void.
Having been involved in radio communications for over 35 years and personally I would not use the product to get the best results out of the system.
|
|
|
|
|
|
 Posting Rules
|
You may not post new threads
You may not post replies
You may not post attachments
You may not edit your posts
HTML code is Off
|
|
|
|
 » Recent Discussions
 |
|
|
|
|
|
|
|
|
|
|
|
|
|
|
|
|
|
|
|
|
|
|
|
|
|
|
|
|
|
|

|


 Linear Mode

