 |
 07-06-2014, 09:57 PM
|
#1
|
|
Member
Join Date: May 2013
Posts: 579
|
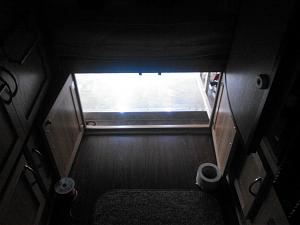
Heat Pad / Under Bed Lighting Switches On LED Warning Light Mod
|

|

|
|
07-06-2014, 10:04 PM
|
#2
|
|
Member
Join Date: May 2013
Posts: 579
|
More Pics
|
|
|
|
|
07-07-2014, 05:32 AM
|
#3
|
|
Senior Member
Join Date: Jun 2010
Location: Central, Pennsylvania
Trailer: Escape#5 2022 E19
Posts: 26,268
|
Nice work, good idea on moving the lights outside the box. It is a real pain working under there, isn't it? I felt trapped when I put up the original LED xmas lights under there.
__________________
Jim
Sometime life gets in the way of living.......
|
|
|
|
|
07-07-2014, 06:39 AM
|
#4
|
|
Member
Join Date: May 2013
Posts: 579
|
Quote:
Originally Posted by cpaharley2008

Nice work, good idea on moving the lights outside the box. It is a real pain working under there, isn't it? I felt trapped when I put up the original LED xmas lights under there.
|
Hey,
Yeah it is though, more for my back going across that ridge them anything else though, had to be somewhat of a contortionist to feed wires and such. I have not hung the LEDs yet everything is set for them just plug and clip and done. I am going to paint the underside white to reflect more light ( May Rent A Child To Do It :}). I will take a picture when it is done I have a before paint with LED shot.
Cypher
|
|
|
|
|
07-07-2014, 07:20 AM
|
#5
|
|
Senior Member
Join Date: Jun 2010
Location: Central, Pennsylvania
Trailer: Escape#5 2022 E19
Posts: 26,268
|
OK ….Tom Sawyer….or was that Huck Finn?
__________________
Jim
Sometime life gets in the way of living.......
|
|
|
|
|
08-23-2014, 07:38 PM
|
#6
|
|
Member
Join Date: May 2013
Posts: 579
|
Quote:
Originally Posted by cpaharley2008
OK ….Tom Sawyer….or was that Huck Finn?
|
Hey,
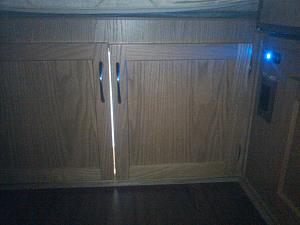
I don't remember but I could have used either one painted and installed the LEDs looks a heck of a lot brighter.
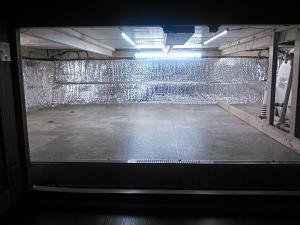


Totally Dark inside the trailer lol you get the idea it is a bit bright.:}
One switch at each access point either one turns the inside Blue LED on to warn me the lights are on ... Though, no one may be home :}
Cypher
|
|
|
|
|
08-23-2014, 07:43 PM
|
#7
|
|
Member
Join Date: May 2013
Posts: 579
|
More Pics
Lights on under bed Blue Warning Light On

No LED just painted white.
|
|
|
|
|
08-23-2014, 07:51 PM
|
#8
|
|
Senior Member
Join Date: Jun 2010
Location: Central, Pennsylvania
Trailer: Escape#5 2022 E19
Posts: 26,268
|
I feel like it's homecoming, nice work there.
__________________
Jim
Sometime life gets in the way of living.......
|
|
|
|
|
08-23-2014, 09:40 PM
|
#9
|
|
Senior Member
Join Date: Oct 2008
Location: Calgary, Alberta
Trailer: 2017 Escape 5.0 TA
Posts: 15,547
|
Nice and bright in there. How much paint did you get your face crawling under there. That refectix helps too, I have been thinking of adding it too.
__________________
2017 Escape 5.0 TA
2015 Ford F150 Lariat 3.5L EcoBoost
2009 Escape 19 (previous)
Most folks are about as happy as they make up their minds to be. Abraham Lincoln
|
|
|
|
|
08-23-2014, 09:56 PM
|
#10
|
|
Member
Join Date: May 2013
Posts: 579
|
Quote:
Originally Posted by Jim Bennett
Nice and bright in there. How much paint did you get your face crawling under there. That refectix helps too, I have been thinking of adding it too.
|
None believe it or not, now my hand , arm and shirt well good thing the stuff dries fast and rolls right off when it is. The shirt well it is now a paint rag lol. I used a cutting in brush and paint blade just painted the plywood and out to about an inch and a half from the walls. I did not want to mask and such nor paint around the wiring and such. I used one of the 1 inch medium rough surface roller with a LONG handle :} hence no paint in the face. Some of my lines are off but I was not wearing my glasses I was worried about getting paint on them so oh well. It is a lot brighter with it painted then it was with out. You want to Ram Rod a floor job I will paint yours and do the lights ...:} It is nicer here in the winter then there ..just saying ROFLMAO.
Cypher
|
|
|
|
|
08-23-2014, 10:08 PM
|
#11
|
|
Senior Member
Join Date: Oct 2008
Location: Calgary, Alberta
Trailer: 2017 Escape 5.0 TA
Posts: 15,547
|
Quote:
Originally Posted by Cypherian
You want to Ram Rod a floor job I will paint yours and do the lights ...:} It is nicer here in the winter then there ..just saying ROFLMAO.
Cypher
|
LOL...Nice here right now, so you should head on up.
Actually, today I just installed wired in LED strip lighting for under cabinet lighting in a large kitchen we are doing, and my wife spent the day painting our rec room. 
__________________
2017 Escape 5.0 TA
2015 Ford F150 Lariat 3.5L EcoBoost
2009 Escape 19 (previous)
Most folks are about as happy as they make up their minds to be. Abraham Lincoln
|
|
|
|
|
08-23-2014, 10:17 PM
|
#12
|
|
Member
Join Date: May 2013
Posts: 579
|
Quote:
Originally Posted by Jim Bennett
LOL...Nice here right now, so you should head on up.
Actually, today I just installed wired in LED strip lighting for under cabinet lighting in a large kitchen we are doing, and my wife spent the day painting our rec room. |
Sure now if I can sell a kidney for fuel and take some more of my owed time ... I do not see either one happening any time soon. For my next trick the cabinets are all getting LED'd as well as some ground lighting and a led in the front box. All of the stuff is on hand for those things.
Cypher
|
|
|
|
|
 Posting Rules
|
You may not post new threads
You may not post replies
You may not post attachments
You may not edit your posts
HTML code is Off
|
|
|
|
 » Recent Discussions
 |
|
|
|
|
|
|
|
|
|
|
|
|
|
|
|
|
|
|
|
|
|
|
|
|
|
|
|
|
|
|

|


 Linear Mode

