 |
|
 04-12-2021, 11:11 AM
|
#41
|
|
Site Team
Join Date: Nov 2008
Location: Portland, Oregon
Trailer: 2014 Escape 5.0 TA
Posts: 11,046
|
Quote:
Originally Posted by rubicon327

Should be simple. 3 wires. Some butt connectors and a crimp tool should be all you need.
|
I think techfan was the first to have leaking issues on his 15B with the long upper tail lights. He said the wires were very short! So, be prepared to add some as needed. You'll find his responses to the issue in this thread: Leaks at running lights https://www.escapeforum.org/forums/f...html#post82998
__________________
Donna D.
Ten Forward
2014 Escape 5.0TA
|

|

|
|
04-12-2021, 01:32 PM
|
#42
|
|
Senior Member
Join Date: Nov 2013
Location: Jeromesville, Ohio
Trailer: 2014 Escape 21' pulled with 2014 Silverado Crewcab
Posts: 854
|
Quote:
Originally Posted by Donna D.
I think techfan was the first to have leaking issues on his 15B with the long upper tail lights. He said the wires were very short! So, be prepared to add some as needed. You'll find his responses to the issue in this thread: Leaks at running lights https://www.escapeforum.org/forums/f...html#post82998 |
My 2014 had it. Leaked into passenger side cupboard, Removed light, caulk, then recaulked leaving small gap in bottom center, Light still warped but caulk filled gap. Did all 3 no problem since. Plastic putty knife and solvent to get old caul off. Bit of a job. Cannot remember which solvent.
__________________
Carl,
"Isn't it amazing how much stuff we get done the day before vacation?"
Zig Ziglar
|
|
|
|
|
04-12-2021, 01:35 PM
|
#43
|
|
Site Team
Join Date: Nov 2008
Location: Portland, Oregon
Trailer: 2014 Escape 5.0 TA
Posts: 11,046
|
Quote:
Originally Posted by skiman
My 2014 had it. Leaked into passenger side cupboard, Removed light, caulk, then recaulked leaving small gap in bottom center, Light still warped but caulk filled gap. Did all 3 no problem since.
|
My 2014 too. I just caulk the tops of all the lights. So far, so good... knock wood. BUT, the drivers side upper has a couple of LEDs that have gone out. I know replacement is in my future. 
__________________
Donna D.
Ten Forward
2014 Escape 5.0TA
|
|
|
|
|
04-12-2021, 03:00 PM
|
#44
|
|
Senior Member
Join Date: Feb 2010
Location: Oswego, New York
Trailer: 2017 Escape 21C, 2018 Ford F150
Posts: 5,372
|
Quote:
Originally Posted by skiman
My 2014 had it. Leaked into passenger side cupboard, Removed light, caulk, then recaulked leaving small gap in bottom center, Light still warped but caulk filled gap. Did all 3 no problem since. Plastic putty knife and solvent to get old caul off. Bit of a job. Cannot remember which solvent.
|
I don't know which you used, but acetone works. It will remove any wax, is very flammable, and while I haven't experienced the problem, I've been told it will soften polyester (the resin used with the fiberglass of the trailer) if left on too long, so take care...
|
|
|
|
|
04-12-2021, 04:52 PM
|
#45
|
|
Senior Member
Join Date: Feb 2009
Location: Madison area, Wisconsin
Trailer: 2016 Escape 19 Chevy 2012 Express 3500 Van
Posts: 1,754
|
Acetone
The good thing about acetone is it is very volatile.......it quickly evaporates away. I don't believe it would do damage to gel coat if just wiped around.
|
|
|
|
|
04-18-2021, 05:09 PM
|
#46
|
|
Senior Member
Join Date: Oct 2012
Location: Olympia, Washington
Trailer: 2013 Escape 15A "Traveling Sedge"
Posts: 101
|
Attaching a picture of the gap between the upper tail light and the fiberglass. Qtip for scale reference. This is the left light which I am replacing. The right one is not quite as bad and I have caulked it with ProFlex. The taillights have 2 screws holes and the hole that the 3 wires come out of. With both lights having the gap (pictured) do you think that is enough space to let an amount of water leak in? Seems like small holes to me but I guess it is possible. Anyway I am well on my way to becoming a decent caulker and will be diligent about this in the future. Thanks Donna for adding the light replacement link - very helpful. And yes the wires to connect to are extremely short.
The taillight is held on by 2 screws and some glue between the light assembly and the fiberglass. Can I use caulk to reglue the replacement assembly on? Or do you think I should get some kind of glue? Thanks.
Jane
|
|
|
|
|
04-18-2021, 05:26 PM
|
#47
|
|
Senior Member
Join Date: Mar 2018
Location: Tulsa, Oklahoma
Trailer: 2012 E19
Posts: 1,750
|
What are you using for caulk? No silicone, I hope.
__________________
Losing weight puts one at much greater risk of becoming thin.
|
|
|
|
|
04-18-2021, 05:34 PM
|
#48
|
|
Senior Member
Join Date: Oct 2012
Location: Olympia, Washington
Trailer: 2013 Escape 15A "Traveling Sedge"
Posts: 101
|
Not silicone, thanks to this trusty forum. I am using ProFlex.
|
|
|
|
|
04-18-2021, 05:35 PM
|
#49
|
|
Senior Member
Join Date: Oct 2017
Location: Kelowna, British Columbia
Trailer: 2018 Escape 19
Posts: 2,718
|
Make sure to keep the Acetone away from the tail lights as it will start to melt them, take the finish off and your rag may even get stuck to the lens. 
|
|
|
|
|
04-18-2021, 05:58 PM
|
#50
|
|
Senior Member
Join Date: Feb 2009
Location: Madison area, Wisconsin
Trailer: 2016 Escape 19 Chevy 2012 Express 3500 Van
Posts: 1,754
|
'Tis true
Quote:
Originally Posted by Eggscape
Make sure to keep the Acetone away from the tail lights as it will start to melt them, take the finish off and your rag may even get stuck to the lens. |
Acetone on the lens is not good at all. They're likely a styrene material, and can soften. Either be careful, use physical scraping of old caulk or a milder solvent. Or so I'd do.
It seems like you're dealing with an application of a flat surface device attached to a curved surface. Caulk is a reasonable fix in that situation. Alternatives come to mind, but none of them are quick & easy.
|
|
|
|
|
04-18-2021, 06:52 PM
|
#51
|
|
Senior Member
Join Date: Oct 2008
Location: North Vancouver, British Columbia
Trailer: 2009 Escape 17B 2020 Toyota Highlander XLE
Posts: 17,136
|
Yup. I tried cleaning model glue off the windshield of a model car when I was about ten-years-old. Don't do that.
__________________
What happens to the hole when the cheese is gone?
- Bertolt Brecht
|
|
|
|
|
04-18-2021, 07:51 PM
|
#52
|
|
Member
Join Date: Jan 2016
Location: Glacier, Washington
Trailer: 2018 Escape 21
Posts: 85
|
Mineral spirits softens proflex
|
|
|
|
|
04-18-2021, 10:38 PM
|
#53
|
|
Senior Member
Join Date: Mar 2016
Location: New Mexico, New Mexico
Trailer: 2017 E19
Posts: 613
|
Thanks all for the heads up regarding leaking trailer lights. I will be adding check & caulk lights to the to do list (for when the weather warms up a bit) along with checking & caulking belly band rivets.
I will use blue painters tape to make sure that I get clean crisp even caulk lines.
People have mentioned leaks around windows. Where does the leak generally occur; where should I be looking to find evidence of a leak?
- Kathy
|
|
|
|
|
04-19-2021, 07:14 AM
|
#54
|
|
Senior Member
Join Date: Nov 2013
Location: Jeromesville, Ohio
Trailer: 2014 Escape 21' pulled with 2014 Silverado Crewcab
Posts: 854
|
Quote:
Originally Posted by MVA
Thanks all for the heads up regarding leaking trailer lights. I will be adding check & caulk lights to the to do list (for when the weather warms up a bit) along with checking & caulking belly band rivets.
I will use blue painters tape to make sure that I get clean crisp even caulk lines.
People have mentioned leaks around windows. Where does the leak generally occur; where should I be looking to find evidence of a leak?
- Kathy
|
Painters tape is great for those of us who are all thumbs challenged!
__________________
Carl,
"Isn't it amazing how much stuff we get done the day before vacation?"
Zig Ziglar
|
|
|
|
|
04-19-2021, 10:23 AM
|
#55
|
|
Senior Member
Join Date: Mar 2020
Location: Venice, Florida
Trailer: 2020 Escape 19
Posts: 1,267
|
Quote:
Originally Posted by chuckwhanson
It seems very odd to me that they would make the effort to fiberglass the two halves together to prevent water intrusion (IE: one shell with no seam), but then drive rivets through that area just to hold the belly band. Why bother with one shell if you are just going to drive rivets through it anyway? Again, seems very odd to me.
|
Seemed odd to me too. That's why I asked Escape not to install the bellyband.
They are planning on using a VHB attached bellyband on the Escape 23.
I am sealing the seam between the two halves with Six 10 epoxy, and then adding a automotive VHB attached trim piece in place of the traditional aluminum / plastic insert bellyband.
|
|
|
|
|
04-19-2021, 06:10 PM
|
#56
|
|
Senior Member
Join Date: Oct 2012
Location: Olympia, Washington
Trailer: 2013 Escape 15A "Traveling Sedge"
Posts: 101
|
Couple questions ~
If using painters tape with Proflex and fiberglass do you pull it off when the caulk is wet or dry?
The screw holes are a bit stripped (the new light appliance does not come w new screws so I used the old ones). They are just a tad proud. Solid but not super solid against the plastic of the light. Any tricks for sealing the tiny gap where the screw does not meet super firmly to the plastic? Should I try to get a little gasket for the screw or should I use caulk around it. And if you recommend caulk do you have any tricks for not making a huge glob on the screw?
Thanks!!
|
|
|
|
|
04-19-2021, 10:51 PM
|
#57
|
|
Senior Member
Join Date: Mar 2016
Location: New Mexico, New Mexico
Trailer: 2017 E19
Posts: 613
|
I would pull the tape off right after you finish smoothing the bead while the caulk is still wet. If you wait to remove the tape until after the caulk has skinned over or dried the caulk joint will probably be damaged.
I have included the home depot link because it shows how to use tape to approximate a curve (steps 2 and 3). On a side note, I would also have taped the side of the sink bowl prior to caulking to prevent smearing caulk on the sink. https://www.homedepot.com/c/ah/how-t...5fab9012f8277f
Thoughts on leaks at the belly band:
After taking a closer look at the belly band on our trailer, I suspect water running behind the belly band and hitting the rivet shaft and leaking into the trailer is a larger source of water leaks than water making its way behind the vinyl trim covering the rivets and leaking through the rivet heads. Therefore caulking the rivet heads won't do much to stop leaks since water can still get behind the belly band and to the rivet shafts. The solution seems to be a bead of caulk where the top of the belly band meets the side of the trailer. Thoughts?
- Kathy
|
|
|
|
|
04-19-2021, 11:07 PM
|
#58
|
|
Senior Member
Join Date: Mar 2020
Location: Venice, Florida
Trailer: 2020 Escape 19
Posts: 1,267
|
Quote:
Originally Posted by MVA
After taking a closer look at the belly band on our trailer, I suspect water running behind the belly band and hitting the rivet shaft and leaking into the trailer is a larger source of water leaks than water making its way behind the vinyl trim covering the rivets and leaking through the rivet heads. Therefore caulking the rivet heads won't do much to stop leaks since water can still get behind the belly band and to the rivet shafts.
|
This is correct.
Additionally, what you can't see behind the aluminum is where the two halves come together, they form a channel which will catch the water. This is likely where the rivets are drilled through.
That channel is what I am filling with Six 10 epoxy on my no drill belly band trailer.
|
|
|
|
|
04-25-2021, 01:17 PM
|
#59
|
|
Senior Member
Join Date: Oct 2012
Location: Olympia, Washington
Trailer: 2013 Escape 15A "Traveling Sedge"
Posts: 101
|
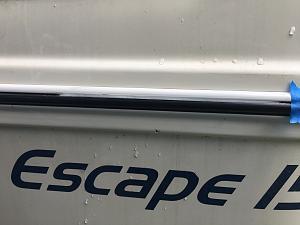
Morning,
I have caulked a test strip on the top of belly band. Is this the idea?
In attached picture, to left of blue tape I have a short strip of white caulk. Just checking to confirm I got this correct.
Also, I have seen youtubes where the caulker uses gloves and then puts mineral spirit on finger to smooth caulk. Is this what any of you do to smooth the caulk in to a neet line? Thanks!
|
|
|
|
|
04-25-2021, 01:21 PM
|
#60
|
|
Senior Member
Join Date: Oct 2008
Location: North Vancouver, British Columbia
Trailer: 2009 Escape 17B 2020 Toyota Highlander XLE
Posts: 17,136
|
I've not caulked the top or bottom. I just direct a stream of water from a hose at the top to drive debris out the bottom of the belly band.
Not sure what about the belly band is a problem. Caulk will become discoloured and dirty over time and look worse than what you have, and you will have to recaulk.
__________________
What happens to the hole when the cheese is gone?
- Bertolt Brecht
|
|
|
|
|
|
 Posting Rules
|
You may not post new threads
You may not post replies
You may not post attachments
You may not edit your posts
HTML code is Off
|
|
|
|
 » Recent Discussions
 |
|
|
|
|
|
|
|
|
|
|
|
|
|
|
|
|
|
|
|
|
|
|
|
|
|
|
|
|
|
|

|


 Linear Mode

