Ron's Dual 12 volt install - Escape Trailer Owners Community
Journey with Confidence RV GPS App RV Trip Planner RV LIFE Campground Reviews RV Maintenance Take a Speed Test Free 7 Day Trial ×

Go Back   Escape Trailer Owners Community > Escape Tech > Modifications and Alterations
Click Here to Login
Register Files FAQ Community Calendar Today's Posts Search Log in
Reply
 
Thread Tools Display Modes
 
Old 09-25-2019, 11:36 AM   #1
Senior Member
 
Ron in BC's Avatar
 
Join Date: Jan 2014
Location: North Van., British Columbia
Trailer: 2014 Escape 19, sold; 2019 Escape 21, Sept. 2019
Posts: 8,860
Ron's Dual 12 volt install

I expected to make a new tongue box and use the existing battery box for two 12s. Instead I got a free tongue box and had to make a custom box for two 12s. That's the way it goes sometimes.

I fabricated a battery box, used the existing floor drain and exterior vent. It's well sealed. I used separate entrance holes for the cables unlike ETI's way of notching the rim. The negative of that way is that every time you take off the lid you disturb the putty seal.

Installed the Blue Seas battery switch so that it's easily reachable. Easier install for the battery and switch than the 19, with the batteries and switch in the same locker. The old battery switch will become my solar on-off switch. I didn't have one of those switches on my 19, , but I see now why the Myron mod switch protector would be a good idea.

Took the opportunity to replace the seat support to nowhere with a continuous one and paint the plywood. I hate bare unfinished plywood.

Lots of mods to do and systems still to test. 2 night shakedown scheduled for next week.

Ron
Attached Images
File Type: jpg 1.JPG (341.5 KB, 61 views)
File Type: jpg 2.jpg (339.4 KB, 62 views)
File Type: jpg 3.jpg (200.8 KB, 53 views)
File Type: jpg 4.JPG (304.5 KB, 49 views)
Ron in BC is online now   Reply With Quote
Old 09-25-2019, 01:07 PM   #2
Senior Member
 
Join Date: Jul 2015
Location: Surrey, British Columbia
Trailer: 2013, 17B 'Mini Pearl' and a 2010 Highlander
Posts: 400
Nice..
It took me awhile to spot the seat support to nowhere.
Now I'm going to have take my 17 apart to see if it is made the same way.
What are you up to next? A small inverter? A plug for a portable panel?
__________________
____
John
jxoco is offline   Reply With Quote
Old 09-25-2019, 01:56 PM   #3
Senior Member
 
Ron in BC's Avatar
 
Join Date: Jan 2014
Location: North Van., British Columbia
Trailer: 2014 Escape 19, sold; 2019 Escape 21, Sept. 2019
Posts: 8,860
Well, if I was a betting guy I'd bet you'd find supports to nowhere in several places. The tip off is seeing a group of about 5 screws. They depend on several screws to the deck material to bridge the gap. It works but I noticed in my 19 that it you put a point load on the area, like kneeling, you hear it creak. Not a big deal but I wasn't going to ignore it and put it back together when I had a chance to improve it.

What's next? Don't make me think that far ahead. The list is very long.

One thing that is different though is that for the first time since 1988 when it became feasible to have a consumer priced inverter and microwave, they're not on the list. With USB charging and a 12 volt TV and extremely minimal use of the microwave I'll probably skip installing them. But they're are easy to retro-fit and never say never.

Ron
Ron in BC is online now   Reply With Quote
Old 09-25-2019, 02:37 PM   #4
Senior Member
 
Join Date: Jul 2015
Location: Surrey, British Columbia
Trailer: 2013, 17B 'Mini Pearl' and a 2010 Highlander
Posts: 400
Quote:
Originally Posted by Ron in BC View Post
Well, if I was a betting guy I'd bet you'd find supports to nowhere in several places.

With USB charging and a 12 volt TV
You can find lots of variations of this on amazon.ca for USB stuff.
And newer models have QC3 charging that works quite well.

I'll be looking for those non-supports...
Attached Images
File Type: jpg USBa.jpg (312.1 KB, 25 views)
__________________
____
John
jxoco is offline   Reply With Quote
Old 09-25-2019, 03:36 PM   #5
Senior Member
 
MyronL's Avatar
 
Join Date: May 2013
Location: ..., New Mexico
Trailer: 2013 Esc19/'14 Silvrado
Posts: 4,193
Eyes on you, Ron.
Attached Images
File Type: jpg eyes.jpg (89.2 KB, 11 views)
__________________
Myron
"A billion here, a billion there...add it all up and before you know it you're talking real money." Everett Dirkson
MyronL is offline   Reply With Quote
Old 09-25-2019, 03:46 PM   #6
Senior Member
 
Join Date: Apr 2018
Location: Ocean Park, Maine
Trailer: 21NE picked up in May 2022
Posts: 207
I just put one of these in where my 12volt socket comes in (since my "non-escape trailer" does not have a volt meter in it)......about $20.

Randy in Maine is offline   Reply With Quote
Old 09-25-2019, 05:47 PM   #7
Senior Member
 
Oldtimer's Avatar
 
Join Date: Apr 2017
Location: DFW, Texas
Trailer: 2018 21 Sept 7 2018
Posts: 1,073
And where did you purchase this setup
Oldtimer is offline   Reply With Quote
Old 09-25-2019, 06:08 PM   #8
Senior Member
 
Ron in BC's Avatar
 
Join Date: Jan 2014
Location: North Van., British Columbia
Trailer: 2014 Escape 19, sold; 2019 Escape 21, Sept. 2019
Posts: 8,860
So just dealt with the support to nowhere on the other side and I open up the drivers side. What's the first thing that I do? Put my elbow down on the "support" and lean forward. Almost did a face plant. Must be a slow learner. Jim, no comment.

Yes, USB and voltmeter outlets are very inexpensive. I had 3 different ones in my 19 and will have at least 2 in the 21. Always nice to see voltage at a glance and you can never have too many outlets.

I see ETI hasn't lost their love of crimp connectors. At least opening up hidden spaces shows me where they are if I have problems in the future.

Ron
Attached Images
File Type: jpg IMGP0054_resize.JPG (300.1 KB, 37 views)
File Type: jpg 18-01-2015 3-19-29 PM6_resize.jpg (167.5 KB, 40 views)
File Type: jpg IMGP0018_resize.JPG (179.1 KB, 34 views)
File Type: jpg IMGP0055_resize.JPG (350.1 KB, 38 views)
Ron in BC is online now   Reply With Quote
Old 09-25-2019, 08:55 PM   #9
Senior Member
 
Patandlinda's Avatar
 
Join Date: Sep 2013
Location: Ventura County, California
Trailer: 2013 19 Escape
Posts: 7,204
Quote:
Originally Posted by Ron in BC View Post
So just dealt with the support to nowhere on the other side and I open up the drivers side. What's the first thing that I do? Put my elbow down on the "support" and lean forward. Almost did a face plant. Must be a slow learner. Jim, no comment.

Yes, USB and voltmeter outlets are very inexpensive. I had 3 different ones in my 19 and will have at least 2 in the 21. Always nice to see voltage at a glance and you can never have too many outlets.

I see ETI hasn't lost their love of crimp connectors. At least opening up hidden spaces shows me where they are if I have problems in the future.

Ron
Ron first picture shows your cord confined but it is a little tangled . That will definitely gets worst as cord gets cold Pat
Patandlinda is offline   Reply With Quote
Old 09-26-2019, 09:16 AM   #10
Senior Member
 
Join Date: Jul 2015
Location: Surrey, British Columbia
Trailer: 2013, 17B 'Mini Pearl' and a 2010 Highlander
Posts: 400
Quote:
Originally Posted by Oldtimer View Post
And where did you purchase this setup
you will find a lot of them on amazon, many variations.

https://www.amazon.com/Linkstyle-Cha...6TAWJTPDWGKR94

https://www.amazon.com/Ginsco-Cigare...4RABN8K9AD1X40

I like the ones with RED leds, they don't light up the interior of the trailer so much.
__________________
____
John
jxoco is offline   Reply With Quote
Old 09-26-2019, 09:41 AM   #11
Senior Member
 
Join Date: Apr 2018
Location: Ocean Park, Maine
Trailer: 21NE picked up in May 2022
Posts: 207
I have a nice set of "open barrel crimpers" that I do most of my automotive crimping with pretty good success.

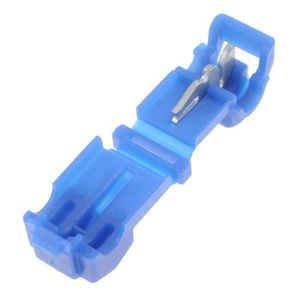
I have never been a big fan of these "Scotch Block" connectors like these that we sumetimes need to use....


I had a "boat guy" show me a little trick when using them. If you insert some basic silicon rtv sealant into the completed connection it 1) not only makes the connection a lot more watertight but 2) more importantly it greatly minimizes any vibration/looseness by keeping the connector "pretty tight" as it cures pretty solid.

Just another option to consider.
Randy in Maine is offline   Reply With Quote
Old 09-25-2019, 06:19 PM   #12
Senior Member
 
gbaglo's Avatar
 
Join Date: Oct 2008
Location: North Vancouver, British Columbia
Trailer: 2009 Escape 17B 2020 Toyota Highlander XLE
Posts: 17,136
Here's the ad Google placed alongside your post.
Hope it helps.
Attached Images
File Type: jpg Screen Shot 2019-09-25 at 4.18.00 PM.jpg (55.3 KB, 10 views)
__________________
What happens to the hole when the cheese is gone?
- Bertolt Brecht
gbaglo is offline   Reply With Quote
Old 09-25-2019, 07:24 PM   #13
Senior Member
 
Ron in BC's Avatar
 
Join Date: Jan 2014
Location: North Van., British Columbia
Trailer: 2014 Escape 19, sold; 2019 Escape 21, Sept. 2019
Posts: 8,860
Good one Glenn. Kind of scary though, it's kind of like someones looking over your shoulder. We used to joke about Big Brother watching, not so much of a joke now.

Ron
Ron in BC is online now   Reply With Quote
Old 09-25-2019, 08:12 PM   #14
Senior Member
 
Mike Lewis's Avatar
 
Join Date: Feb 2013
Location: Santa Rosa County, Florida
Trailer: 2014 Escape 21 Tow: 2024 Toyota Tundra
Posts: 3,105
Ron- Did you reinforce the front panel where you installed the marine battery switch? If so, how did you do it? Thanks.

And regarding ETI crimping connections-- how would you do it? Crimp and solder? I'm trying to learn best practices for low voltage wiring.
__________________
Mike Lewis
She don't lie, she don't lie, she don't lie-- propane
Photos and travelogues here: mikelewisimages.com
Mike Lewis is offline   Reply With Quote
Old 09-25-2019, 08:50 PM   #15
Senior Member
 
Join Date: Dec 2012
Location: Edmonton, Alberta
Trailer: 1979 Boler B1700
Posts: 14,935
Quote:
Originally Posted by Mike Lewis View Post
... how would you do it? Crimp and solder? I'm trying to learn best practices for low voltage wiring.
Electrical connections are crimped - there's nothing wrong with that. Practices which are problems (which may or may not occur in any specific trailer) include
  • splices in what should be continuous wire runs (I think the crimped butt splice connectors in Ron's last photo are the issue to which he is referring), and
  • insulation-displacing connectors (such as 3M Scotchlok taps)
  • twist-on wire nuts
Solder is for printed circuit boards. Others will disagree, but try to find a soldered connection other than on a circuit board anywhere in a modern automobile...
Brian B-P is offline   Reply With Quote
Old 09-25-2019, 09:22 PM   #16
Senior Member
 
Ron in BC's Avatar
 
Join Date: Jan 2014
Location: North Van., British Columbia
Trailer: 2014 Escape 19, sold; 2019 Escape 21, Sept. 2019
Posts: 8,860
Quote:
Originally Posted by Mike Lewis View Post
Ron- Did you reinforce the front panel where you installed the marine battery switch? If so, how did you do it? Thanks.

And regarding ETI crimping connections-- how would you do it? Crimp and solder? I'm trying to learn best practices for low voltage wiring.
No, I didn't reinforce the front panel. It is a rotary switch, there isn't any push-pull action. The forces required to rotate the knob aren't large and the 4 machine screws are in shear. I've mounted them this way before and it's certainly strong enough to not require a back panel.

Personally I always solder my crimped connectors. Even being very careful crimping I've had crimped connectors come apart with a small tug. Soldered connections don't separate easily.


Quote:
Originally Posted by Brian B-P View Post
Electrical connections are crimped - there's nothing wrong with that. Practices which are problems (which may or may not occur in any specific trailer) include
  • splices in what should be continuous wire runs (I think the crimped butt splice connectors in Ron's last photo are the issue to which he is referring), and
  • insulation-displacing connectors (such as 3M Scotchlok taps)
  • twist-on wire nuts
Solder is for printed circuit boards. Others will disagree, but try to find a soldered connection other than on a circuit board anywhere in a modern automobile...
Yes, it's the butt splices in normally inaccessible spaces that I don't like. I'd like to see more continuous runs and less butt splices.

Also the wire color changes drive me nuts. You look in a hidden space and see that a red wire becomes a green wire etc. Makes it very hard to trouble shoot if you're looking for the exit point of the red wire.

True about the lack of soldered connections in a modern car. But I have to believe that the highly standardized process in car production yields pretty consistent results. The "individually done by hand" method that ETI uses does yield some less than terrific results as I found on my last trailer.

Pat, that's a discussion for another day.

Ron
Attached Images
File Type: jpg 27-03-2015 2-37-28 PM3_resize.jpg (240.0 KB, 24 views)
Ron in BC is online now   Reply With Quote
Old 09-25-2019, 08:42 PM   #17
Senior Member
 
Merlin's Avatar
 
Join Date: Nov 2018
Location: Left turn at Albuquerque, New Mexico
Trailer: 505 5.0TA
Posts: 147
Quote:
Originally Posted by Ron in BC View Post
Good one Glenn. Kind of scary though, it's kind of like someones looking over your shoulder. We used to joke about Big Brother watching, not so much of a joke now.

Ron

Not to worry, it's just google selling your data to advertisers. Big Brother has said this is OK.
Merlin is offline   Reply With Quote
Old 09-26-2019, 06:12 AM   #18
Senior Member
 
Oldtimer's Avatar
 
Join Date: Apr 2017
Location: DFW, Texas
Trailer: 2018 21 Sept 7 2018
Posts: 1,073
I had to redo my crimp connection on my 21 right after we picked it up last yr. seems to be a reoccurring problem that ETI hasn’t resolved yet.
Oldtimer is offline   Reply With Quote
Old 09-26-2019, 07:29 AM   #19
Senior Member
 
MyronL's Avatar
 
Join Date: May 2013
Location: ..., New Mexico
Trailer: 2013 Esc19/'14 Silvrado
Posts: 4,193
When I use a twist on wire nut I always use electrical tape to keep things from coming apart.
__________________
Myron
"A billion here, a billion there...add it all up and before you know it you're talking real money." Everett Dirkson
MyronL is offline   Reply With Quote
Old 09-26-2019, 10:17 AM   #20
Senior Member
 
Patandlinda's Avatar
 
Join Date: Sep 2013
Location: Ventura County, California
Trailer: 2013 19 Escape
Posts: 7,204
Quote:
Originally Posted by MyronL View Post
When I use a twist on wire nut I always use electrical tape to keep things from coming apart.
Me too Myron . Pat
Patandlinda is offline   Reply With Quote
Reply


Posting Rules
You may not post new threads
You may not post replies
You may not post attachments
You may not edit your posts

BB code is On
Smilies are On
[IMG] code is On
HTML code is Off
Trackbacks are Off
Pingbacks are Off
Refbacks are Off


» Featured Campgrounds

Reviews provided by

Disclaimer:

This website is not affiliated with or endorsed by Escape Trailer Industries or any of its affiliates. This is an independent, unofficial site.


All times are GMT -5. The time now is 07:28 PM.


Powered by vBulletin® Version 3.8.8 Beta 4
Copyright ©2000 - 2024, vBulletin Solutions, Inc.
Copyright 2023 Social Knowledge, LLC All Rights Reserved.