 |
|
 06-07-2018, 11:48 AM
|
#1
|
|
Member
Join Date: Apr 2017
Location: Seattle, Washington
Trailer: 2018 17B
Posts: 45
|
17B with gaucho bunk beds: modifications, décor, and storage solutions
We are a family of four and got our 17B in April. We have been very busy getting it all set up and are finally finished! I collaborated with an interior designer friend of mine ( Seattle Urban Getaways) on the decor. I spent a lot of time gleaning ideas from this forum and other trailer groups. I also poured over pictures on Pinterest and Google Images and did a lot of Amazon searching.
Thank you so much to everyone on this forum for all your great ideas and helpful posts! We want to return the favor now, so I’ll post pictures and more detailed info of our modifications in separate comments below. I always appreciated product links in other people’s posts, so I will include those for things we ordered online. Highlights include: - Bunk bed guard rails and ladder
- Pegboard
- Chalkboard fridge
- Ceiling light decal
- Subway tile backsplash
- Wallpaper on bathroom
- Bathroom interior
- Outdoor towel drying rack
- Kitchen storage solutions and trash cans
- Containers for overhead bins
- Foam strip on top of door to prevent head banging
- Blackout curtains
- Foam mattress topper and RV Superbag bedding

|

|

|
|
06-07-2018, 12:04 PM
|
#2
|
|
Member
Join Date: Apr 2017
Location: Seattle, Washington
Trailer: 2018 17B
Posts: 45
|
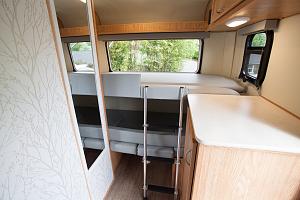
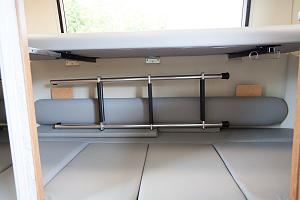
Bunk bed guard rails and ladder
We ordered the gaucho bunk bed option, which is available in the 17B. This allows the smaller dinette to also convert to a sofa or bunk beds. The 19 has a cot option.
We have two small kids and worried they could roll off the beds and would have a hard time getting up and down from the top bunk on their own. We wanted a solution that was safe, stored easily, gave the kids independent access to their beds, and looked good.
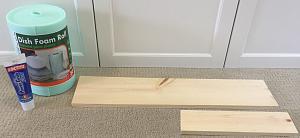
For the top bunk, we bought: - 1x8 board
- 1x4 board
- Loctite Power Grab all-purpose glue
- Dish foam wrap roll
- L Brackets (we used 4 smaller ones for the guard rail board that was also supported by the wall, and 4 larger ones for the load bearing ladder board)
- Bunk bed ladder
We had the boards cut to the right size at Home Depot. To provide extra cushioning, we wrapped them in the dish foam using both Loctite Power Grab glue and a staple gun. ETI gave us the extra custom fabric from our seat cushions, so we next wrapped the guard rails in our seat cushion material. We drilled holes and attached it to the long bunk bed board using L brackets. For the ladder support board, we also installed screws with spacers to keep the ladder from moving out of place. We cut the bunk bed ladder to the right size using the instructions provided.
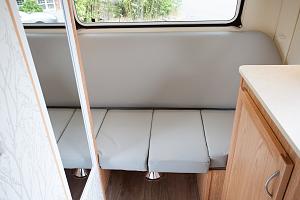
For the bottom bunk, we ordered a foam bumper and wrapped the long side in the custom fabric using the Loctite glue.
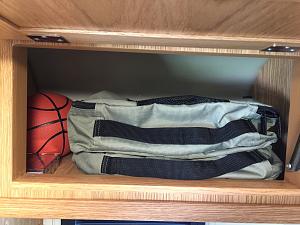
When in dinette mode, the long board and the ladder can be stored behind the gaucho seat back. The bumper from the bottom bunk can be stored in the overhead shelf.
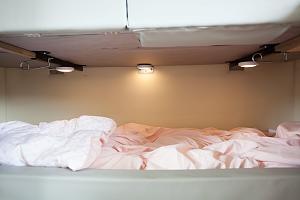
Based on the recommendation of another forum member, we also bought magnetic lights that can give light to the bottom bunk. This kind is great, because it can be bright or dim for a night light.
Before:
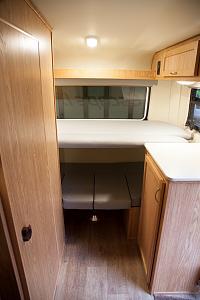
After:
Magnetic lights for lower bunk.
This is where the ladder and long board store when in dinette or sofa mode.
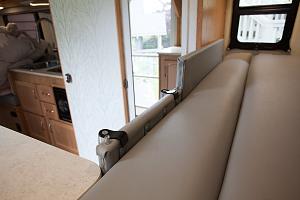
Dinette option. Notice we put the bumper in the shelf above.

Gaucho sofa option. The mirror makes the cushions look a little more chopped up than in reality. The table makes a base, and the two back cushions go in the center.
Some of the supplies:

|
|
|
|
|
06-07-2018, 12:13 PM
|
#3
|
|
Member
Join Date: Apr 2017
Location: Seattle, Washington
Trailer: 2018 17B
Posts: 45
|
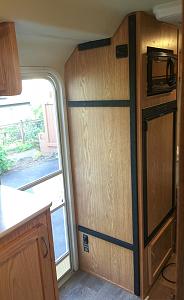
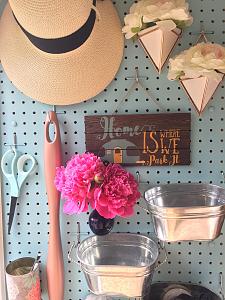
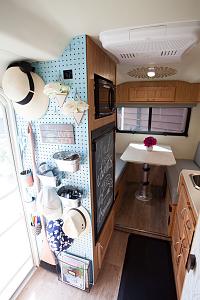
Pegboard
This is a functional accent wall. It serves as our entryway and gives us a place to hang our coming and going things: keys, hats, sunglasses, headlamps, etc. It also gives us a spot for our broom, scissors, paper, books, pens, and markers.
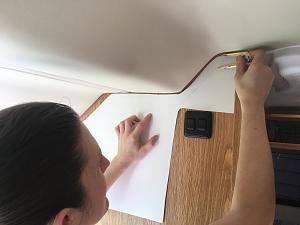
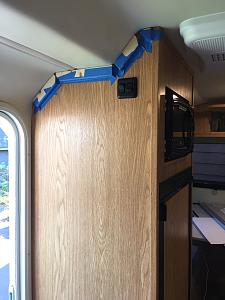
To cut the pegboard, we first made a life-size template using poster board. We learned how to scribe the curve by watching this Youtube video. We first scribed along the ceiling, and then taped up wood to scribe exactly where the pegboard would hit the ceiling. The sides of the wall were not perfectly parallel, so we also had to measure and account for that. Once we had our life size template that fit perfectly, we traced it on the pegboard, and then cut the pegboard with a jig saw. Cutting was tricky, but we ended up with a perfect snug fit! We cut out holes for the awning and light switches.
We cut furring strips, painted them, and screwed them into studs on the wall. The pegboard both rests on the floor and is screwed into these furring strips, so it is very securely attached.
We painted the pegboard and screw cap covers a blue color. Then bought pegboard hardware and decorations for the pegboard.
Before:
After:

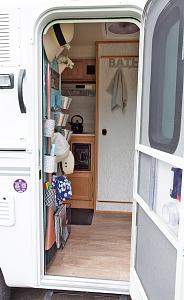
Entrance before:
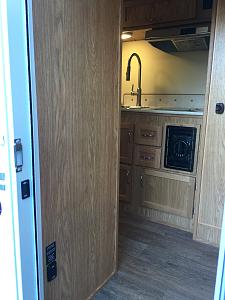
Entrance after:
Scribing the curve on poster board
Then we scribed the curve exactly where the peg board would be by taping up wood blocks to the correct depth.
Furring strips:
I have a magnetic flower vase that I can attach to pegboard hardware and put real flowers in I took peonies, my favorite flower, on our first trip.

|
|
|
|
|
06-07-2018, 12:19 PM
|
#4
|
|
Member
Join Date: Apr 2017
Location: Seattle, Washington
Trailer: 2018 17B
Posts: 45
|
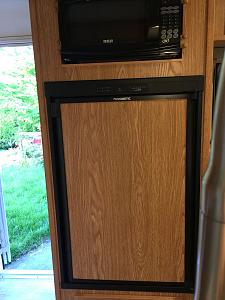
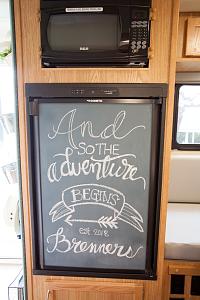
Chalkboard fridge
We took out the fridge panel and used the back side for this project. We sanded it and then painted it using this Martha Stewart guide for custom color chalkboard paint.
Our interior designer friend did the chalk art for us.
Before:
After:


|
|
|
|
|
06-07-2018, 12:28 PM
|
#5
|
|
Member
Join Date: Apr 2017
Location: Seattle, Washington
Trailer: 2018 17B
Posts: 45
|
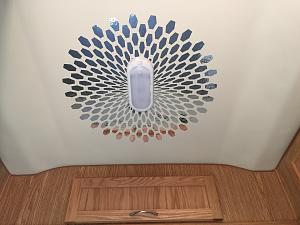
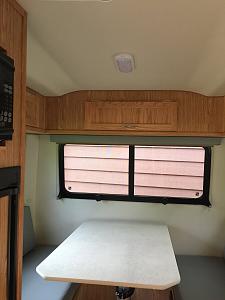
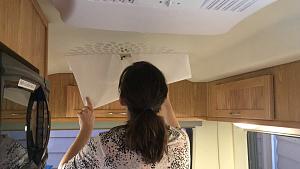
Ceiling light decal
I really wanted to do something on the c  eiling and poured over tons of ideas. In the end, we decided to do a decal around the light over the larger dinette because of ease of application and it being impermanent. I first tested some of the decal pieces on a vinyl wall sample from ETI, and it removed with no trace.
We ordered this 3-D Reflective Decal in the 22inch diameter.
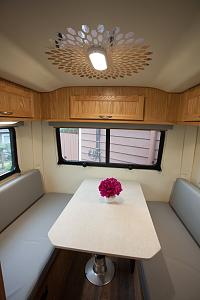
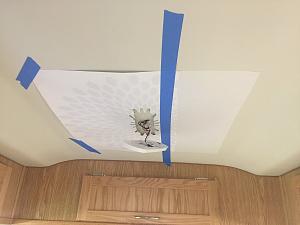
We removed the light cover and used it to trace on the decal. I cut out the decal center part that would not show. Then we put it on the ceiling using the hinge application method. Then we put the light cover back up, and it looks like the decal comes right out of the light!

Then we put the light cover back up, and it looks like the decal comes right out of the light!
Before:
After:
Hinge application method:
Easy peel off application:

|
|
|
|
|
06-07-2018, 12:38 PM
|
#6
|
|
Member
Join Date: Apr 2017
Location: Seattle, Washington
Trailer: 2018 17B
Posts: 45
|
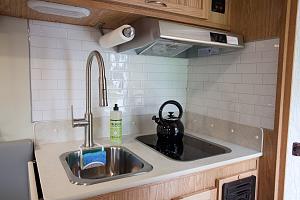
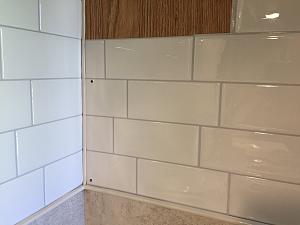
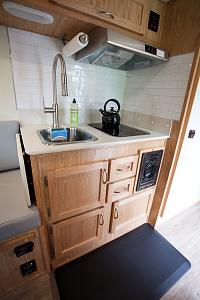
Subway tile backsplash
We were inspired by many others on this forum who have installed backsplash and wanted to do the same.
First, we painted the brown countertop trim and screw cap covers. I color matched it to the cream trim in front; we used Benjamin Moore Aura interior paint in semi gloss OC-7 Creamy White. For the screw caps, I pried them off with a screwdriver and then stuck them on little balls of playdough to keep them from moving around when I painted them.
We installed Smart Tiles peel and stick subway tiles in Metro Campagnola. I bought them at Home Depot. I tested them on both a vinyl wall and wood sample from ETI, and they both peeled off without damage.
I also installed a peel and stick edge trim.
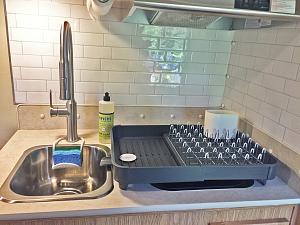
Additionally, we have a custom faucet that ETI installed for us. It is this one: Nola Single Lever Pull-down Kitchen Faucet Stainless Steel Finish.
Before:
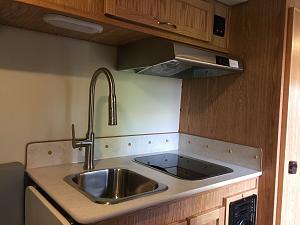
After:
I could slide the painters tape slightly beneath the edge of the trim. This painting part of the project was a bit time consuming.
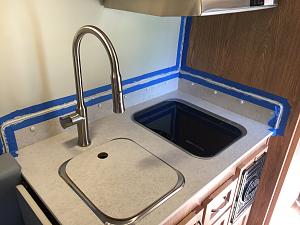
For the tile with screws, I drilled a hole in the tiles before installing them.

|
|
|
|
|
06-07-2018, 12:46 PM
|
#7
|
|
Member
Join Date: Apr 2017
Location: Seattle, Washington
Trailer: 2018 17B
Posts: 45
|
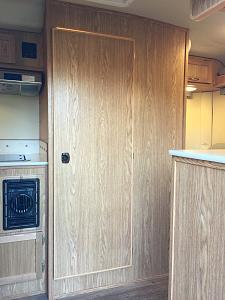
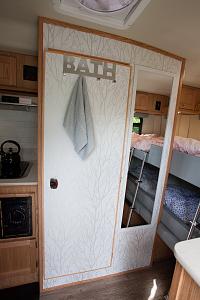
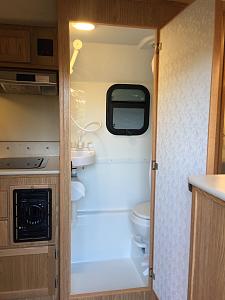
Wallpaper and mirror on bathroom
We used a peel and stick wallpaper on the bathroom. We ordered two of these treetop rolls from Wayfair.
Again, we tested the wallpaper, and it removed without a trace.
Installing this turned out to be rather tricky. We cut it with a razor blade, and it was hard to get a perfectly straight line right along the edge. Also, we had to measure exactly for leaving space to hang a mirror.
We bought this lightweight mirror from Target and hung it with 3M Scotch Permanent Double Sided Extreme Mounting Tape.
I bought this over-the-door hook rack as a place to hang our kitchen towel or extra things as needed. We bent the hooks to fit snugly over our door and taped it at the top of the bath door with VHB tape so it doesnt slide around.
We love the end result and how it brightens the space! It makes the bathroom feel more like its own room rather than blending in with the rest of the cabinetry. The mirror also helps the narrow space between the bath and the wardrobe not feel so tight.
Before:
After:
In process:

|
|
|
|
|
06-07-2018, 12:48 PM
|
#8
|
|
Senior Member
Join Date: Jun 2010
Location: Central, Pennsylvania
Trailer: Escape#5 2022 E19
Posts: 26,268
|
You guys have been busy....
__________________
Jim
Sometime life gets in the way of living.......
|
|
|
|
|
06-07-2018, 01:02 PM
|
#9
|
|
Member
Join Date: Apr 2017
Location: Seattle, Washington
Trailer: 2018 17B
Posts: 45
|
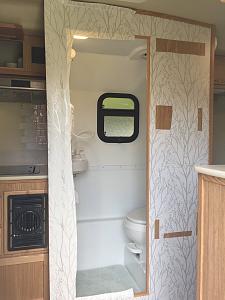
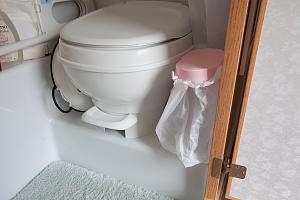
Bathroom interior
I ordered a 21 wide bath mat , then cut it down to a 21 square size, and sewed the edging back on the side I cut. It gives the floor warmth, and then we set it just outside the bath when we shower.
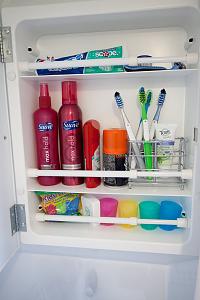
We tried to keep the bulk of items down low so that they do not get into our elbow space. Useful items:
Also, for anyone else with little kids, a potty toilet trainer seat fits to the side of the toilet.
Before:
After:
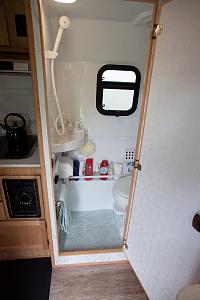

Tension rods in medicine cabinet:

|
|
|
|
|
06-07-2018, 01:08 PM
|
#10
|
|
Member
Join Date: Apr 2017
Location: Seattle, Washington
Trailer: 2018 17B
Posts: 45
|
Outside towel drying rack
|
|
|
|
|
06-07-2018, 01:41 PM
|
#11
|
|
Member
Join Date: Apr 2017
Location: Seattle, Washington
Trailer: 2018 17B
Posts: 45
|
Kitchen storage solutions and trash cans
I did a lot of research on items to stock our kitchen. So in case this is helpful for anyone, here are things we ordered that I really like in our kitchen: - Anti fatigue mat fits perfectly!
- Sponge sink caddy keeps the limited counter space clear, but is easy to move if you need the sink space.
- Wall mounted paper towel holder
- Slim waste baskets in different colors – I wanted to be able to fit three trash cans – trash, recycling, and compost – and these fit well in the lower right cabinet of the kitchen. We put some wood boards down (not attached, just sitting on the floor) to help the trash cans stand evenly and right at the edge.
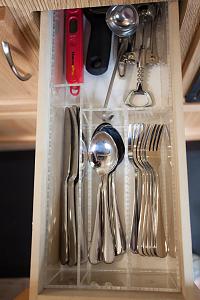
- Custom silverware drawer organizer - After extensive searching, I could not find a standard silverware organizer that would fit in the tiny Escape drawers, but we did find this company that custom cuts drawer inserts to your specifications. Perfect fit for our silverware!
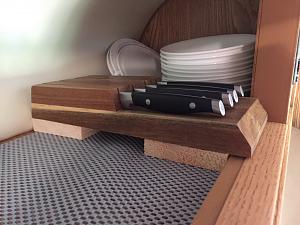
- Knife block – We needed to keep our sharp knives out of reach of the kids. We screwed a wood block down below this and it fits snugly in place up high above the stove.
- Grip shelf liner – helps keep dishes from sliding
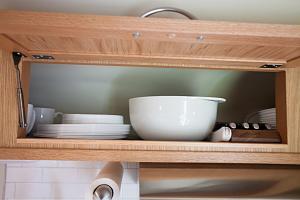
- Nesting bowls set – fits nicely overhead
- Corelle dishes (We bought this set for 4 with mugs and lids and this set for 6 of plates and bowls) – these dishes are microwavable, have lids for the bowls (function like Tupperware), and are less likely to break than regular ceramic dishes.
- Water tumblers – look like glasses, but are plastic
- Expandable dish drying rack – fits in overhead and gives a large space for dish drying
Anti fatigue mat and paper towel holder:
Trash cans:
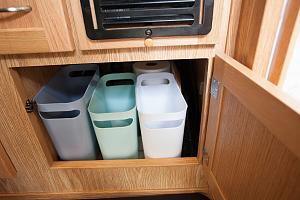
Boards for trash cans to rest on.

Laser cut silverware drawer insert:
Overhead cabinet above stove:
To get the knife block to fit in cabinet, we raised it up by screwing wood blocks underneath it.
Overhead cabinet above table:
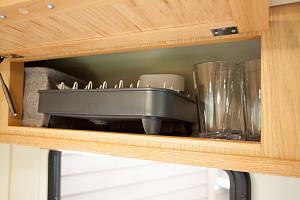
Expandable dish drying rack:

|
|
|
|
|
06-07-2018, 01:48 PM
|
#12
|
|
Member
Join Date: Apr 2017
Location: Seattle, Washington
Trailer: 2018 17B
Posts: 45
|
Containers for overhead bins
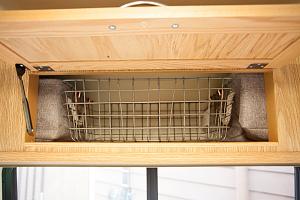
- Fabric baskets these are just the right size to maximize the corner spaces in the bigger overhead bins.
- Wire basket This plus two of the above fabric baskets fill the cabinet over the larger dinette nearly perfectly. I hesitate to post this one though, because this basket is just a wee bit too large at the top, and while the door does close, the basket presses into the headliner. I have been planning to try to bend the basket slightly narrower, but haven't attempted it yet.
- -Packing cubes - We already owned this set and the medium size cubes fit great in the small cabinet above the bunk beds. At the suggestion of another forum member, we are using this as a toy cabinet for the kids, and they each get one cube to fill.
Cabinet over larger dinette
Small cabinet behind bathroom above smaller dinette

|
|
|
|
|
06-07-2018, 01:51 PM
|
#13
|
|
Member
Join Date: Apr 2017
Location: Seattle, Washington
Trailer: 2018 17B
Posts: 45
|
Foam strip on top of door to prevent head banging
After painfully banging our head above the door several times, we installed a foam bumper strip, and attached it with the double-sided tape that came with it. It definitely helps.

|
|
|
|
|
06-07-2018, 01:55 PM
|
#14
|
|
Member
Join Date: Apr 2017
Location: Seattle, Washington
Trailer: 2018 17B
Posts: 45
|
Blackout curtains
We ordered blackout curtains and small strong magnets. We cut the curtains to size for all the windows, and then superglued the magnets to the location of the screws on the window frames. These blackout curtains go up behind the regular cellular blinds and help keep the morning sunshine from waking us up.
We havent done this yet, but we are planning to sew or staple little patches of fabric over the magnets to ensure they stay in place. Right now, we have to carefully roll the curtains up to store so that the magnets dont stick together.

|
|
|
|
|
06-07-2018, 02:00 PM
|
#15
|
|
Member
Join Date: Apr 2017
Location: Seattle, Washington
Trailer: 2018 17B
Posts: 45
|
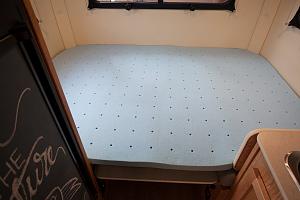
Grip liner, foam mattress topper, and RV Superbag bedding
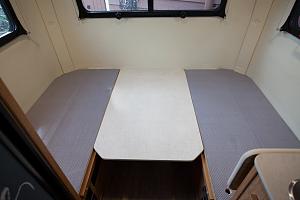
We are sleeping four people, so we are converting our table and bed every day. At the suggestion of people on this forum, we got the pedestal table option for ease of pushing the table up and down.
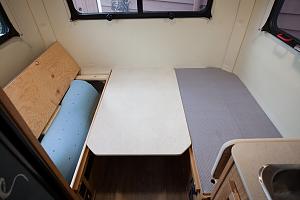
We had our seat cushions wrapped on both sides. Because of another suggestion of people on this forum, we stapled a grip liner on both dinettes to keep the cushions from sliding and to protect them from the hinges.
After sleeping on the seat cushions for our first trip, we thought a mattress topper would be more comfortable. We bought the same 2 mattress topper that we have on our bed at home and like. We used the seat cushions to trace the curved edging, and then measured the space to find the appropriate length. We cut the mattress topper using a bread knife (recommended by an upholsterer), which worked surprisingly well. We are able to fit both our bedding and mattress topper in the large bench storage. Our pillows fit in one of the smaller bench storage compartments.
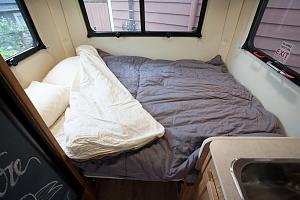
For bedding we ordered an RV Superbag. We got a gray queen size one that they shortened to 77 length free of charge. This has the ease of a sleeping bag for set up and storing, but comes with a sheet, and has a lighter summer comforter side and heavier winter comforter side.
Here you can see the pedestal table:
Grip liner:
Storage for mattress topper and bedding
Mattress topper
RV Superbag:

|
|
|
|
|
06-07-2018, 02:17 PM
|
#16
|
|
Senior Member
Join Date: Jun 2010
Location: Central, Pennsylvania
Trailer: Escape#5 2022 E19
Posts: 26,268
|
Where do you keep all the items on the pegboard while undertow? Really like some of your homey touches...
__________________
Jim
Sometime life gets in the way of living.......
|
|
|
|
|
06-07-2018, 02:23 PM
|
#17
|
|
Senior Member
Join Date: Jun 2010
Location: Central, Pennsylvania
Trailer: Escape#5 2022 E19
Posts: 26,268
|
I tried to rotate your pictures but for some reason they do not appear? some glitch somewhere 
__________________
Jim
Sometime life gets in the way of living.......
|
|
|
|
|
06-07-2018, 02:48 PM
|
#18
|
|
Senior Member
Join Date: Oct 2008
Location: North Vancouver, British Columbia
Trailer: 2009 Escape 17B 2020 Toyota Highlander XLE
Posts: 17,136
|
Good luck with suction cup anything.
I find mine on the floor of the bath after most trips.
__________________
What happens to the hole when the cheese is gone?
- Bertolt Brecht
|
|
|
|
|
06-07-2018, 04:32 PM
|
#19
|
|
Senior Member
Join Date: Jun 2013
Location: Felton, California
Trailer: 2018 21' ; 2014 19' (Sold)
Posts: 1,309
|
(One can see photos of the interior by clicking on the web site provided in the first post and going to the Blog.)
Your trailer is amazing and, with all the special touches, you're going to really love your home away from home!! Enjoy and thank you for sharing all this information!
__________________
Jan
We do not remember days, we remember moments.
- Cesare Pavese
|
|
|
|
|
06-07-2018, 04:34 PM
|
#20
|
|
Member
Join Date: Apr 2017
Location: Seattle, Washington
Trailer: 2018 17B
Posts: 45
|
Quote:
Originally Posted by cpaharley2008

Where do you keep all the items on the pegboard while undertow? Really like some of your homey touches...
|
For our last trip, we left everything on the pegboard when traveling and nothing fell off. We have peg locks on the hooks and that helps. However, some of the metal items scuffed up the pegboard while swinging (e.g. scissors). So we did some paint touch ups and this next trip, we are going to try setting those items on the lower bunk bed for travel.
Thanks for trying to rotate the blackout curtain pictures. I couldn't figure out why they were sideways either.
|
|
|
|
|
|
 Posting Rules
|
You may not post new threads
You may not post replies
You may not post attachments
You may not edit your posts
HTML code is Off
|
|
|
|
 » Recent Discussions
 |
|
|
|
|
|
|
|
|
|
|
|
|
|
|
|
|
|
|
|
|
|
|
|
|
|
|
|
|
|
|

|


 Linear Mode

