 |
|
 01-19-2017, 04:49 PM
|
#1
|
|
Senior Member
Join Date: Jun 2015
Location: Parker, Colorado
Trailer: 2016 Escape 19
Posts: 120
|
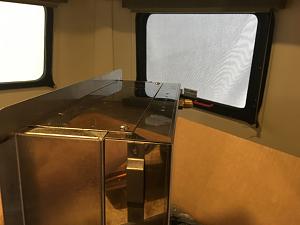
New Stove Install
Decided to swap out the stock stove with something new. We had thought about sending up a custom stove to ETI but weren’t sure, when we ordered the trailer, what we would ultimately want or if the stock stove would be fine. After our first season of camping, we didn’t like the way the stove and cover broke up the small counter and decided on the Dickinson marine stove after reading about it on this forum.
So out with the old and in with the new….
Removing the old stove is pretty straight forward.

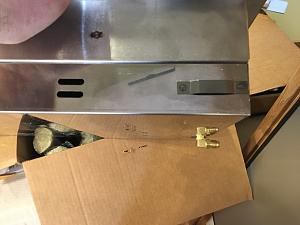
The first issue to deal with was the flare fitting coming out of the bottom of the stove. With the copper gas line needing to curve up and have room for the fitting nut, it would interfere with the top drawer. One option was to trim down the drawer so it would fit.
The other option (which I used) was to replace the 1/4” fitting on the stove with a street elbow fitting.
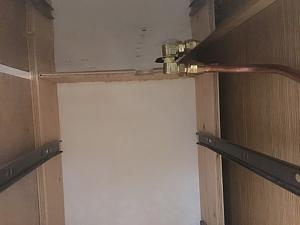
Once I had that figured out, I knew where to ultimately cut the larger opening.
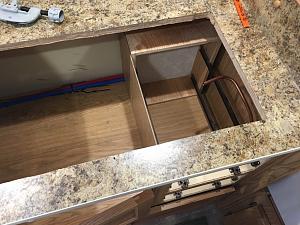
Cut and re-bent the copper line and used my flare tool for the stove fitting. Very important to place the flare nut on the pipe before flaring the end (ask me how I know  ). But you can see it creates more room below the stove and the drawer fit without having to cut it down. I also had to cut a hole in the rear drawer support so that I could access the corner anchor with a screw driver.
|

|

|
|
01-19-2017, 04:51 PM
|
#2
|
|
Senior Member
Join Date: Jun 2015
Location: Parker, Colorado
Trailer: 2016 Escape 19
Posts: 120
|
|
|
|
|
|
01-19-2017, 05:00 PM
|
#3
|
|
Senior Member
Join Date: Aug 2015
Location: Ponoka, Alberta
Trailer: 2016 19 classic "outta sight", jeep rubicon unlimited
Posts: 1,645
|
Nice job Mess!! Sure gives a lot more useable counter space.
__________________
"never lose hope, never lose faith"
|
|
|
|
|
01-19-2017, 06:41 PM
|
#4
|
|
Senior Member
Join Date: Oct 2015
Location: Spokane, Washington
Trailer: 2017 Escape 17B/2021 F150 w/ 3.5 Ecoboost
Posts: 368
|
Really nice. Too big to fit in a 17B though. I seriously looked at these stoves but couldn't swing the counter space without spending the extra $$$ to move up to a 19ft.
__________________
Rick
|
|
|
|
|
01-19-2017, 06:53 PM
|
#5
|
|
Senior Member
Join Date: Oct 2008
Location: Calgary, Alberta
Trailer: 2017 Escape 5.0 TA
Posts: 15,552
|
That looks great. I is nice to see all these Dickinson stoves going in. Here I am the first to buy one 1 1/2 years agi, and recently sold it to another member, so I could install one with an oven, a request from our chief cook. 
__________________
2017 Escape 5.0 TA
2015 Ford F150 Lariat 3.5L EcoBoost
2009 Escape 19 (previous)
Most folks are about as happy as they make up their minds to be. Abraham Lincoln
|
|
|
|
|
01-19-2017, 06:57 PM
|
#6
|
|
Senior Member
Join Date: Feb 2016
Location: Area 51, New Mexico
Trailer: pondering.....
Posts: 728
|
Quote:
Originally Posted by Mesa

|
thanks for the info...your instructions made it sound like a somewhat easy project and this method required no cutting of the drawer and no issues with operation of the drawer.
So the right angle gas fitting was the big difference from another Escape owners recent install.
If it required no modification of the drawers and nothing more than a different cutout and right angle gas fitting, then possibly ETI could do it if they were so inclined.
|
|
|
|
|
01-19-2017, 07:14 PM
|
#7
|
|
Site Team
Join Date: Jun 2014
Location: Canyon Lake, Texas
Trailer: 2015 19 "Past Tents", 2021 F150 Lariat 2.7L EB
Posts: 10,222
|
I like the solution of just changing the fitting on the stove side, Shawn. And a good point about the flare. Another tip is not to skimp on the flare tool by getting a cheap one at HD. Didn't work, and wound up going to Ace for a quality tool.
__________________
"You can't buy happiness, but you can buy an RV. And that is pretty close."
|
|
|
|
|
01-19-2017, 07:18 PM
|
#8
|
|
Site Team
Join Date: Jun 2014
Location: Canyon Lake, Texas
Trailer: 2015 19 "Past Tents", 2021 F150 Lariat 2.7L EB
Posts: 10,222
|
Quote:
Originally Posted by freespirit
trying to figure out how this method differed from Roberts install...
|
By removing the downward facing fitting on the stove and putting in an elbow, Shawn was apparently able to gain enough clearance to use the drawer without cutting it. I had an elbow, and measured where the bottom would be, and I determined at the time that it would not clear. This might be due to some height variance in the drawer, but I'm not sure. Anyway, his method worked and no mods to the top drawer.
There was one other difference. I had to cut the thin plywood support panels down quite a bit to clear the stove and provide access to the back anchor screws - not just the hole as Shawn was able to do. That's probably due to differences in the placement of those panels during the build.
__________________
"You can't buy happiness, but you can buy an RV. And that is pretty close."
|
|
|
|
|
01-19-2017, 07:35 PM
|
#9
|
|
Senior Member
Join Date: Feb 2016
Location: Area 51, New Mexico
Trailer: pondering.....
Posts: 728
|
Quote:
Originally Posted by rbryan4
By removing the downward facing fitting on the stove and putting in an elbow, Shawn was apparently able to gain enough clearance to use the drawer without cutting it. I had an elbow, and measured where the bottom would be, and I determined at the time that it would not clear. This might be due to some height variance in the drawer, but I'm not sure. Anyway, his method worked and no mods to the top drawer.
|
like trail leaders you both have shown the rest of us how to drop what appears to be a better functioning stove top in the trailer.. thanks
might try getting Escape to read this thread and see if they can make sure the cabinet dimensions remain such that the fitting is the only change.
|
|
|
|
|
01-19-2017, 07:59 PM
|
#10
|
|
Senior Member
Join Date: Sep 2016
Location: Bremerton, Washington
Trailer: 2019 5.0 TA
Posts: 1,141
|
Quote:
Originally Posted by Mesa
Here are before and after pics. Pretty happy with it. Definitely a better performing stove.
|
Nice Job! I hope to make a similar mod down the road.
On closer inspection of your before and after, it appears you removed the 12V outlet in the front. Did you relocate it elsewhere? or abandon it?
Arnie
__________________
- Arnie & Paula & Kizzy the rat terrier
https://www.arniesea.com
- 2019 5.0 TA, 2017 Tundra Platinum.
- Bremerton, WA
|
|
|
|
|
01-19-2017, 08:16 PM
|
#11
|
|
Senior Member
Join Date: Mar 2016
Location: Burlington Twp., New Jersey
Trailer: 2010 Escape 19
Posts: 7,146
|
Quote:
Originally Posted by Mesa
Once I had that figured out, I knew where to ultimately cut the larger opening.
|
Mesa: Nice work. I have this stove in hand awaiting install so it is nice to see someone else tackle it in a 19. Really hope the elbow will work for me as I was hoping to avoid altering the drawer. Question regarding positioning: Did you move the stove to the right at all towards the bulkhead/divider?
|
|
|
|
|
01-19-2017, 09:25 PM
|
#12
|
|
Senior Member
Join Date: Oct 2014
Location: Juneau, Alaska
Trailer: 2015 17A - Ready for more Maiden Voyages ....
Posts: 881
|
I measured it some time ago and found it would not fit in my 17A either. The problem was it needed 4 - 3/4" from (I think) the top of counter top. I did not have that much room below. Beautiful stove and I liked the higher burner output. Be careful though of the heat spill over up against your back splash.
Eventually, I'll install a taller metal back splash ..... probably at the same time that I raise the countertop.
Tom
__________________
Consciousness: That confusing time between naps
|
|
|
|
|
01-19-2017, 09:37 PM
|
#13
|
|
Site Team
Join Date: Jun 2014
Location: Canyon Lake, Texas
Trailer: 2015 19 "Past Tents", 2021 F150 Lariat 2.7L EB
Posts: 10,222
|
Quote:
Originally Posted by arniesea
On closer inspection of your before and after, it appears you removed the 12V outlet in the front. Did you relocate it elsewhere? or abandon it?
|
Good eye, Arnie. I didn't notice that. We have a 120V receptacle in the same location, but didn't have to remove it at all. Perhaps the 12V outlet protrudes more toward the back? I guess Shawn can weigh in.
__________________
"You can't buy happiness, but you can buy an RV. And that is pretty close."
|
|
|
|
|
01-19-2017, 09:43 PM
|
#14
|
|
Site Team
Join Date: Jun 2014
Location: Canyon Lake, Texas
Trailer: 2015 19 "Past Tents", 2021 F150 Lariat 2.7L EB
Posts: 10,222
|
Quote:
Originally Posted by StarvingHyena
Be careful though of the heat spill over up against your back splash.
Eventually, I'll install a taller metal back splash ..... probably at the same time that I raise the countertop.
|
That's a good point about the heat spill over Tom. 15K BTU's is much higher than the stock stove, and we do notice it. One key in our case was to install the stove as far forward as possible, to keep the distance to the backsplash at a maximum. The other key is to not turn it all the way up when cooking. That one doesn't need much of a reminder though, since all the way up is hot enough to easily sear a steak.
__________________
"You can't buy happiness, but you can buy an RV. And that is pretty close."
|
|
|
|
|
01-19-2017, 09:52 PM
|
#15
|
|
Senior Member
Join Date: Jun 2015
Location: Parker, Colorado
Trailer: 2016 Escape 19
Posts: 120
|
Quote:
Originally Posted by Jim Bennett
That looks great. I is nice to see all these Dickinson stoves going in. Here I am the first to buy one 1 1/2 years agi, and recently sold it to another member, so I could install one with an oven, a request from our chief cook. |
You're the one that turned me on to this stove.
|
|
|
|
|
01-19-2017, 09:54 PM
|
#16
|
|
Senior Member
Join Date: Jun 2015
Location: Parker, Colorado
Trailer: 2016 Escape 19
Posts: 120
|
Quote:
Originally Posted by rbryan4
There was one other difference. I had to cut the thin plywood support panels down quite a bit to clear the stove and provide access to the back anchor screws - not just the hole as Shawn was able to do. That's probably due to differences in the placement of those panels during the build.
|
I definitely had more space and the thin plywood was not a problem. Possibly a difference with a 2016 build.
|
|
|
|
|
01-19-2017, 09:59 PM
|
#17
|
|
Senior Member
Join Date: Jun 2015
Location: Parker, Colorado
Trailer: 2016 Escape 19
Posts: 120
|
Quote:
Originally Posted by arniesea
Nice Job! I hope to make a similar mod down the road.
On closer inspection of your before and after, it appears you removed the 12V outlet in the front. Did you relocate it elsewhere? or abandon it?
Arnie
|
Yeah, it's a real tight fit with the sidewall of the stove and mounting bolt. It will fit but I'm a little concerned about possible rubbing. I'll either put a double marine plug with a volt meter and outlet towards the sink (the volt meter isn't as deep and will line up with the old hole), or I'll just move the current plug towards the sink and put a decorative plate to hide the old hole.
|
|
|
|
|
01-19-2017, 10:03 PM
|
#18
|
|
Senior Member
Join Date: Jun 2015
Location: Parker, Colorado
Trailer: 2016 Escape 19
Posts: 120
|
Quote:
Originally Posted by rubicon327
Mesa: Nice work. I have this stove in hand awaiting install so it is nice to see someone else tackle it in a 19. Really hope the elbow will work for me as I was hoping to avoid altering the drawer. Question regarding positioning: Did you move the stove to the right at all towards the bulkhead/divider?
|
No, not at all. I extended the original cut, on the counter edge side, toward the sink. I also extended the original cut closest to, and parallel, to the bed bulkhead.
You really can't move it over since you still need a bend in the copper line and that put the rest of the pipe very close to the bulkhead.
|
|
|
|
|
01-19-2017, 10:07 PM
|
#19
|
|
Senior Member
Join Date: Jun 2015
Location: Parker, Colorado
Trailer: 2016 Escape 19
Posts: 120
|
Quote:
Originally Posted by StarvingHyena
Be careful though of the heat spill over up against your back splash.
Eventually, I'll install a taller metal back splash ..... probably at the same time that I raise the countertop.
Tom
|
That is a good point and will have to be watched, but I don't think it will be a huge problem. And to be honest, we still do most of our cooking outside but wanted a flush countertop. A little pricey for that feature, but we really like it.
|
|
|
|
|
01-19-2017, 10:11 PM
|
#20
|
|
Senior Member
Join Date: Aug 2009
Location: Victoria, Vancouver Island, British Columbia
Trailer: 2015 5.0 TA
Posts: 394
|
Quote:
Originally Posted by rubicon327
Question regarding positioning: Did you move the stove to the right at all towards the bulkhead/divider?
|
With a pot on the right smaller burner, the flame is quite close to the control knobs, so having that space between the stove and the bulkhead is needed for your hand, especially using the main burner control. So far, I have yet to use either burner on full and the simmer is 100% better than the stock cooktop.
|
|
|
|
|
|
 Posting Rules
|
You may not post new threads
You may not post replies
You may not post attachments
You may not edit your posts
HTML code is Off
|
|
|
|
 » Recent Discussions
 |
|
|
|
|
|
|
|
|
|
|
|
|
|
|
|
|
|
|
|
|
|
|
|
|
|
|
|
|
|
|

|


 Linear Mode

