 |
|
 03-14-2018, 10:00 PM
|
#1
|
|
Senior Member
Join Date: Jun 2014
Location: Box Elder, South Dakota
Trailer: Bigfoot 25' 2018
Posts: 347
|
Cracks at Door Latch
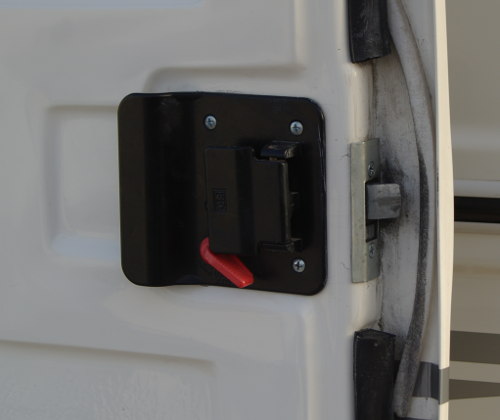
I just finished polishing our 2011 '19. Doing this I noticed a potential problem in the door latch area. Here is a picture of the door latch from the inside.
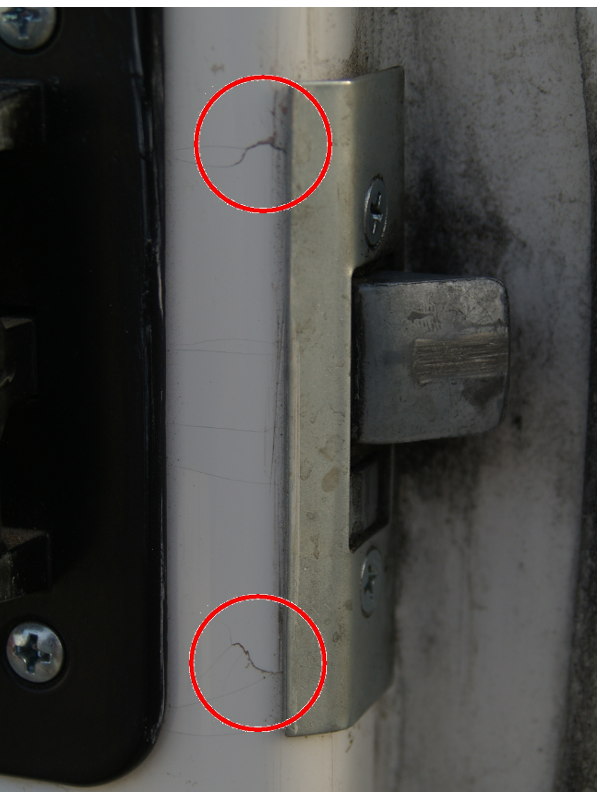
The second picture below shows a close up of the latch area.
The picture above shows two cracks highlighted by the two red circles. I think these start at the screws in the side holding the latch to the door but haven't taken the latch assembly off to verify this.
Has anyone had this problem? Any suggestions on a fix before it fails.
Thanks for any help you can provide.
__________________
Hugh Currin
2018 Bigfoot 25'
2018 RAM 2500 Diesel
|

|

|
|
03-15-2018, 01:16 AM
|
#2
|
|
Site Team
Join Date: Dec 2017
Location: Mid Left Coast, California
Trailer: 2014 Escape 21
Posts: 5,155
|
I'd remove all the door hardware from the area, clean it up as much as you can, and take a few more pictures as close as you can get crisp focus from a couple angles. do you slam your camper door closed? if the latch is a little too tight it encourages that...
drilling very tiny holes at the ends of the cracks may stop spreading.
to fix cracks like that in fiberglass, you need to grind or dremel them out, and apply new resin, then sand, polish, and gelcoat. google `marine fiberglass cracks` and you'll find all kinda information. the magic stuff they are selling doesn't work.
I've done some resin repairs on small boats. its pretty simple. for bigger fixes, you need some chopper glass, which is almost a powder, and you mix that with the resin to thicken it, then mix in the catalyst and brush on or fill the hole or whatever. let cure, sand smooth, fine sand, super fine sand, then brush it with gel-coat enamel. voila, it looks like new. wear a dust mask and gloves when working with the resins and glass and stuff.
this page seems to explain it pretty well, although its talking about a different sort of crack...
https://www.powerandmotoryacht.com/m...cks-fiberglass
figuring out WHY your latch is cracking there, and fixing that so it doesn't happen again, that will be trickier.
|
|
|
|
|
03-15-2018, 01:21 AM
|
#3
|
|
Senior Member
Join Date: Sep 2013
Location: Ventura County, California
Trailer: 2013 19 Escape
Posts: 7,204
|
Quote:
Originally Posted by currinh

I just finished polishing our 2011 '19. Doing this I noticed a potential problem in the door latch area. Here is a picture of the door latch from the inside.
The second picture below shows a close up of the latch area.
The picture above shows two cracks highlighted by the two red circles. I think these start at the screws in the side holding the latch to the door but haven't taken the latch assembly off to verify this.
Has anyone had this problem? Any suggestions on a fix before it fails.
Thanks for any help you can provide. |
Currin looks like some ware on the latch . If I found that on my lockset considering kind of important . I would remove lock .Then I would sand down the fiberglass , clean up good . Get some fiberglass cloth to reinforce that area and fiberglass repair and reinforce . Marine stores have smaller kits to repair . There are some u tube video 's fixing bad area's in boats to help . I checked those out to fix our door cracks . If you can remove your door much easier to do your repairs. That is what I would do . Check out that lockset too . Pat
|
|
|
|
|
03-15-2018, 01:24 AM
|
#4
|
|
Senior Member
Join Date: Sep 2013
Location: Ventura County, California
Trailer: 2013 19 Escape
Posts: 7,204
|
Quote:
Originally Posted by Patandlinda
Currin looks like some ware on the latch . If I found that on my lockset considering kind of important . I would remove lock .Then I would sand down the fiberglass , clean up good . Get some fiberglass cloth to reinforce that area and fiberglass repair and reinforce . Marine stores have smaller kits to repair . There are some u tube video 's fixing bad area's in boats to help . I checked those out to fix our door cracks . If you can remove your door much easier to do your repairs. That is what I would do . Check out that lockset too . Pat
|
Also forgot make small holes at each end of cracks . I still would add some fiberglass cloth . The idea is like fixing cracks in drywall , best to tape them instead of just using compound Pat
|
|
|
|
|
03-15-2018, 03:06 AM
|
#5
|
|
Site Team
Join Date: Dec 2017
Location: Mid Left Coast, California
Trailer: 2014 Escape 21
Posts: 5,155
|
The tricky part is, how do you reinforce that? does that inside panel remove from the door, so you can fix the backing ?
what sort of plate or nuts are on the inside that are holding the screws? thats probably from where the cracks originated, and will again if its not fixed.
|
|
|
|
|
03-15-2018, 07:24 AM
|
#6
|
|
Senior Member
Join Date: Mar 2016
Location: Burlington Twp., New Jersey
Trailer: 2010 Escape 19
Posts: 7,146
|
Quote:
Originally Posted by John in Santa Cruz
The tricky part is, how do you reinforce that? does that inside panel remove from the door, so you can fix the backing ?
what sort of plate or nuts are on the inside that are holding the screws? thats probably from where the cracks originated, and will again if its not fixed.
|
When I had the door off to insulate it I don't recall the inside panel being removable. Also the latch was simply screwed into holes in the fiberglass. I don't recall any type of plate/nuts on the inside when I put it back together. Ignore the paper towel tube. It was my funnel.
On edit I realized that there is actually small bolts that go through the latch plate, thru the fiberglass hole and then engage with threaded inserts on the lock mechanism itself.
|
|
|
|
|
03-15-2018, 08:16 AM
|
#7
|
|
Senior Member
Join Date: Apr 2012
Location: Edmonton, Alberta
Trailer: 2013 19' & 2013 15B
Posts: 2,636
|
My guess as to cause of the cracking is that the door is either being slammed to close it, or the door is being pulled shut without pulling back on the latching mechanism. On our 19', I always pull back on the latch as I pull the door shut. Makes it much easier to close properly without excessive resistance.
__________________
2013 19' \ 2013 15B, 2020 Toyota 4Runner TRD Offroad
"It is better to remain silent at the risk of being thought a fool, than to talk and remove all doubt of it." - 1907, Maurice Switzer
|
|
|
|
|
03-15-2018, 08:23 AM
|
#8
|
|
Site Team
Join Date: Nov 2008
Location: Portland, Oregon
Trailer: 2014 Escape 5.0 TA
Posts: 11,051
|
Quote:
Originally Posted by John in Santa Cruz
The tricky part is, how do you reinforce that? does that inside panel remove from the door, so you can fix the backing ?
|
Perhaps with the lockset removed, someone could get their hand and fiberglass mat inside enough to reinforce those areas? I haven't seen the inside of the door. Is there insulation that might be in the way?
__________________
Donna D.
Ten Forward
2014 Escape 5.0TA
|
|
|
|
|
03-15-2018, 08:23 AM
|
#9
|
|
Senior Member
Join Date: Jul 2017
Posts: 343
|
If you put a load on it while it's open, can you see the cracks open up ? Might be more cosmetic than structural if you're lucky ( gelcoat crack ) .
But yeah, we always try to "open" the latch while closing the door, never slamming it.
__________________
No good deed goes unpunished. 
|
|
|
|
|
03-15-2018, 12:15 PM
|
#10
|
|
Senior Member
Join Date: Oct 2017
Location: Smithers, BC, British Columbia
Trailer: Escape 21, July 2018 delivery
Posts: 322
|
Quote:
Originally Posted by John in Santa Cruz
to fix cracks like that in fiberglass, you need to grind or dremel them out, and apply new resin, then sand, polish, and gelcoat. google `marine fiberglass cracks` and you'll find all kinda information. the magic stuff they are selling doesn't work.
|
John, your solution works if the cracks are just in the gel coat, but not if the problem is structural and involves fracture of the fiberglass in the laminate. If the fiberglass is compromised, the repair would have to include grinding a taper into the laminate, and adding glass cloth reinforcement over the crack. Given the nature of the cracking, I suspect that the damage is more structural than just gel coat, so a proper repair will involve some significant glass work, and making it as tidy as the original but stronger will be a challenge.
If the OP wants to take this on, there is plenty of information on line about structural glass repairs, not to be confused with gel coat crack repairs. For what it is worth, I would choose epoxy over polyester for a repair in material this thin, but in theory either will work. Just make sure that you use glass that is compatible with epoxy, and epoxy that works well with glass (relatively low viscosity for starters). Not all glass works well with epoxy (the stuff at the local hardware store will not likely even tell you one way or another), and not all epoxy will properly wet out glass cloth. Finally, more layers of thinner glass will be a better bet on this repair than fewer layers of heavy cloth. The stuff at the local hardware store is likely thicker than ideal in my opinion.
https://www.thayercraft.com/ is an excellent source of glass material and information.
OTOH, if this seems too complicated, it may be time to find a competent glass repair place - good luck with that.
|
|
|
|
|
03-15-2018, 12:34 PM
|
#11
|
|
Senior Member
Join Date: Jan 2014
Location: North Van., British Columbia
Trailer: 2014 Escape 19, sold; 2019 Escape 21, Sept. 2019
Posts: 8,813
|
Quote:
Originally Posted by John in Santa Cruz
and apply new resin, then sand, polish, and gelcoat.
.
|
Resin only is only suitable if it's over a substrate that isn't damaged.
Quote:
Originally Posted by Patandlinda
Then I would sand down the fiberglass , clean up good . Get some fiberglass cloth to reinforce that area and fiberglass repair and reinforce .Pat
|
Yup
Quote:
Originally Posted by Patandlinda
I still would add some fiberglass cloth . The idea is like fixing cracks in drywall , best to tape them instead of just using compound Pat
|
Good analogy
Quote:
Originally Posted by Donna D.
Perhaps with the lockset removed, someone could get their hand and fiberglass mat inside enough to reinforce those areas? I haven't seen the inside of the door.
|
Yes, or use something to polk it into position. If it's inside it doesn't have to be pretty.
Ron
|
|
|
|
|
03-15-2018, 12:53 PM
|
#12
|
|
Senior Member
Join Date: Oct 2008
Location: Calgary, Alberta
Trailer: 2017 Escape 5.0 TA
Posts: 15,552
|
Quote:
Originally Posted by AllanEdie
John, your solution works if the cracks are just in the gel coat, but not if the problem is structural and involves fracture of the fiberglass in the laminate. If the fiberglass is compromised, the repair would have to include grinding a taper into the laminate, and adding glass cloth reinforcement over the crack. Given the nature of the cracking, I suspect that the damage is more structural than just gel coat, so a proper repair will involve some significant glass work, and making it as tidy as the original but stronger will be a challenge.
If the OP wants to take this on, there is plenty of information on line about structural glass repairs, not to be confused with gel coat crack repairs. For what it is worth, I would choose epoxy over polyester for a repair in material this thin, but in theory either will work. Just make sure that you use glass that is compatible with epoxy, and epoxy that works well with glass (relatively low viscosity for starters). Not all glass works well with epoxy (the stuff at the local hardware store will not likely even tell you one way or another), and not all epoxy will properly wet out glass cloth. Finally, more layers of thinner glass will be a better bet on this repair than fewer layers of heavy cloth. The stuff at the local hardware store is likely thicker than ideal in my opinion.
https://www.thayercraft.com/ is an excellent source of glass material and information.
OTOH, if this seems too complicated, it may be time to find a competent glass repair place - good luck with that. |
Good post, saved me from having to say much of what I wanted. I think it is more that just gelcoat in this case too.
If structural, hopefully there is enough room to facilitate the repairs through the door handle hole, and enough space to build up a bit. No doubt it can be repaired, but exactly what it takes can't really been seen without seeing the door in person.
__________________
2017 Escape 5.0 TA
2015 Ford F150 Lariat 3.5L EcoBoost
2009 Escape 19 (previous)
Most folks are about as happy as they make up their minds to be. Abraham Lincoln
|
|
|
|
|
03-15-2018, 01:17 PM
|
#13
|
|
Site Team
Join Date: Dec 2017
Location: Mid Left Coast, California
Trailer: 2014 Escape 21
Posts: 5,155
|
my boat (hobie cat) repairs used chopped glass in epoxy resin for cracks that were dremeled out to like 1/8 to 1/4". this created quite a strong repair in places which are too small for laying down sheets of glass. above about 1/2" I'd start looking at sheets, but in this particular case, I'm not sure there is room for that and the added thickness of the glass backing likely would interfere with reinstalling the lock..
|
|
|
|
|
03-15-2018, 09:18 PM
|
#14
|
|
Senior Member
Join Date: Jun 2014
Location: Box Elder, South Dakota
Trailer: Bigfoot 25' 2018
Posts: 347
|
Thank you all for the great replies. Let me try to summarize and see if I have this right, and ask some questions along the way.
1. If the crack is not structural it can be fixed with resin only. Pretty sure this is not the case, the adjacent edges of the cracks are slightly displaced (no longer level). I'm pretty sure it's structural.
2. Since it is structural it needs to be ground down and built back up with fiber and resin. Grind or sand with very shallow taper to the crack, clean, fill with several layers of glass and resin. Makes sense to me. My feeling is that woven fiber is stronger than mat. Thin woven is likely be cats meow. I have no idea how thick the layup is there.
3.
Quote:
Originally Posted by AllanEdie
For what it is worth, I would choose epoxy over polyester for a repair in material this thin, but in theory either will work.
|
I thought the strength came from the fiber rather than the resin. If true then choosing epoxy or polyester wouldn't matter. Is it your experience that some strength comes from the resin? I also just read that epoxy is harder than polyester, so sanding epoxy to be even with polyester is difficult. Do you find this not relevant in the real world? I'd prefer to use epoxy, I think it is less irritating.
4. Drilling stress relief holes at the ends of the cracks is a good idea, but not adequate by itself at this point. Drilling these holes will give a better idea how thick the glass is there.
5. Nobody has mentioned how much room there is around the lock and lock plate. If there is room, and one can reach inside, adding structure on the inside of the door in the latch area would be a good idea. Sounds like the latch plate screws thread into the lock itself. So adding thickness inside the door may mess with the fit. Any information here? The two shells that make up the door don't appear to come apart easily.
6.
Quote:
Originally Posted by Dave Walter
My guess as to cause of the cracking is that the door is either being slammed to close it, or the door is being pulled shut without pulling back on the latching mechanism. On our 19', I always pull back on the latch as I pull the door shut. Makes it much easier to close properly without excessive resistance.
|
Quote:
Originally Posted by John in Santa Cruz
do you slam your camper door closed? if the latch is a little too tight it encourages that...
figuring out WHY your latch is cracking there, and fixing that so it doesn't happen again, that will be trickier.
|
We never slam the door. We gently pull or push it closed. However, as with all our doors (house, etc), we haven't been pulling the latch open while closing the door. Never though about it, or thought it was necessary. We are now in re-training mode to do this. So, once fixed it should be good even if a little weaker than original. It does need fixing though.
Not relieving the latch when closing is obviously at least on of the causes. But we are trainable.
7.
Quote:
Originally Posted by Patandlinda
Currin looks like some ware on the latch . If I found that on my lockset considering kind of important . .... Check out that lockset too .Pat
|
The wear on the latch is likely OK. We've lived in Dora (our '19) for over 14 months in the last 4 years, quite a bit of use. It seems to latch easily and solidly. From the wear you see, is the latch engaging too much? What would you suggest to check the lockset?
8.
Quote:
Originally Posted by Patandlinda
If you can remove your door much easier to do your repairs. Pat
|
If the screws are taken out at the hinges, are the part they screw into fixed inside? i.e. If I take the hinges off can I easily put it back together?
9.
Quote:
Originally Posted by AllanEdie
If the OP wants to take this on, there is plenty of information on line about structural glass repairs, not to be confused with gel coat crack repairs.
OTOH, if this seems too complicated, it may be time to find a competent glass repair place - good luck with that.
|
I don't know of a "competent glass repair place" that I trust. As you say, "good luck with that". So I, as the OP, will have to "take this on".
Thanks for the link. I didn't see any resin from there. Do you have a source for resin? I've used "Fibre Glast" before and may just order from them. Do you think Thayercraft would be a better source?
These are all useful suggestions, and there seems to be a consensus. I was, however, hoping someone out there had had the same failure, and could provide the fix they used. Anyone?
If you have answers to the above, intermixed, questions please let us know.
We're on the road so I can't mess with the door right now. We'll be home first part of April and I'll pull the latch and look more closely. I'll let you all know what I end up doing. Might even send more pics when I get it apart.
Thank you all.
__________________
Hugh Currin
2018 Bigfoot 25'
2018 RAM 2500 Diesel
|
|
|
|
|
03-15-2018, 09:32 PM
|
#15
|
|
Senior Member
Join Date: Jun 2014
Location: Wenatchee, WA, Washington
Trailer: 2014 Escape 19'
Posts: 179
|
Regarding your item #4, stop drilling the crack WILL stop the growth of the crack. It may be all you need to do. Personally, I'd stop drill the cracks and then just wait and watch.
|
|
|
|
|
03-15-2018, 10:03 PM
|
#16
|
|
Senior Member
Join Date: Jan 2014
Location: North Van., British Columbia
Trailer: 2014 Escape 19, sold; 2019 Escape 21, Sept. 2019
Posts: 8,813
|
Quote:
Originally Posted by currinh
1. If the crack is not structural it can be fixed with resin only. Pretty sure this is not the case, the adjacent edges of the cracks are slightly displaced (no longer level). I'm pretty sure it's structural.
If there's displacement then it's structural and crack filling with gelcoat wouldn't be a viable option.
2. Since it is structural it needs to be ground down and built back up with fiber and resin. Grind or sand with very shallow taper to the crack, clean, fill with several layers of glass and resin. Makes sense to me. My feeling is that woven fiber is stronger than mat. Thin woven is likely be cats meow. I have no idea how thick the layup is there.
I don't agree. If it was my repair I'd try and put my repair material on the interior and then do a gelcoat repair to make the cracks invisible.
3.
I thought the strength came from the fiber rather than the resin. If true then choosing epoxy or polyester wouldn't matter. Is it your experience that some strength comes from the resin? I also just read that epoxy is harder than polyester, so sanding epoxy to be even with polyester is difficult. Do you find this not relevant in the real world? I'd prefer to use epoxy, I think it is less irritating.
I think that's it's really not that important for this repair.
But remember, you can repair polyester with epoxy but you can't later put polyester over epoxy. Using epoxy for the structural part would have an effect on then using polyester gelcoat for an invisible gelcoat repair.
5. Nobody has mentioned how much room there is around the lock and lock plate. If there is room, and one can reach inside, adding structure on the inside of the door in the latch area would be a good idea. Sounds like the latch plate screws thread into the lock itself. So adding thickness inside the door may mess with the fit. Any information here? The two shells that make up the door don't appear to come apart easily.
Using one or two layers of cloth doesn't amount to very much thickness. There may be lot's of clearance. You'll know when you remove the lock.
We never slam the door. We gently pull or push it closed.
Which reminds me, I haven't yet installed a separate grab handle as others have. For us, it's not the slamming the door it's the force put on the latch handle when strong winds try and rip the door from your grasp.
If the screws are taken out at the hinges, are the part they screw into fixed inside? i.e. If I take the hinges off can I easily put it back together?
Yes
Thanks for the link. I didn't see any resin from there. Do you have a source for resin? I've used "Fibre Glast" before and may just order from them. Do you think Thayercraft would be a better source?
You only need a very few ounces, it's usually readily available
|
Just happen to have a bit of f.g. stuff handy. ")
The stuff on the left is f.g. cloth. That's what I would use inside the door.
The center is woven roving. Heavy duty stuff, one layer of that is pretty much a canoe shell.
The other material is matt. By itself it is very resin rich and and has a comparatively low strength.
Ron
|
|
|
|
|
03-15-2018, 10:08 PM
|
#17
|
|
Site Team
Join Date: Dec 2017
Location: Mid Left Coast, California
Trailer: 2014 Escape 21
Posts: 5,155
|
since those cracks are quite small, I'd use a fairly small drill bit like 1/8th inch... I'd remove the latch hardware first, I think. one page I was perusing last night talked about special plastic drill bits that have a steeper point than the standard HS twist bit
|
|
|
|
|
03-16-2018, 01:38 AM
|
#18
|
|
Senior Member
Join Date: Sep 2013
Location: Ventura County, California
Trailer: 2013 19 Escape
Posts: 7,204
|
Quote:
Originally Posted by Ron in BC
Just happen to have a bit of f.g. stuff handy.
The stuff on the left is f.g. cloth. That's what I would use inside the door.
The center is woven roving. Heavy duty stuff, one layer of that is pretty much a canoe shell.
The other material is matt. By itself it is very resin rich and and has a comparatively low strength.
Ron |
Currin taking out the screws to remove the door , there is supposed to be some wood that they screw into . I have removed the door and screws more then once . The last time was to change the hinges to the new stainless hinges I was able to get . When I reinstalled screws I added a little Proflex or like to the screw holes . Everything is tight and still good . I used a hand screw driver not a drill to attach screws . Pat
|
|
|
|
|
03-16-2018, 04:31 AM
|
#19
|
|
Senior Member
Join Date: Jun 2010
Location: Central, Pennsylvania
Trailer: Escape#5 2022 E19
Posts: 26,268
|
Quote:
Originally Posted by Patandlinda
When I reinstalled screws I added a little Proflex or like to the screw holes . Everything is tight and still good . I used a hand screw driver not a drill to attach screws . Pat
|
Yes, the hand method is recommended for a better feel of tightening which is critical with fiberglass, the dab of proflex keeps it waterproof. You will need a Torx bit driver for this operation.
__________________
Jim
Sometime life gets in the way of living.......
|
|
|
|
|
03-16-2018, 10:49 AM
|
#20
|
|
Senior Member
Join Date: Oct 2017
Location: Smithers, BC, British Columbia
Trailer: Escape 21, July 2018 delivery
Posts: 322
|
Quote:
Originally Posted by currinh
1. If the crack is not structural it can be fixed with resin only. Pretty sure this is not the case, the adjacent edges of the cracks are slightly displaced (no longer level). I'm pretty sure it's structural. Definitely structural then, and it needs to be repaired. If the surface is displaced, you may want to re-align the surfaces during the repair. Sometimes it is possible to clamp them into position during the initial application of material, let that set up, then continue with further material addition once the surfaces are held in position without clamps. If clamps won't fit sometimes tape will pull things into place for a while. Whatever works.
2. Since it is structural it needs to be ground down and built back up with fiber and resin. Grind or sand with very shallow taper to the crack, clean, fill with several layers of glass and resin. Makes sense to me. My feeling is that woven fiber is stronger than mat. Thin woven is likely be cats meow. I have no idea how thick the layup is there. I would do this on the outside, and add cloth/epoxy on the inside as well if there is room. This glass from Thayercraft would be a good choice, and you will have lots left for future projects. https://www.thayercraft.com/2.85-oz-1675-1.html
I would not use mat on this repair, it would add too much thickness, and not enough relative strength compared to cloth.
3.
I thought the strength came from the fiber rather than the resin. If true then choosing epoxy or polyester wouldn't matter. Is it your experience that some strength comes from the resin? I also just read that epoxy is harder than polyester, so sanding epoxy to be even with polyester is difficult. Do you find this not relevant in the real world? I'd prefer to use epoxy, I think it is less irritating. The strength comes from the glass, but epoxy has better adhesion than polyester, which will be important on a repair this thin and small. Do be careful with epoxy, it is actually as bad or worse for you than polyester, it just doesn't stink as badly. It can cause sensitivity that will end your epoxy career permanently. It is best to wear an organic vapor respirator when using it.
4. Drilling stress relief holes at the ends of the cracks is a good idea, but not adequate by itself at this point. Drilling these holes will give a better idea how thick the glass is there. By all means drill, but in my opinion it will not stop further damage on its own, and in any case, most of the drill holes will be thinned to insignificance once you taper to the cracks - you need to taper from the ends as well as from the sides.
5. Nobody has mentioned how much room there is around the lock and lock plate. If there is room, and one can reach inside, adding structure on the inside of the door in the latch area would be a good idea. Sounds like the latch plate screws thread into the lock itself. So adding thickness inside the door may mess with the fit. Any information here? The two shells that make up the door don't appear to come apart easily. I agree that extra reinforcement on the inside is a good idea, but proper preparation of the repair surface on the inside may be difficult, and preparation is everything. You absolutely must obtain a perfectly clean abraded surface, and if you don't taper finely to the crack, you will leave a weak spot at the crack which may then crack again in the same place. The strength of the repair needs to increase smoothly over the crack location, not change stiffness abruptly at the crack location.
6.
We never slam the door. We gently pull or push it closed. However, as with all our doors (house, etc), we haven't been pulling the latch open while closing the door. Never though about it, or thought it was necessary. We are now in re-training mode to do this. So, once fixed it should be good even if a little weaker than original. It does need fixing though.
Not relieving the latch when closing is obviously at least on of the causes. But we are trainable.
7.
The wear on the latch is likely OK. We've lived in Dora (our '19) for over 14 months in the last 4 years, quite a bit of use. It seems to latch easily and solidly. From the wear you see, is the latch engaging too much? What would you suggest to check the lockset?
8.
If the screws are taken out at the hinges, are the part they screw into fixed inside? i.e. If I take the hinges off can I easily put it back together?
9.
I don't know of a "competent glass repair place" that I trust. As you say, "good luck with that". So I, as the OP, will have to "take this on".
Thanks for the link. I didn't see any resin from there. Do you have a source for resin? I've used "Fibre Glast" before and may just order from them. Do you think Thayercraft would be a better source? I provided a link to the Thayercraft cloth I would suggest. Other glass would be fine, but it needs to have a silane finish so epoxy will wet it, and it needs to be light weight so you use more layers. I would call or email Thayercraft and have them recommend an epoxy supplier for you. Some lumberyards, and most marine supply stores will have decent stuff, but Thayercraft will know decent options for you. You will want to buy only about 250ml of good epoxy - you will not need a lot for this repair, and it, unlike the glass, has a shelf life. You may just have to buy more than you need, but do not be tempted to make do with hardware store junk.
This repair will be best done indoors, preferably in a very warm workspace if possible (>75F). You will get more thorough wetting of the cloth and repair surface at the warmer temperature than at cooler ones. You are better off with a moderately slow setting epoxy rather than the fast stuff - it will have more time to very thoroughly wet the cloth and repair surface, and will avoid kicking off too early due to the warm temperature.
Oh, and one final comment about epoxy. Ron is correct that the conventional rule is that epoxy will bond to polyester, but polyester will not bond to epoxy. The thought being that, once you use epoxy, you are stuck with it thereafter because putting polyester on top will not adhere. In my opinion, this is slightly true, but much exaggerated. With proper surface preparation, gel coat does stick fine to epoxy. The key is surface preparation, and with epoxy in particular, removal of surface amine blush, which you have to do between coats of some epoxies anyway. In any case, perfect surface finish on your repair is optional, structural integrity is not. If you don't get the repair strong enough the first time, subsequent attempts will be more difficult.
These are all useful suggestions, and there seems to be a consensus. I was, however, hoping someone out there had had the same failure, and could provide the fix they used. Anyone?
If you have answers to the above, intermixed, questions please let us know.
We're on the road so I can't mess with the door right now. We'll be home first part of April and I'll pull the latch and look more closely. I'll let you all know what I end up doing. Might even send more pics when I get it apart.
Thank you all. |
Good luck with this. Keep us posted once you dig further, and please post more questions if we can help. I will be looking very carefully at the door of our new 21 now, and may do some prevention. Thanks for posting this problem so we can all learn something from your experience.
Ok, one final suggestion. This guy knows what he is talking about, and has lots of great fiberglass repair demos on YouTube. Watching some of his stuff before tackling your repair might be both entertaining and helpful.
https://www.youtube.com/playlist?lis...ation_49071801
|
|
|
|
|
|
 Posting Rules
|
You may not post new threads
You may not post replies
You may not post attachments
You may not edit your posts
HTML code is Off
|
|
|
|
 » Recent Discussions
 |
|
|
|
|
|
|
|
|
|
|
|
|
|
|
|
|
|
|
|
|
|
|
|
|
|
|
|
|
|
|

|


 Linear Mode

