 |
|
 08-02-2022, 09:41 PM
|
#1
|
|
Senior Member
Join Date: Oct 2020
Location: San Jose, California
Trailer: 2022 5.0 TA
Posts: 680
|
Our custom Lithium battery installation
When we ordered our 5.0, we ordered the Lithium ready option. I wasnt thrilled with the lithium battery options/price from ETI, so I decided Id do my own installation after having the trailer for a bit.
Theres a number of choices for Lithium batteries. I had the 1500w inverter and needed to have enough current capacity to support that (150 amps or so). I also wanted to have more than 100ah, actually more than 2kwh available. Another goal I had was to have a single battery, for simplicitys sake.
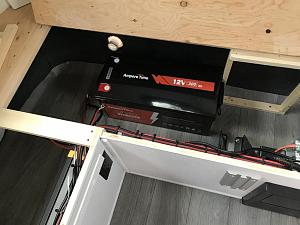
I wound up purchasing a AmpereTime 300ah battery directly, and a tr16 shunt from alibaba.
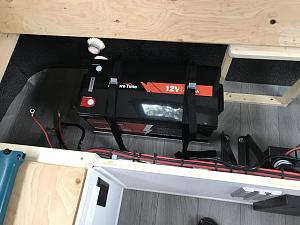
Heres photos of my installation of it, First, the stock battery and box.
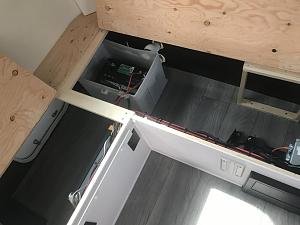
Once that was removed, I plugged the holes in the vents with 1&1/2 inch pvc caps.

Then, set the battery in where I planned to mount it.
I borrowed an angle grinder and picked up some inch and a half 1/8 aluminum angle. I modeled the mount after John in Santa Cruzs lithium battery mount, except I decided to put the angles under the battery.

I couldnt find short enough square drive screws, so I went with Philips head wood screws (3/4), and drilled the holes and counter sinks for the heads.
Then I mounted the angles with enough space to be able to the straps through.
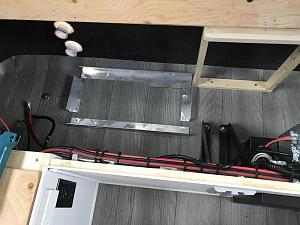
And cut and laid some 50 durometer 1/8 rubber to provide a flat surface.
Then added one more layer of 1/8 rubber to cover the screw heads and provide a little vibration isolation.
Finally, the straps added and the physical mounting is complete.
|

|

|
|
08-14-2022, 12:32 AM
|
#2
|
|
Senior Member
Join Date: Oct 2020
Location: San Jose, California
Trailer: 2022 5.0 TA
Posts: 680
|
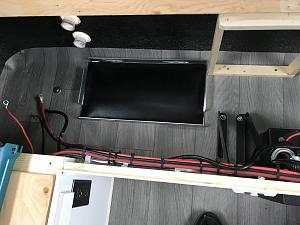
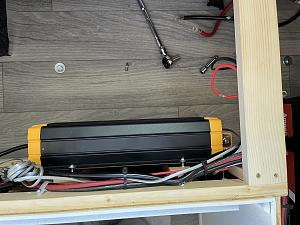
Next up is wiring the battery and inverter.
I had a shunt to install on the negative side of the battery and a class T fuse to install on the positive side.
So, I made a two-sided wiring board to locate between the battery and inverter. I used 5.5 x .75 poplar board, and some angle aluminum and a 5” corner brace.
|
|
|
|
|
08-14-2022, 12:38 AM
|
#3
|
|
Senior Member
Join Date: Oct 2020
Location: San Jose, California
Trailer: 2022 5.0 TA
Posts: 680
|
I mounted the shunt on one side and the fuse on the other.
|
|
|
|
|
08-14-2022, 12:46 AM
|
#4
|
|
Senior Member
Join Date: Oct 2020
Location: San Jose, California
Trailer: 2022 5.0 TA
Posts: 680
|
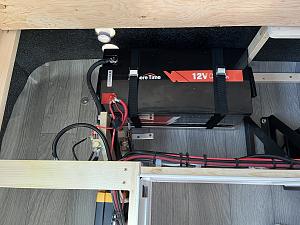
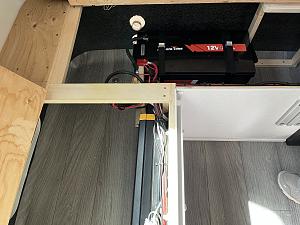
I had to loosen the screws that mounted the inverter to remove the wiring on the inverter, it was much easy than removing the inverter.
As tight as things look and fit together, it went in fairly smoothly. Heres a shot with everything but the capacity meter installed.

|
|
|
|
|
08-14-2022, 01:47 PM
|
#5
|
|
Senior Member
Join Date: Oct 2020
Location: San Jose, California
Trailer: 2022 5.0 TA
Posts: 680
|
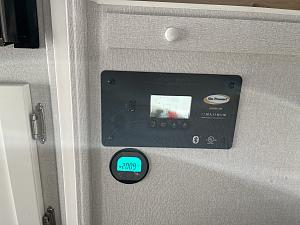
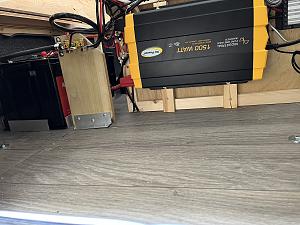
Got the capacity meter installed. I turned the three-way fridge on to dc to drain the battery for the capacity test. The refrigerator uses about 24amps DC. 
I used a blow dryer via the inverter and got about 100amps flowing out of the battery, everything works!
Heres the meter installed
Wiring buttoned up
And a couple of pics (one from outside the trailer through the hatch) that show the storage space:
|
|
|
|
|
08-14-2022, 09:41 PM
|
#6
|
|
Senior Member
Join Date: Mar 2021
Location: Richmond, Virginia
Trailer: 2022 Escape 21C
Posts: 269
|
Nice install! I used 1x2's around the battery, but that definitely takes more room (and is less neat) than your aluminum angle.
Do you need to do anything to avoid charging below freezing temperatures? I'm assuming not a big concern in San Jose...
|
|
|
|
|
08-14-2022, 09:53 PM
|
#7
|
|
Senior Member
Join Date: Oct 2020
Location: San Jose, California
Trailer: 2022 5.0 TA
Posts: 680
|
Quote:
Originally Posted by hugh

Nice install! I used 1x2's around the battery, but that definitely takes more room (and is less neat) than your aluminum angle.
Do you need to do anything to avoid charging below freezing temperatures? I'm assuming not a big concern in San Jose...
|
I got the aluminum angle idea from John in Santa Cruzs lithium thread.
Yeah, we dont really get below freezing much here, so I dont think Ill hit that limitation. On our way back from Sumas, we hit some 40 degree weather, and it was a toasty 70 in the trailer running the electric heat. So, I kinda think the battery being inside probably means it wont see freezing until outside air is in the teens for some hours.
Oh, I tried to run our AC on the inverter, no go. Its not wired to a circuit thats connected to the inverter.
|
|
|
|
|
08-15-2022, 03:29 AM
|
#8
|
|
Senior Member
Join Date: Mar 2021
Location: Richmond, Virginia
Trailer: 2022 Escape 21C
Posts: 269
|
Quote:
Originally Posted by splitting_lanes
Oh, I tried to run our AC on the inverter, no go. Its not wired to a circuit thats connected to the inverter.
|
Yep, I'm guessing Escape didn't think anyone would be crazy enough to try and run AC on batteries. With your 300ah battery, it ought to be possible though. I don't have the sub panel in mine (my inverter runs the main panel) but it might just be a matter of moving the AC circuit from the main panel to a breaker in the sub panel.
|
|
|
|
|
08-15-2022, 04:08 PM
|
#9
|
|
Site Team
Join Date: Dec 2017
Location: Mid Left Coast, California
Trailer: 2014 Escape 21
Posts: 5,155
|
300AH at 12V might get you a bit over 2 hours of the rooftop A/C before needing a FULL charge.
300AH at 12V is 3600 watt hours. your A/C probably draws pretty close to 1500 watts once the compressor has started, so 2 hours of this is 3000 watt*hours., at this point, your batteries are 80% discharged.
|
|
|
|
|
08-15-2022, 04:55 PM
|
#10
|
|
Senior Member
Join Date: Mar 2021
Location: Richmond, Virginia
Trailer: 2022 Escape 21C
Posts: 269
|
Quote:
Originally Posted by John in Santa Cruz
300AH at 12V might get you a bit over 2 hours of the rooftop A/C before needing a FULL charge.
300AH at 12V is 3600 watt hours. your A/C probably draws pretty close to 1500 watts once the compressor has started, so 2 hours of this is 3000 watt*hours., at this point, your batteries are 80% discharged.
|
I wouldn't be surprised if you could get 4-5 hours from 300Ah. My AC unit draws 1100-1200 DC watts on low, and the compressor doesn't run anywhere near 100% of the time. That's a decent amount of time to get through the hotter part of the evening, or maybe cooling off at a lunch time stopover.
|
|
|
|
|
08-15-2022, 05:01 PM
|
#11
|
|
Site Team
Join Date: Dec 2017
Location: Mid Left Coast, California
Trailer: 2014 Escape 21
Posts: 5,155
|
Quote:
Originally Posted by hugh
I wouldn't be surprised if you could get 4-5 hours from 300Ah. My AC unit draws 1100-1200 DC watts on low, and the compressor doesn't run anywhere near 100% of the time. That's a decent amount of time to get through the hotter part of the evening, or maybe cooling off at a lunch time stopover.
|
however much you use, you need enough solar to recharge. I have a high efficiency 360W monocrystalline panel on a MPPT controller, it generates around 2000-2400 watt*hours in a day. So I would want about DOUBLE that if I was running as much as 3000 watt*hours daily. I'm not sure there's room on my roof for another 360W, maybe 2 180W.
|
|
|
|
|
08-15-2022, 05:37 PM
|
#12
|
|
Senior Member
Join Date: Mar 2021
Location: Richmond, Virginia
Trailer: 2022 Escape 21C
Posts: 269
|
Quote:
Originally Posted by John in Santa Cruz
however much you use, you need enough solar to recharge. I have a high efficiency 360W monocrystalline panel on a MPPT controller, it generates around 2000-2400 watt*hours in a day. So I would want about DOUBLE that if I was running as much as 3000 watt*hours daily. I'm not sure there's room on my roof for another 360W, maybe 2 180W.
|
Well, that's true if the use case is supporting multiple off-grid days with only solar. If the use case is just bridging the a few hours or a day between shore power or generator hookups then solar power isn't as important.
|
|
|
|
|
08-16-2022, 11:16 PM
|
#13
|
|
Senior Member
Join Date: Oct 2020
Location: San Jose, California
Trailer: 2022 5.0 TA
Posts: 680
|
I didn’t intend for this setup to be for long term boondocking. I may eventually re-wire the AC to the switched inverter output, but not this season. As it sits now, I can run the refrigerator off DC, boondock during our cross country trip, and have plenty of DC to last between nights with shore power.
I really like the tr16h capacity gauge, I’ve done a couple full cycles of capacity tests and this battery tests out at 320ah of capacity.
|
|
|
|
|
08-17-2022, 06:15 PM
|
#14
|
|
Senior Member
Join Date: Oct 2020
Location: San Jose, California
Trailer: 2022 5.0 TA
Posts: 680
|
One tidbit of information that I discovered installing a battery larger than 200ah into an Escape trailer:
The WFCO WF-8955-AD doesn’t need any switches to be set or changed when switching battery types. However, it sets a timer for bulk mode to 4 hours when it is plugged in and it determines that a lithium battery is present. If you’re connecting more than 200ah of lithium to it, it will switch out of bulk mode before the battery is fully charged. The solution is to disconnect the shore power after four hours and reconnect it - I found if I put a little load on the battery for 5 minutes and then reconnected shore power, it would go right back into bulk mode and finish charging to over 14 volts.
It’s not an issue unless your battery needs 200+ ah to charge, or you don’t need to cell balance or get the last few % charge into the battery.
|
|
|
|
|
12-19-2022, 08:13 AM
|
#15
|
|
Senior Member
Join Date: Oct 2020
Location: San Jose, California
Trailer: 2022 5.0 TA
Posts: 680
|
Added/Modified a few things
I discovered that the WFCO charger wasnt switching into Lithium mode. The main drawback was that it took so much longer to charge because the charge rate is slower. I also wanted to be able to switch off the solar charging, so it wouldnt keep trying to charge the battery if I didnt want it to.
I relocated the battery isolater switch from under the back of the u-shaped dinette to the front, and removed about 10 feet of extra wire from the circuit.
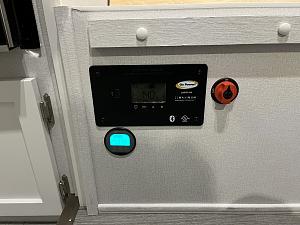
Heres the new switch ( and a usb a/c pd-4.0 outlet I added )

I removed the 50 A thermal switch and installed an ANL 80 A fuse.

And here is the solar disconnect switch thats wired on the + side of the solar panel.
It consistently goes into Lithium bulk mode now, even when the solar panel is charging the battery also. When I saw it going over 60 amps charge rate I ordered 80 A fuses, as I originally installed a 60 A fuse.
I believe this aspect of the trailer modifications are done. 
|
|
|
|
|
12-19-2022, 03:26 PM
|
#16
|
|
Senior Member
Join Date: Mar 2016
Location: Burlington Twp., New Jersey
Trailer: 2010 Escape 19
Posts: 7,146
|
Quote:
Originally Posted by splitting_lanes
When I saw it going over 60 amps charge rate I ordered 80 A fuses, as I originally installed a 60 A fuse.
|
Nice work. Just curious what size wire you have going to and from your 80A ANL fuse.
|
|
|
|
|
12-19-2022, 03:32 PM
|
#17
|
|
Senior Member
Join Date: Nov 2012
Location: Little Rock, Arkansas
Trailer: 2014 Escape 19' and 2016 GMC Yukon SLT SUV.
Posts: 500
|
Hello splitting_lanes'
Thank you very much for sharing your Lithium battery installation mod. I think that is exactly What I need.
(Quote: And here is the solar disconnect switch that’s wired on the + side of the solar panel.)
Would you please share How to wire the solar disconnect switch. I have the same Gold power solar charger controller, but I don't know how to identify the solar panel wire going to the charger/converter box. Do you install the solar disconnect switch before or after the solar charger controller?. I have very little knowledge of solar panel wiring. Thanks.
Tonny LR
|
|
|
|
|
12-19-2022, 05:07 PM
|
#18
|
|
Senior Member
Join Date: Oct 2020
Location: San Jose, California
Trailer: 2022 5.0 TA
Posts: 680
|
Quote:
Originally Posted by rubicon327
Nice work. Just curious what size wire you have going to and from your 80A ANL fuse.
|
8 AWG. I used the Escape provided wire, just removed most of it.
8 AWG is rated for fusing at 80 amps, unless its inside an engine compartment, then its 60 amps.
|
|
|
|
|
12-19-2022, 05:17 PM
|
#19
|
|
Senior Member
Join Date: Oct 2020
Location: San Jose, California
Trailer: 2022 5.0 TA
Posts: 680
|
Quote:
Originally Posted by Tonny LR
Hello splitting_lanes'
Thank you very much for sharing your Lithium battery installation mod. I think that is exactly What I need.
(Quote: And here is the solar disconnect switch thats wired on the + side of the solar panel.)
Would you please share How to wire the solar disconnect switch. I have the same Gold power solar charger controller, but I don't know how to identify the solar panel wire going to the charger/converter box. Do you install the solar disconnect switch before or after the solar charger controller?. I have very little knowledge of solar panel wiring. Thanks.
Tonny LR
|
Hi Tonny -
It was easier than I thought. The switch itself I got from Amazon, and it required a 1&1/8 hole. I had to loosen the inverter to push it out of the way a bit, then remove the positive wire ( I did that part at night, so I wouldnt run the risk of getting shocked ), I shorted the wire by a half inch and put a couple 1/4 crimps.
Heres the back side of the switch:
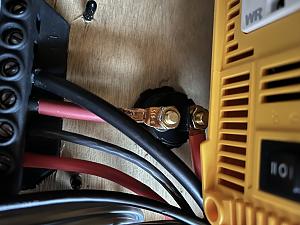
For some reason the picture is upside down, but it shows the wiring. Simple.
Edit: the wire with the switch on it is the red wire from the solar panel
|
|
|
|
|
12-19-2022, 07:38 PM
|
#20
|
|
Senior Member
Join Date: Nov 2012
Location: Little Rock, Arkansas
Trailer: 2014 Escape 19' and 2016 GMC Yukon SLT SUV.
Posts: 500
|
Thank you for posting the wiring picture and explanation.
Tonny LR
|
|
|
|
|
|
 Posting Rules
|
You may not post new threads
You may not post replies
You may not post attachments
You may not edit your posts
HTML code is Off
|
|
|
|
 » Recent Discussions
 |
|
|
|
|
|
|
|
|
|
|
|
|
|
|
|
|
|
|
|
|
|
|
|
|
|
|
|
|
|
|

|


 Linear Mode

