 |
|
 12-07-2018, 10:49 AM
|
#261
|
|
Senior Member
Join Date: Oct 2008
Location: Calgary, Alberta
Trailer: 2017 Escape 5.0 TA
Posts: 15,552
|
Quote:
Originally Posted by cpaharley2008

Thanks everyone....What is the procedure for cutting the PEX, razor knife or some other sharp instrument, maybe an oscillating tool?
|
A sharp utility knife will do the trick. A slight bending pressure away from the start of the cut and it will go quite easy. No need for any kind of cutters, though if doing a lot of plumbing they certainly are handy to have. The BORG sells a set that works fine for moderate use for under $10.
__________________
2017 Escape 5.0 TA
2015 Ford F150 Lariat 3.5L EcoBoost
2009 Escape 19 (previous)
Most folks are about as happy as they make up their minds to be. Abraham Lincoln
|

|

|
|
12-07-2018, 11:24 AM
|
#262
|
|
Senior Member
Join Date: Jan 2014
Location: North Van., British Columbia
Trailer: 2014 Escape 19, sold; 2019 Escape 21, Sept. 2019
Posts: 8,818
|
Quote:
Originally Posted by MyronL
Learned cutting pex with the wrong tool does not work. Got lucky at nearby Salvation Army store, one dollar. Adding my 2cents, hose clamps a definite no-no. More luck: Borrowed pex crimp tools from neighbor.
|
Well Myron, as the saying goes, "it's not what you got, it's how you use it. " 
Quote:
Originally Posted by Jim Bennett
A sharp utility knife will do the trick. A slight bending pressure away from the start of the cut and it will go quite easy. No need for any kind of cutters, though if doing a lot of plumbing they certainly are handy to have. The BORG sells a set that works fine for moderate use for under $10.
|
I agree. I did my first few pex uses without the cutter. No problems. I did buy an inexpensive cutter and it's easier and faster per cut. I love pex, either using crimp rings or sharkbite fittings. Wish I'd started using it years ago but I was a little slow to start using it due to the Poly-B problems of yesteryear.
Ron
|
|
|
|
|
12-07-2018, 11:28 AM
|
#263
|
|
Senior Member
Join Date: Sep 2013
Location: Ventura County, California
Trailer: 2013 19 Escape
Posts: 7,204
|
Quote:
Originally Posted by sclifrickson
|
What I used . Pat
|
|
|
|
|
12-07-2018, 11:53 AM
|
#264
|
|
Senior Member
Join Date: Dec 2012
Location: Edmonton, Alberta
Trailer: 1979 Boler B1700
Posts: 14,935
|
Quote:
Originally Posted by rubicon327
Another option is a Flair-it fitting. They are less expensive and less bulky than the Sharkbite.
|
The regular Flair-It fitting for PEX appear to use an compression ring and nut; I would have a lot more faith in that than an O-ring type of connection (such as a Sharkbite).
Looking at the Flair-It catalog, I see that they now have another alternative for a clamp around the usual PEX barb: PEXLOCK, which has a plastic ring which is tightened with pliers. I don't see any indication of how these clamps are removed.
Quote:
Originally Posted by rubicon327
I am actually going to use a bypass valve with the common port towards the shower. The bypass will normally have a cap on it but the valve can be turned to isolate from water system and drain shower by gravity. Plan to insert fitting in the quick connect port while opening exterior valves to allow air in.
|
Clever! 
|
|
|
|
|
12-07-2018, 12:19 PM
|
#265
|
|
Senior Member
Join Date: Jun 2010
Location: Central, Pennsylvania
Trailer: Escape#5 2022 E19
Posts: 26,268
|
I have asked Escape to route my shower plumbing from above vs from underneath, should simplify gravity based drainage at the shower. Still waiting for an answer
__________________
Jim
Sometime life gets in the way of living.......
|
|
|
|
|
12-07-2018, 12:23 PM
|
#266
|
|
Senior Member
Join Date: Oct 2008
Location: Calgary, Alberta
Trailer: 2017 Escape 5.0 TA
Posts: 15,552
|
Quote:
Originally Posted by Ron in BC
Wish I'd started using it years ago but I was a little slow to start using it due to the Poly-B problems of yesteryear.
|
You are not the only one. I know a few plumbers who were a bit gun shy to use PEX at first. I have changed out the Poly B in a couple dozen houses due to them having multiple leaks over time, or even just precautionary.
__________________
2017 Escape 5.0 TA
2015 Ford F150 Lariat 3.5L EcoBoost
2009 Escape 19 (previous)
Most folks are about as happy as they make up their minds to be. Abraham Lincoln
|
|
|
|
|
12-07-2018, 01:16 PM
|
#267
|
|
Senior Member
Join Date: Sep 2015
Location: Port Townsend, Washington
Trailer: 2010 17B MATT, then 2017 19 Lilly
Posts: 1,584
|
Quote:
Originally Posted by Brian B-P
The regular Flair-It fitting for PEX appear to use an compression ring and nut; I would have a lot more faith in that than an O-ring type of connection (such as a Sharkbite).
Looking at the Flair-It catalog, I see that they now have another alternative for a clamp around the usual PEX barb: PEXLOCK, which has a plastic ring which is tightened with pliers. I don't see any indication of how these clamps are removed. |
This one from the catalog you linked looks particularly useful for the outside shower application. Could be a one cut and done installation, replacing the screw on fitting at back of shower.
__________________
💩-p+☕️+n
|
|
|
|
|
12-07-2018, 02:45 PM
|
#268
|
|
Senior Member
Join Date: Jun 2014
Location: Wenatchee, WA, Washington
Trailer: 2014 Escape 19'
Posts: 179
|
Quote:
Originally Posted by Patandlinda
What I used . Pat
|
Same here. Works great!
Chuck
|
|
|
|
|
12-08-2018, 08:04 AM
|
#269
|
|
Senior Member
Join Date: Mar 2016
Location: Burlington Twp., New Jersey
Trailer: 2010 Escape 19
Posts: 7,146
|
Quote:
Originally Posted by Brian B-P
That sounds like they're counting on gravity drainage, either out the shower or the other way to a low-point drain in the RV. I think this would only work well in this case if each shutoff valve is the high point of it's piping (mounted above the shower assembly).
|
Quote:
Originally Posted by cpaharley2008
I have asked Escape to route my shower plumbing from above vs from underneath, should simplify gravity based drainage at the shower. Still waiting for an answer
|
I dont think it will drain properly even if piped in this manner. There are check valves in the rear stems of the D&W/ Phoenix spray port box that Escape uses. These take force to open. Water will be trapped between the shutoff valve and the check valve. That is why I recommended the suction method earlier which if done from the outside could possibly work.
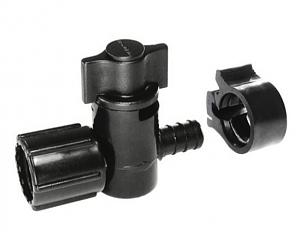
My new shower will have the checks removed and be piped from below. The first photo is the check valve. The second photo is the bypass valve I will use with handle inline for normal mode. The third photo is the bypass valve in isolation mode with handle perpendicular. Simply insert fitting in quick connect outside to allow air to enter, open hot and cold shower valves and remove cap inside to drain assembly fully via gravity into a large cup.
|
|
|
|
|
12-08-2018, 08:23 AM
|
#270
|
|
Senior Member
Join Date: Jun 2010
Location: Central, Pennsylvania
Trailer: Escape#5 2022 E19
Posts: 26,268
|
I was planning on opening the spray port to allow drainage and release the pressure, but with the plumbing from above, without any pressure, the lines should drain. Once drained, there should be some empty tubing to allow for expansion if needed.
__________________
Jim
Sometime life gets in the way of living.......
|
|
|
|
|
12-08-2018, 08:25 AM
|
#271
|
|
Senior Member
Join Date: Jun 2010
Location: Central, Pennsylvania
Trailer: Escape#5 2022 E19
Posts: 26,268
|
So you are saying there is a check valve inside each hot/cold knob as well as a check valve to hook up the outside hose? What is the purpose of the check valve, can it be operated without one? I understand now, if there is a check valve in the on/off know, then you would wand this 3 way below the source(rather than above) so that once you release the pressure it will drain. What is the p/n of this valve and how installed. Please post when you do this, thanks.
__________________
Jim
Sometime life gets in the way of living.......
|
|
|
|
|
12-08-2018, 09:46 AM
|
#272
|
|
Senior Member
Join Date: Apr 2017
Location: DFW, Texas
Trailer: 2018 21 Sept 7 2018
Posts: 1,073
|
The only downside of plumbing in the ceiling i see is I find you spring a leak
|
|
|
|
|
12-08-2018, 10:24 AM
|
#273
|
|
Senior Member
Join Date: Mar 2016
Location: Burlington Twp., New Jersey
Trailer: 2010 Escape 19
Posts: 7,146
|
Quote:
Originally Posted by cpaharley2008
So you are saying there is a check valve inside each hot/cold knob as well as a check valve to hook up the outside hose? What is the purpose of the check valve, can it be operated without one? I understand now, if there is a check valve in the on/off know, then you would wand this 3 way below the source(rather than above) so that once you release the pressure it will drain. What is the p/n of this valve and how installed. Please post when you do this, thanks.
|
Jim: You got it now. The check valves are in the rear stems of the hot and cold connections. I just stuck a screwdriver in and pulled them out. They are only there to prevent siphoning, but that is a really low risk given the application. There is no check valve elsewhere in the assembly but you need to open the quick connect fitting and Hot/Cold exterior valves to allow air in when draining. I tested it by blowing air through the assembly and it works as I describe.
The bypass valve part is:
https://www.amazon.com/Flair-16910-P.../dp/B002UCAE2U
Buy one for hot and one for cold.
You need two caps too:
https://www.amazon.com/Flair-16860-P...28XDTBRXMY4C2W
The valve is installed by cutting the pex. Slipping the nut over the piping. Inserting the pex onto the fitting and then tightening the nut.
|
|
|
|
|
12-08-2018, 10:37 AM
|
#274
|
|
Senior Member
Join Date: Jun 2010
Location: Central, Pennsylvania
Trailer: Escape#5 2022 E19
Posts: 26,268
|
Dave, is it possible to remove the check valve and operate the unit without such. If so then the upward plumbing would work, once you released the pressure outside? On edit and after thought, it would be very hard and inaccessible to do this from the rear in some of the units. May be best just easier to winterize via antifreeze.
__________________
Jim
Sometime life gets in the way of living.......
|
|
|
|
|
12-08-2018, 11:24 AM
|
#275
|
|
Senior Member
Join Date: Sep 2015
Location: Port Townsend, Washington
Trailer: 2010 17B MATT, then 2017 19 Lilly
Posts: 1,584
|
Quote:
Originally Posted by cpaharley2008
Dave, is it possible to remove the check valve and operate the unit without such. If so then the upward plumbing would work, once you released the pressure outside? On edit and after thought, it would be very hard and inaccessible to do this from the rear in some of the units. May be best just easier to winterize via antifreeze.
|
I can only think of two reasons to add shutoff valves. 1) To be able to winterize just the exterior shower while still maintaining usability of the rest of the system (why I did it), or 2) To be able to shut off the shower in case it ever develops a leak.
If you plan to do the full on pink stuff anyway I dont know that adding the valves would be of significant additional benefit.
__________________
💩-p+☕️+n
|
|
|
|
|
12-08-2018, 11:53 AM
|
#276
|
|
Senior Member
Join Date: Mar 2016
Location: Burlington Twp., New Jersey
Trailer: 2010 Escape 19
Posts: 7,146
|
Quote:
Originally Posted by sclifrickson
I can only think of two reasons to add shutoff valves. 1) To be able to winterize just the exterior shower while still maintaining usability of the rest of the system (why I did it), or 2) To be able to shut off the shower in case it ever develops a leak.
If you plan to do the full on pink stuff anyway I dont know that adding the valves would be of significant additional benefit.
|
Exactly.
|
|
|
|
|
12-08-2018, 12:14 PM
|
#277
|
|
Senior Member
Join Date: Jun 2010
Location: Central, Pennsylvania
Trailer: Escape#5 2022 E19
Posts: 26,268
|
Well I'm glad we got that settled, thanks for the reasoning. It will be on the back burner unless I get a leak...
__________________
Jim
Sometime life gets in the way of living.......
|
|
|
|
|
12-08-2018, 10:16 PM
|
#278
|
|
Member
Join Date: Oct 2018
Location: Bristol, Virginia
Trailer: 2019 Escape 19 "Full Quiver"; 2018 Ford F 150 3.0l Turbodiesel
Posts: 85
|
ETI install of external shut off valves
Quote:
Originally Posted by sclifrickson
|
I too asked for shut off valves for our summer 2019 19 build and was turned down!
Oh well more future mods for us winter camping buffs.
Thanks for all the great photos and detailed parts photos.
|
|
|
|
|
12-27-2018, 02:27 AM
|
#279
|
|
Member
Join Date: Aug 2017
Location: Arroyo Grande, California
Trailer: 2018 Escape 5 TA
Posts: 63
|
My pressure relief valve drips at a rate of 4 drops per second. Yep, 240 drops per minute. For about 20 minutes each time I run the hot water tank. Okay you math geniuses ... If I run my hot water twice a day, for 10 days, how much water do I lose?
|
|
|
|
|
12-27-2018, 02:35 AM
|
#280
|
|
Senior Member
Join Date: Sep 2015
Location: Port Townsend, Washington
Trailer: 2010 17B MATT, then 2017 19 Lilly
Posts: 1,584
|
Mods I Haven't Seen Elsewhere
Quote:
Originally Posted by KatrinaOstby
My pressure relief valve drips at a rate of 4 drops per second. Yep, 240 drops per minute. For about 20 minutes each time I run the hot water tank. Okay you math geniuses ... If I run my hot water twice a day, for 10 days, how much water do I lose?
|
6.1111111111 gallons for two, twenty minute periods of leakage, at 240 drips per minute, daily for ten days. If you let it drip for the solid ten days youd use 220 gallons.
Have you tried resetting your overpressure valve? It sounds like its either bad or perhaps the seal is obstructed by something, like a grain of sand. Try opening it up briefly to see if it clears up. Or try gently tapping with a hammer to see if that helps it seat.
__________________
💩-p+☕️+n
|
|
|
|
|
|
 Posting Rules
|
You may not post new threads
You may not post replies
You may not post attachments
You may not edit your posts
HTML code is Off
|
|
|
|
 » Recent Discussions
 |
|
|
|
|
|
|
|
|
|
|
|
|
|
|
|
|
|
|
|
|
|
|
|
|
|
|
|
|
|
|

|


 Linear Mode

