 |
|
 02-12-2019, 12:44 PM
|
#301
|
|
Senior Member
Join Date: Oct 2017
Location: Kelowna, British Columbia
Trailer: 2018 Escape 19
Posts: 2,720
|
Looks great! 
|

|

|
|
02-12-2019, 03:57 PM
|
#302
|
|
Senior Member
Join Date: Sep 2016
Location: Bremerton, Washington
Trailer: 2019 5.0 TA
Posts: 1,141
|
Quote:
Originally Posted by sclifrickson

Well, yeah! [emoji1303] Half the fun is sharing! Okay, maybe 1/4. Half the fun is figuring out and doing. 1/4 is using, and that leaves 1/4 for sharing.
|
Great mod! So I have to ask, are you lucky enough to have your trailer in a garage? We are just an hour from you and got 14" of snow since last Friday. I enjoy doing mods to my trailer as much as the next guy but not when my trailer looks like this:
__________________
- Arnie & Paula & Kizzy the rat terrier
https://www.arniesea.com
- 2019 5.0 TA, 2017 Tundra Platinum.
- Bremerton, WA
|
|
|
|
|
02-12-2019, 04:08 PM
|
#303
|
|
Senior Member
Join Date: Sep 2015
Location: Port Townsend, Washington
Trailer: 2010 17B MATT, then 2017 19 Lilly
Posts: 1,584
|
Quote:
Originally Posted by arniesea
Great mod! So I have to ask, are you lucky enough to have your trailer in a garage? We are just an hour from you and got 14" of snow since last Friday. I enjoy doing mods to my trailer as much as the next guy but not when my trailer looks like this:
|
No, no garage, unfortunately. But we are accidentally missing out on all the snow fun as we headed south just as it was all kicking off up there. NorCal is nice - love the Redwoods - but honestly would rather be at home making cross country trails right now. Although if we were, Id probably be too distracted by other things to knock out some of the trailer mods that Id been putting off and now getting around to. The kids work on their homeschooling and I get to noodle around. Have tools, will travel [emoji6]
__________________
💩-p+☕️+n
|
|
|
|
|
02-13-2019, 08:19 AM
|
#304
|
|
Senior Member
Join Date: Dec 2013
Location: Lancaster, Pennsylvania
Trailer: E 21 2019 Tow Vehicle: 2019 4Runner Limited
Posts: 740
|
Quote:
Originally Posted by sclifrickson
Ive wanted to add pilot light switches to certain things, eg the awning power switch, so its more readily apparent if its on or off.
|
Very nice mod. When I get my trailer back to home base I'll do this to.
|
|
|
|
|
03-06-2019, 03:48 PM
|
#305
|
|
Senior Member
Join Date: Sep 2015
Location: Port Townsend, Washington
Trailer: 2010 17B MATT, then 2017 19 Lilly
Posts: 1,584
|
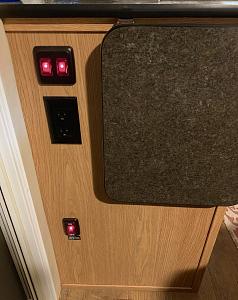
I installed a powered dehumidifier. We enjoy using our trailer year-round, and in the non-summer months humidity and condensation are issues that we must deal with routinely to avoid mold and mildew. We've had a powered dehumidifier for a couple of years, but as it was AC powered, that limited its usability to when we're able to plug the trailer in. Either that, or we could run it off the inverter, but that's just throwing amps away in the conversion. Another issue with the powered unit was where to physically put it. When not under tow we could put it on a counter or under the table, but that's a temporary solution. I scratched my head thinking of a tidy way to put this all together, and this is what we came up with, and the mods required to make it work. Step 1, convert the AC dehumidifier to DC. Noting that the unit specifies 9V DC input, I bought a 12V to 9V buck converter off the Amazon, then snipped the unit's power cord, inserted the buck converter in the middle and put a cigarette lighter adapter on the other end. Voila, now it runs off 12V and can be plugged in directly wherever we have an appropriate outlet. But where? Considering that our under-bed area is ventilated with the main cabin, with air circulation forced through the space constantly by twin computer fans, as discussed earlier in this thread, I decided that mounting the dehumidifier under the bed would be both out of the way, and effective, as it should get a steady stream of cabin air circulating through the area. Just to the left of the under-bed doors is a small nook, right next to the wheel well, perfect for the unit. So, Step 2, install a 12V cigarette lighter outlet. I used the nearby exterior-mounted 12V outlet as a power source, and then mounted my new outlet just to the left of the underbed access doors. Step 3, I screwed a pair of small D rings to the floor, on either side of the dehumidifier, and then put a bungee cord over it to hold it in place. Success! We used it throughout a one month trip that we just returned from, and it worked as I'd hoped. I learned fast though that I had to keep a careful eye on our battery levels though, as this unit sucks 3A, even at 12V, so there were many times it was shut off to conserve juice during the trip. Our Trimetric battery monitor was invaluable in knowing what our true State of Charge was at any given time. Pics to follow.
__________________
💩-p+☕️+n
|
|
|
|
|
03-06-2019, 03:49 PM
|
#306
|
|
Senior Member
Join Date: Sep 2015
Location: Port Townsend, Washington
Trailer: 2010 17B MATT, then 2017 19 Lilly
Posts: 1,584
|
__________________
💩-p+☕️+n
|
|
|
|
|
03-06-2019, 04:32 PM
|
#307
|
|
Senior Member
Join Date: Sep 2015
Location: Port Townsend, Washington
Trailer: 2010 17B MATT, then 2017 19 Lilly
Posts: 1,584
|
Mods I Haven't Seen Elsewhere
I updated our marker light mod to make it either steady-on, or flashing. We've had our marker lights wired up to a switch for maybe a year now, such that we can turn them on/off via a switch inside the cabin. I was recently inspired by Ed (Eggscape) to update our setup slightly to add the flashing capability. I installed a three way switch that either goes straight to the lights (no flashing) or to a flasher module and then the lights. Switch is installed next to the (illuminated) marker on/off switch. This was an easy mod only because I luckily had Escape install a three strand wire from the switch location to the front box area. One strand is neutral, one is hot steady-on, and the third, which was previously unused, is now the hot flasher wire. 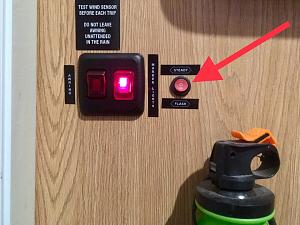
__________________
💩-p+☕️+n
|
|
|
|
|
03-06-2019, 05:15 PM
|
#308
|
|
Senior Member
Join Date: Oct 2017
Location: Kelowna, British Columbia
Trailer: 2018 Escape 19
Posts: 2,720
|
|
|
|
|
|
03-26-2019, 09:31 AM
|
#309
|
|
Senior Member
Join Date: Oct 2015
Location: Retired from Dallas & Full-Timing, Texas
Trailer: 2017 21' Escape as of 01/16/17
Posts: 1,312
|
Quote:
Originally Posted by sclifrickson
Well, yeah! [emoji1303] Half the fun is sharing! Okay, maybe 1/4. Half the fun is figuring out and doing. 1/4 is using, and that leaves 1/4 for sharing.
|
Scott,
Thank you for the idea. I now have performed this mod.
Fred M.
__________________
Fred M.
"Whoever said retirement was overrated...
...never had an Escape"
|
|
|
|
|
10-04-2019, 09:51 AM
|
#310
|
|
Senior Member
Join Date: Sep 2015
Location: Port Townsend, Washington
Trailer: 2010 17B MATT, then 2017 19 Lilly
Posts: 1,584
|
Mods I Haven't Seen Elsewhere
I modd the slide lock mechanism on our table about two years ago and had meant to post about it but kept forgetting. Was recently reminded, so here it is.
I was never a fan of the factory friction lock system. Have to crank it fairly hard to ensure it doesnt move, and doing so distorts the level of the table. Plus its a lot of twisting. So I replaced the screw lock with a spring loaded plunger.
GN 717-NI Series Stainless Steel Lock-Out Type Inch Size Indexing Plunger with Pull Knob, with Lock Nut, 5/8"-11 Thread Size, 0.94" Thread Length https://www.amazon.com/dp/B00BTHV5VQ..._VH1LDbP9W4EZA
I mounted this behind the supplied locking mechanism (which I removed) so it could be reversed, if I ever wanted to.
To make for a positive latch between plunger and table I cut a section of an old aluminum ruler and drilled holes in it where I wanted stops. This way the table can be adjusted and locked at various left/right positions, which is not as useful as I thought it might be.
The two screws with large heads near the ends serve as slide stops.
Table now securely locks instantly, but simply pulling the knob down releases it. Knob can be turned 1/4 turn to keep it unlocked if desired.
__________________
💩-p+☕️+n
|
|
|
|
|
10-04-2019, 11:20 AM
|
#311
|
|
Senior Member
Join Date: Jan 2014
Location: North Van., British Columbia
Trailer: 2014 Escape 19, sold; 2019 Escape 21, Sept. 2019
Posts: 8,819
|
That's a more civilized solution than than the factory one. Never liked the factory one because tightening it up also puts a lot of side load on the plastic slides.
I stopped using ours several years ago. I've never worried about the table moving sideways. Out of sight, out of mind I guess. 
Ron
|
|
|
|
|
10-04-2019, 11:54 AM
|
#312
|
|
Senior Member
Join Date: Mar 2016
Location: Burlington Twp., New Jersey
Trailer: 2010 Escape 19
Posts: 7,146
|
Quote:
Originally Posted by sclifrickson
I was never a fan of the factory friction lock system. Have to crank it fairly hard to ensure it doesnt move, and doing so distorts the level of the table. Plus its a lot of twisting. So I replaced the screw lock with a spring loaded plunger.
|
Quote:
Originally Posted by Ron in BC
That's a more civilized solution than than the factory one. Never liked the factory one because tightening it up also puts a lot of side load on the plastic slides.
|
Our 2010 never even had a table lock. I looked at what was posted and emulated the factory friction type using knobs with threaded studs and t-nuts. Since I used two (one at the front and one towards the back) it puts a more even upward pressure on the table overall and less side load on the plastic slides. What I like about it is that it takes some of the slop out of the slides so the table top doesn't rock as much when leaned on. You really only need to use the front one for travel mode and can tighten the rear one if desired once you sit down. This may all be resolved when I finally install my Dicor slide in combination with the already installed Springfield pedestal. I never got a definitive answer but it appears that the rigid combination should take the rock out of the table almost entirely.
|
|
|
|
|
10-04-2019, 02:06 PM
|
#313
|
|
Commercial Member
Join Date: Apr 2014
Location: Hillsboro, Oregon
Trailer: 2014 Escape 21 - "Felicity"
Posts: 2,945
|
Simple fix - get rid of the slides! I made a 2nd shorter tabletop for when we go without the grandkids (95% of the time.) Solid 1 inch maple, 7 inches shorter front to back and with 6" radius front corners.
Easy in/out.......
__________________
Charlie Y
Need custom storage to your design? Don't drill holes!
www.RVWidgetWorks.com
|
|
|
|
|
10-04-2019, 08:49 PM
|
#314
|
|
Senior Member
Join Date: May 2019
Location: Las Vegas, Nevada
Trailer: 21' Escape in production 12/05/19
Posts: 132
|
Quote:
Originally Posted by KarenH
I tried mine on the ceiling first but am too blind to read any of it so I cut it down to size for my wall (sorry Texas, Louisiana, and Florida). Thanks for such a great idea for a mapophile such as I, Scott!
|
Oh ohhhh. You "messed with Texas"!
__________________
"It's all Perfect, it's all Divine". "Perceived sanity is highly overrated".
|
|
|
|
|
10-05-2019, 12:22 AM
|
#315
|
|
Senior Member
Join Date: Sep 2015
Location: Port Townsend, Washington
Trailer: 2010 17B MATT, then 2017 19 Lilly
Posts: 1,584
|
Quote:
Originally Posted by tractors1
Simple fix - get rid of the slides! I made a 2nd shorter tabletop for when we go without the grandkids (95% of the time.) Solid 1 inch maple, 7 inches shorter front to back and with 6" radius front corners.
Easy in/out.......
|
Unfortunately 19s have different clearances to get in/out than your 21, and a non-sliding top would leave one bench either inaccessible or awkwardly far from the table. Slider makes it work.
__________________
💩-p+☕️+n
|
|
|
|
|
10-08-2019, 09:52 AM
|
#316
|
|
Senior Member
Join Date: Jul 2015
Location: Surrey, British Columbia
Trailer: 2013, 17B 'Mini Pearl' and a 2010 Highlander
Posts: 400
|
Quote:
Originally Posted by sclifrickson
|
Is that dehumidifier an Amazon thing.
The dehumidifier that we use is indeed 9v 2a but it is roundy shaped and we usually have to just put it in the sink as it defies being strapped to anything.
I drilled a hole in the collection tray and ran a small vinyl hose out the crack in the door seal.
The trailer is parked but plugged in and the collection tray would fill up in about 4 days and then the unit would shut off. I don't get out to the trailer except about every two weeks, hence the drain hose.
__________________
____
John
|
|
|
|
|
10-08-2019, 12:30 PM
|
#317
|
|
Member
Join Date: Feb 2019
Location: Snohomish, WA, Washington
Trailer: 2019 21 Escape
Posts: 43
|
Wow, great ideas!!!
|
|
|
|
|
10-08-2019, 02:51 PM
|
#318
|
|
Senior Member
Join Date: Sep 2015
Location: Port Townsend, Washington
Trailer: 2010 17B MATT, then 2017 19 Lilly
Posts: 1,584
|
Quote:
Originally Posted by jxoco
Is that dehumidifier an Amazon thing.
The dehumidifier that we use is indeed 9v 2a but it is roundy shaped and we usually have to just put it in the sink as it defies being strapped to anything.
I drilled a hole in the collection tray and ran a small vinyl hose out the crack in the door seal.
The trailer is parked but plugged in and the collection tray would fill up in about 4 days and then the unit would shut off. I don't get out to the trailer except about every two weeks, hence the drain hose.
|
Yes, I purchased that particular dehumidifier off Amazon. It wasn't a particularly expensive unit, an Ivation ERSDM18. It works alright, and pulls a cup or so of moisture out of the air every week or so, depending on the season. If I were doing it again, I'd get the beefier Whynter Energy Star 30 Pint unit, which is much spendier, but higher performance.
__________________
💩-p+☕️+n
|
|
|
|
|
10-08-2019, 02:54 PM
|
#319
|
|
Senior Member
Join Date: Jun 2010
Location: Central, Pennsylvania
Trailer: Escape#5 2022 E19
Posts: 26,268
|
Probably a peltier vs compressor model difference
__________________
Jim
Sometime life gets in the way of living.......
|
|
|
|
|
10-09-2019, 05:57 PM
|
#320
|
|
Senior Member
Join Date: Sep 2015
Location: Port Townsend, Washington
Trailer: 2010 17B MATT, then 2017 19 Lilly
Posts: 1,584
|
One of the minor niggles with the 19's layout is that the person sleeping against the rear wall has nowhere handy to put stuff. Other forum members have devised some delightful custom shelving and such, but after much pondering we have come to rely on two simple to install items that work for us.
The first is a drop down storage tray that's mounted under the overhead cabinetry. I put a 12V/USB outlet on the face of the cabinet just above this so a phone can be plugged in and then set in the tray when it's Lights Out.
The second doodad is a folding cup holder, handy for those who like a sip of something before or during sleep. I used one existing screw in the window frame to mount the holder, and drilled a second one to complete the simple mounting.
Our girls often use the cot/bed setup in the front of the trailer, and so I mounted a second cup holder on the forward bathroom wall for the upper bunk occupant. This one is mounted with several Command strips.
__________________
💩-p+☕️+n
|
|
|
|
|
|
 Posting Rules
|
You may not post new threads
You may not post replies
You may not post attachments
You may not edit your posts
HTML code is Off
|
|
|
|
 » Recent Discussions
 |
|
|
|
|
|
|
|
|
|
|
|
|
|
|
|
|
|
|
|
|
|
|
|
|
|
|
|
|
|
|

|


 Linear Mode

