 |
|
 10-10-2013, 12:43 PM
|
#1
|
|
Senior Member
Join Date: Sep 2012
Location: Ottawa, Ontario
Trailer: 2013 Escape 19
Posts: 743
|
Repairing the city water check valve
I made a simple newbie mistake a while ago. It's one that frustrates me because it's very easy to do and looking around the web it seems to be common, but the RV manufacturers don't seem to have a good solution. I'm hoping that with this post I can educate others to avoid the mistake, or to recover if necessary.
The mistake in question: the city water hookup has a little check valve. If you press in the valve while there is pressure in the system, you can damage the valve.
As part of winterizing, if you're not using compressed air, you should ( after you drain the rest of the system) press the check valve in. Otherwise surface tension can hold a bit of water in your city water line. But don't do it when the system is pressurized!
Specifically, there is a little rubber O-ring on the check valve. If you press the valve in while there is pressure in the system, this O-ring can become unseated and won't seal properly. From that point, when your system is pressurized, the city water hookup will leak.
I asked Reace about repairing this, and his response was that these are sealed units and aren't repairable. I wasn't happy about that answer, but it freed me up to experiment. It seems at this point that I did successfully repair the problem.
OK, here's the city water hookup:
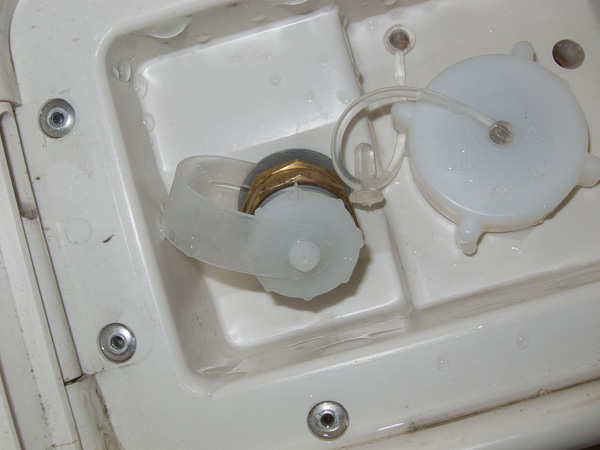
with cap removed:

and with the detritus screen removed:
That white plastic thing inside is the check valve. There's a white plastic valve stem, with an O-ring held against the inside of the valve by the spring you can sort-of see in that photo. The spring is held on with the white plastic cap press-fitted onto the valve stem.
My mistake was to press in the valve stem while the system was pressurized. Don't do that. That's the first thing you should take from this post. Completely drain your system before you touch that valve stem.
But if you do, you may find afterwards that your city water hook leaks when you have your pump turned on and your system pressurized. The problem is that the O-ring I talked about has become unseated.
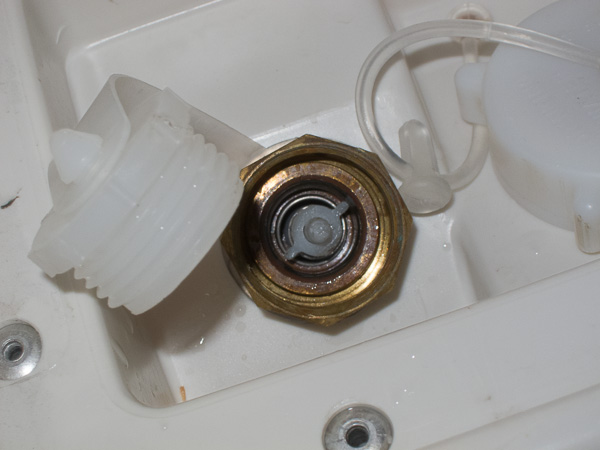
I use a pair of needle-nosed pliers and judicious (careful!) force to remove the white plastic cap. Here's the cap:

And here's the valve with the cap removed. If you look carefully, you can see the problem:
Here's the problem: I've pulled the spring out. That O-ring isn't supposed to be there:
OK, so what next? I tried re-inserting the O-ring at this point, but had no luck. I managed to get it pushed back into the valve, but it wasn't seated properly and the best I could manage was a slow leak.
To effect a true repair, I needed to take the valve apart. The forum limits me to 8 pictures in a post, so the repair follows in the next post.
__________________
Doug
2013 Escape 19 ("The Dog House") , 2018 Ford F150
|

|

|
|
10-10-2013, 12:44 PM
|
#2
|
|
Senior Member
Join Date: Sep 2012
Location: Ottawa, Ontario
Trailer: 2013 Escape 19
Posts: 743
|
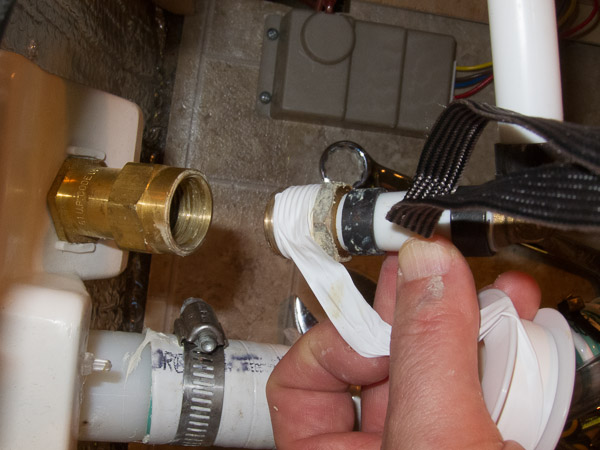
So let's look at the inside of the trailer. To get here I removed the entire bed (mattress and platform!). The alternative was to work lying under the bed platform with my feet hanging out the hatch. Might have been doable, but I figured removing the bed was actually less effort. Not mention a lot better light. Here's what the inside of that fitting looks like:
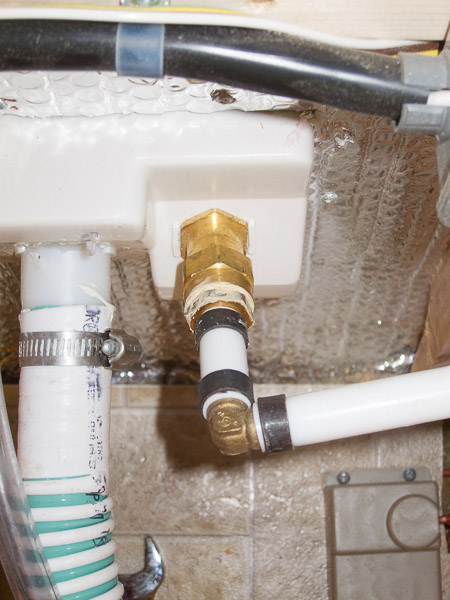
This is where I ran into trouble. It looks like it can come apart, but it didn't want to budge. I was scared to damage it by applying too much force, but in the end that was what it took: more force. Wrenches placed here:
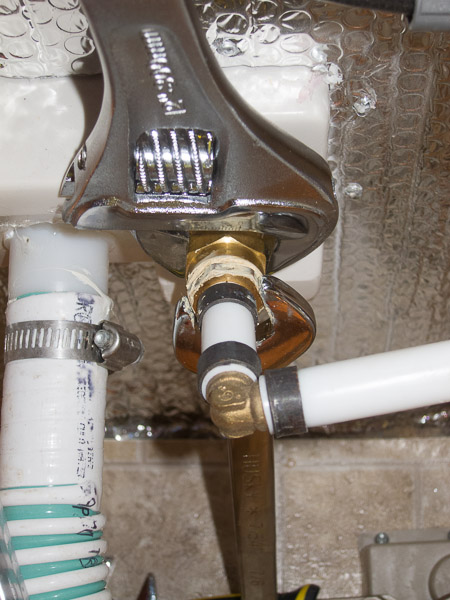
That's a 1" on the fitting, and a 7/8" on the compression nut. (The 7/8" was a little loose, so I'm wondering if it was actually 21mm, but I didn't have a 21mm wrench so can't be sure.) I think the reason so much force was required is because the compression nut doesn't have a swivle at the pipe end -- by turning that nut, you also have to turn the compression fitting inside the pipe. Is that wise? I don't know, but it seems to have worked. I will keep an eye on things to make sure it doesn't leak, but it is in an awkward spot to check once the bed platform is reinstalled.
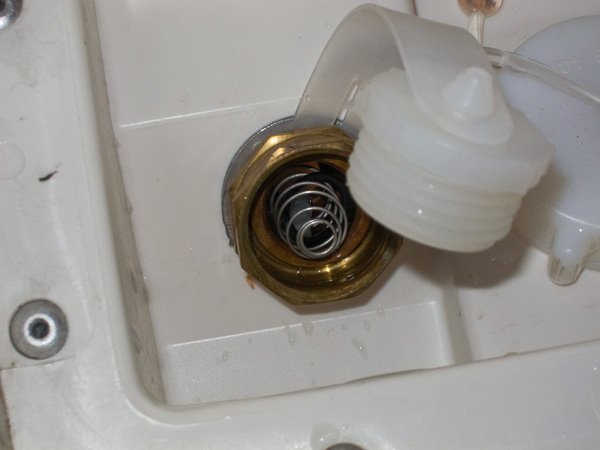
Once you have the compression nut removed, you can poke the valve stem through from the outside:
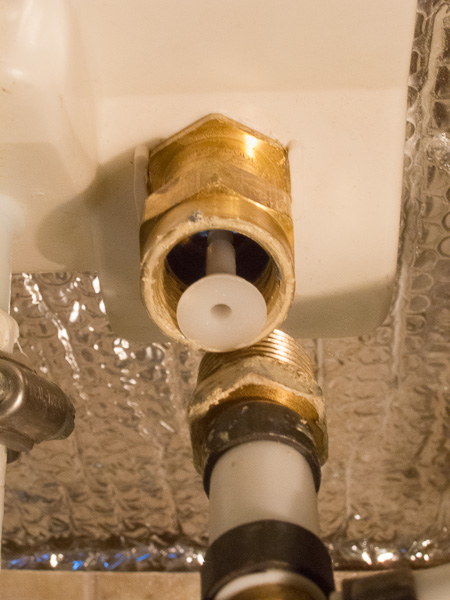
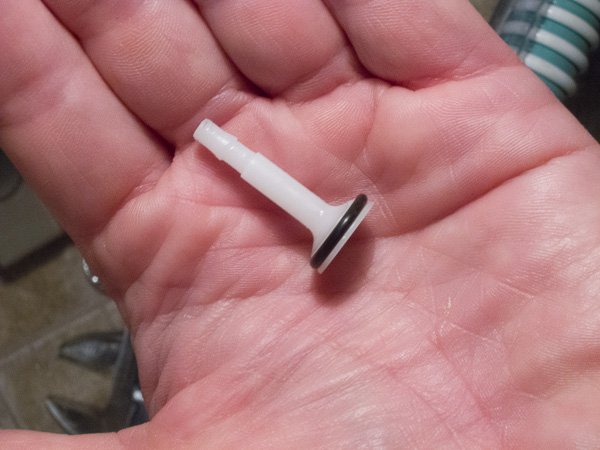
And here's the stem and O-ring:

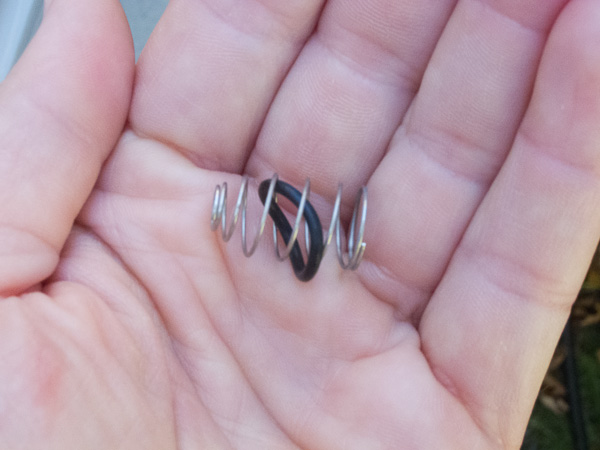
And here's the O-ring put back on the stem:
Putting the valve stem back in was a challenge. It would have been easier with a second set of hands: somebody inside the trailer to hold the stem in place while the spring and plastic cap were reset. But I managed by myself by wedging a rag in the fitting to hold the stem in place while I inserted the spring, put the white plastic cap back on the valve stem loosely, managed to grab the tip of the valve stem with pliers and pushed the cap back on tight with a punch.
Then fix the plumbing inside. A bit of teflon tape on the threads and screw it back together:
Hope that helps, and feel free to correct me if you see something I did wrong or poorly.
__________________
Doug
2013 Escape 19 ("The Dog House") , 2018 Ford F150
|
|
|
|
|
10-10-2013, 12:53 PM
|
#3
|
|
Senior Member
Join Date: Jul 2012
Location: Albuquerque, New Mexico
Trailer: 2013 Escape 19
Posts: 251
|
WOW!! Thanks for taking the time and photos necessary to post this information. Good to know when I manage to mess the value up it can be repaired.
Dave
|
|
|
|
|
10-10-2013, 01:38 PM
|
#4
|
|
Senior Member
Join Date: Oct 2012
Location: Bellingham and Glacier, Washington
Trailer: 2013 Escape 15A
Posts: 2,055
|
One of the best tutorials I've ever seen. Nice job!
__________________
Karen Hulford
2013 Escape 15A, "Egbert"
'93 Ford 150 XLT or
'22 GMC Acadia Denali
|
|
|
|
|
10-10-2013, 01:40 PM
|
#5
|
|
Senior Member
Join Date: Jan 2009
Location: Pollock Pines, California
Trailer: 2009 Escape 19
Posts: 453
|
Doug - I think you should put this into a file for the "Files" section. There's a section there for info like this. That way it won't get buried as time and topics go by. Great job!
Bruce
|
|
|
|
|
10-10-2013, 01:45 PM
|
#6
|
|
Senior Member
Join Date: Oct 2009
Location: Galesville, Wisconsin
Trailer: 2017 21 "Blue II" & 2017 Highlander XLE (previously 2010 17B "Blue" & 2008 Tacoma)
Posts: 4,234
|
Excellent photos and excellent information -- thanks very much!
__________________
Eric (and Mary who is in no way responsible for anything stupid I post)
"Beware of false knowledge; it is more dangerous than ignorance." George Bernard Shaw
|
|
|
|
|
10-10-2013, 01:56 PM
|
#7
|
|
Senior Member
Join Date: Jun 2010
Location: Central, Pennsylvania
Trailer: Escape#5 2022 E19
Posts: 26,268
|
I stickied the thread to keep it at the top...nice work Doug.
__________________
Jim
Sometime life gets in the way of living.......
|
|
|
|
|
10-10-2013, 01:56 PM
|
#8
|
|
Senior Member
Join Date: Oct 2008
Location: North Vancouver, British Columbia
Trailer: 2009 Escape 17B 2020 Toyota Highlander XLE
Posts: 17,136
|
A picture is still worth a thousand words.
baglo
__________________
What happens to the hole when the cheese is gone?
- Bertolt Brecht
|
|
|
|
|
10-10-2013, 07:34 PM
|
#9
|
|
Senior Member
Join Date: Dec 2012
Location: Edmonton, Alberta
Trailer: 1979 Boler B1700
Posts: 14,935
|
Excellent!
Thanks Doug.
One small comment...
Quote:
Originally Posted by dbailey

... It looks like it can come apart, but it didn't want to budge...
That's a 1" on the fitting, and a 7/8" on the compression nut. (The 7/8" was a little loose, so I'm wondering if it was actually 21mm, but I didn't have a 21mm wrench so can't be sure.) I think the reason so much force was required is because the compression nut doesn't have a swivle at the pipe end -- by turning that nut, you also have to turn the compression fitting inside the pipe.
|
You refer to a "compression fitting" and "compression nut", but the body of the inlet fitting (which contains the check valve) appears to be a common tapered pipe thread joint (likely 1/2" NPT size); the body has a female pipe thread, and the fitting on the piping is a male pipe thread to barb adapter which is necessary to attach the tubing and to retain the check valve parts in the inlet assembly body. The PEX tubing is attached to a barb on the adapter by a crimped ring; this isn't called a compression fitting.
The original brown stuff and your white PTFE plumber's tape are sealants, which are needed for pipe threads like this and are not used in compression fittings. The barbed connection doesn't use a sealant, and also doesn't include a nut.
Now that I've typed, posted, and edited this, I realize I was just stumbling over a terminology issue. With that out of the way...
No, there's no swivel: it's annoying, but normally the pipe thread would be assembled then the PEX tubing would be crimped onto the barb - it's one of those build-only things that's hard to repair. If you cut the PEX tubing to allow the pipe thread to turn, then you have to re-make the next crimped joint down the line, and there's just no good place to do that. If you turn the pipe threaded adapter without the tubing turning (which I believe is what Doug did), it certainly would be hard to turn... those crimped connections of tubing to fitting barbs are not supposed to have the barb turned inside the tubing after being crimped together.
An alternative would be to cut off the PEX tubing as close as possible to the adapter fitting, easily unscrew that fitting, and put it back together with another adapter of the same kind (which means you need a crimping tool) or a kind which attaches to the PEX by different method; a direct replacement not needing crimping would (for instance) be a SharkBite 1/2" MNPT connector, but there are other choices such as NPT to compression adapters. You could even eliminate the elbow which is the next part down the line by using an elbow NPT to SharkBite connector, connecting straight to the piece of tubing which runs out of the photos to the right.
There might be varying opinions on the reliability of O-ring sealed connections such as the SharkBites; a more traditional and very secure alternative is a real compression fitting - I assume those are available sized suitably for PEX tubing, which is what I assume is in the Escape.
|
|
|
|
|
10-10-2013, 08:03 PM
|
#10
|
|
Senior Member
Join Date: Dec 2011
Location: _, Texas
Trailer: Escape 5.0 SA
Posts: 544
|
I also had a similar problem with my city water connection. Mine came apart for some unknown reason preventing the water supply from entering. I too was told it was un-repairable but managed to get it to stay together using super glue to keep the spring retainer in place. The only other option seems to be to purchase and install a complete new water connection box.
|
|
|
|
|
10-10-2013, 08:16 PM
|
#11
|
|
Senior Member
Join Date: Sep 2012
Location: Ottawa, Ontario
Trailer: 2013 Escape 19
Posts: 743
|
Brian: yeah, I know my terminology was sloppy. I'm not familiar with plumbing terms. Thanks for the corrections.
__________________
Doug
2013 Escape 19 ("The Dog House") , 2018 Ford F150
|
|
|
|
|
10-10-2013, 08:37 PM
|
#12
|
|
Senior Member
Join Date: Oct 2008
Location: Calgary, Alberta
Trailer: 2017 Escape 5.0 TA
Posts: 15,552
|
Great job explaining things, Doug. 
__________________
2017 Escape 5.0 TA
2015 Ford F150 Lariat 3.5L EcoBoost
2009 Escape 19 (previous)
Most folks are about as happy as they make up their minds to be. Abraham Lincoln
|
|
|
|
|
10-10-2013, 09:13 PM
|
#13
|
|
Senior Member
Join Date: Sep 2012
Location: Ottawa, Ontario
Trailer: 2013 Escape 19
Posts: 743
|
Quote:
Originally Posted by daveandsandyclink
I also had a similar problem with my city water connection. Mine came apart for some unknown reason preventing the water supply from entering. I too was told it was un-repairable but managed to get it to stay together using super glue to keep the spring retainer in place. The only other option seems to be to purchase and install a complete new water connection box.
|
I'm not sure how it could break in such a way as to prevent the water supply from entering, so I'm just guessing here, but...
The only moving part is the valve stem with associated spring and clip. I would guess that they're all similar. If you purchased the brass fitting (I saw one at a local RV shop) you can likely cannibalize it for the valve stem.
__________________
Doug
2013 Escape 19 ("The Dog House") , 2018 Ford F150
|
|
|
|
|
10-10-2013, 09:17 PM
|
#14
|
|
Senior Member
Join Date: Jun 2010
Location: Central, Pennsylvania
Trailer: Escape#5 2022 E19
Posts: 26,268
|
Quote:
Originally Posted by Jim Bennett
Great job explaining things, Doug. |
and to Brian B-P also...
__________________
Jim
Sometime life gets in the way of living.......
|
|
|
|
|
11-16-2013, 02:46 PM
|
#15
|
|
Senior Member
Join Date: Oct 2013
Location: Sequim, Washington, Washington
Trailer: "Teachers' Pet" our 2014 Escape 19
Posts: 185
|
Quote:
Originally Posted by daveandsandyclink
I also had a similar problem with my city water connection. Mine came apart for some unknown reason preventing the water supply from entering. I too was told it was un-repairable but managed to get it to stay together using super glue to keep the spring retainer in place. The only other option seems to be to purchase and install a complete new water connection box.
|
I've had a problem with low pressure on city water with my Flagstaff. I'd like to fix it before putting it on the market, but replacing the whole unit isn't particularly appealing. We've just been dealing with a trickle at the faucet, or using the pump. Wonder if your super glue solution might work for me?
The pop-up trailer has been a lot of fun, but it has also been quite the money pit these last couple of years (winch replacement, broken lift cable, and wind damaged roof supports that had to be replaced). 
__________________
Neal & Sharon
A good traveler has no fixed plans, and is not intent on arriving.
|
|
|
|
|
11-16-2013, 02:50 PM
|
#16
|
|
Senior Member
Join Date: Jun 2010
Location: Central, Pennsylvania
Trailer: Escape#5 2022 E19
Posts: 26,268
|
Is that valve really needed? Is it possible to remove and use the fresh water without it. It is a back flow preventer, correct. You can purchase them separately and attach to your hose.
__________________
Jim
Sometime life gets in the way of living.......
|
|
|
|
|
11-16-2013, 02:53 PM
|
#17
|
|
Senior Member
Join Date: Oct 2013
Location: Sequim, Washington, Washington
Trailer: "Teachers' Pet" our 2014 Escape 19
Posts: 185
|
Quote:
Originally Posted by cpaharley2008
Is that valve really needed? Is it possible to remove and use the fresh water without it. It is a back flow preventer, correct. You can purchase them separately and attach to your hose.
|
That is a good question. Seems like that valve can be a real PITA.
__________________
Neal & Sharon
A good traveler has no fixed plans, and is not intent on arriving.
|
|
|
|
|
11-16-2013, 03:59 PM
|
#18
|
|
Senior Member
Join Date: Dec 2012
Location: Edmonton, Alberta
Trailer: 1979 Boler B1700
Posts: 14,935
|
Quote:
Originally Posted by cpaharley2008
Is that valve really needed? Is it possible to remove and use the fresh water without it. It is a back flow preventer, correct.
|
You can use city water (from an outside hose) without it, but if you try to use your trailer's tank without this check valve, the pump will push your water outside through the inlet fitting.
Yes, it works as a backflow preventer, but that's not its primary purpose in a trailer with a tank and pump feeding the same faucets as the city water.
Quote:
Originally Posted by cpaharley2008
You can purchase them separately and attach to your hose.
|
For using your tank and pump, I suppose you could leave a stub of hose with a check valve (or just any shutoff valve) on it hanging on the outside of the trailer... not my choice except as a temporary fix. Come to think of it, the check valve or a common inline shutoff valve could probably be screwed directly into the inlet.
|
|
|
|
|
11-16-2013, 04:09 PM
|
#19
|
|
Senior Member
Join Date: Jun 2010
Location: Central, Pennsylvania
Trailer: Escape#5 2022 E19
Posts: 26,268
|
Yes, a good temporary fix and good to know, thanks Brian.
__________________
Jim
Sometime life gets in the way of living.......
|
|
|
|
|
11-16-2013, 04:31 PM
|
#20
|
|
Senior Member
Join Date: Oct 2009
Location: Galesville, Wisconsin
Trailer: 2017 21 "Blue II" & 2017 Highlander XLE (previously 2010 17B "Blue" & 2008 Tacoma)
Posts: 4,234
|
What about just screwing the attached plastic cap in tightly enough? With the hose washer inside it should make a tight enough seal I would think.
__________________
Eric (and Mary who is in no way responsible for anything stupid I post)
"Beware of false knowledge; it is more dangerous than ignorance." George Bernard Shaw
|
|
|
|
|
|
 Posting Rules
|
You may not post new threads
You may not post replies
You may not post attachments
You may not edit your posts
HTML code is Off
|
|
|
|
 » Recent Discussions
 |
|
|
|
|
|
|
|
|
|
|
|
|
|
|
|
|
|
|
|
|
|
|
|
|
|
|
|
|
|
|

|


 Linear Mode

